


Proyecto Arduino Range Measurer y Digital Spirit Level
En este tutorial aprenderemos a hacer un medidor de rango Arduino y un nivel de burbuja digital. Puede ver el siguiente video o leer el tutorial escrito a continuación.
El dispositivo cuenta con un sensor ultrasónico para medir la distancia al objeto más cercano, un acelerómetro para medir el ángulo con respecto al suelo, una pantalla LCD para mostrar los resultados y un PCB de diseño personalizado en el que se conectan todos los componentes.
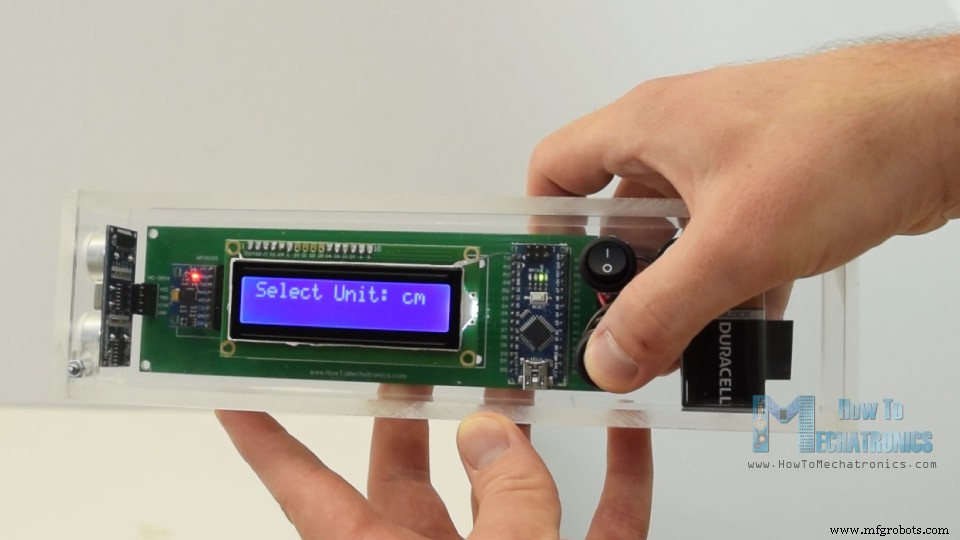
Podemos operar el dispositivo con un solo botón. Una vez que encendemos el dispositivo, debemos seleccionar la unidad de medida.
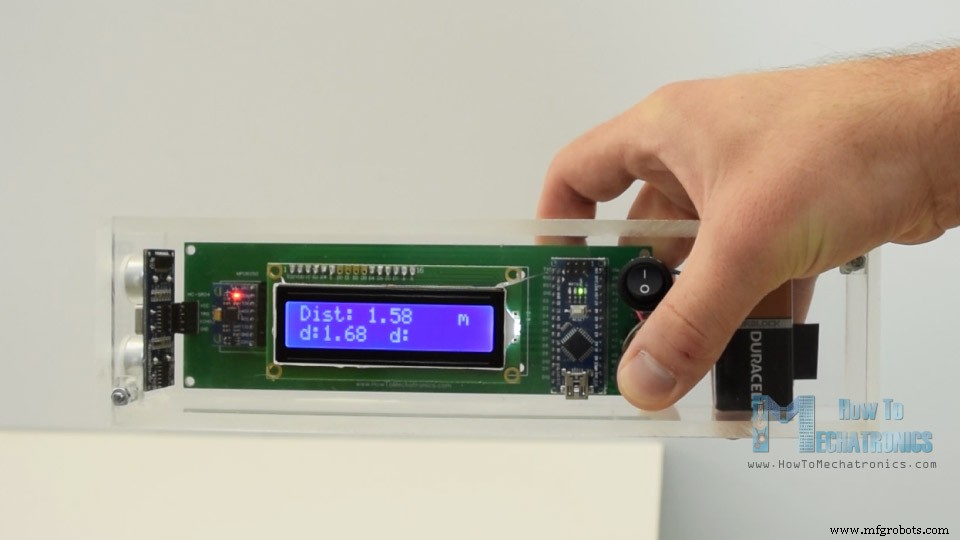
Pulsando el botón podemos alternar entre las unidades, y si mantenemos pulsado el botón durante un rato entraremos en el primer programa. Aquí podemos medir la distancia y también tenemos la capacidad de almacenar las dos últimas medidas.
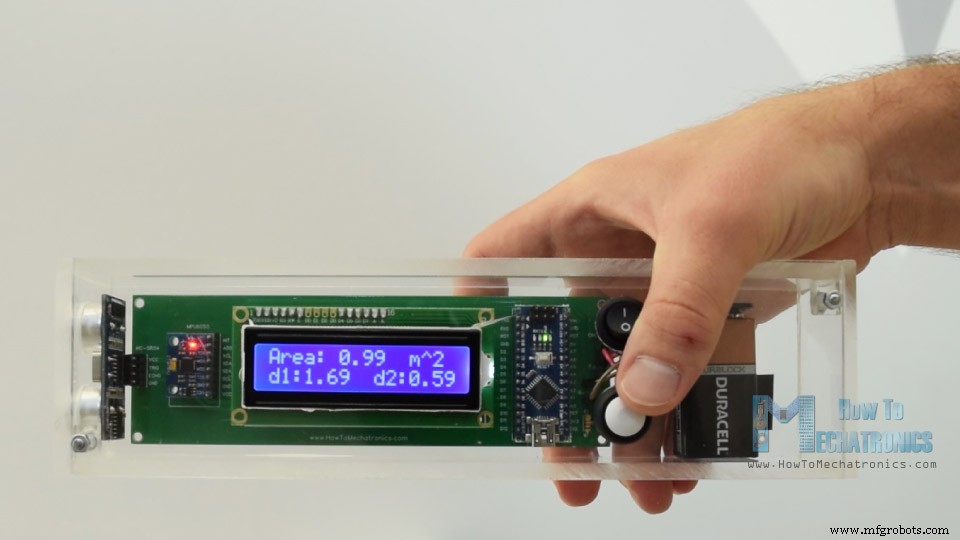
Para ingresar al segundo programa, nuevamente debemos presionar y mantener presionado el botón por un tiempo. En este programa podemos medir un área cuadrada tomando dos medidas de distancia perpendiculares.
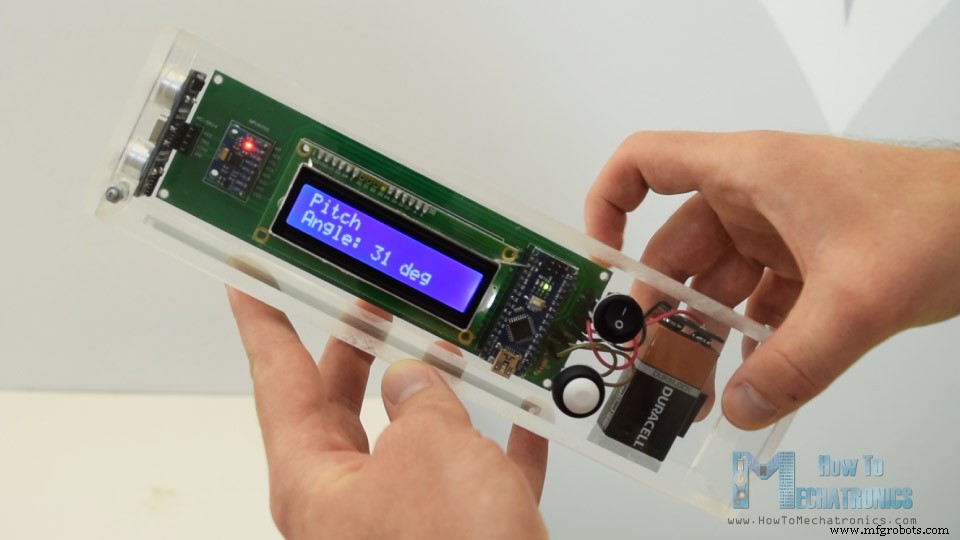
El siguiente programa es el nivel de burbuja digital y aquí podemos medir el ángulo con respecto al suelo.
Usando el botón podemos alternar entre los dos ejes o podemos medir el Pitch o el Roll.
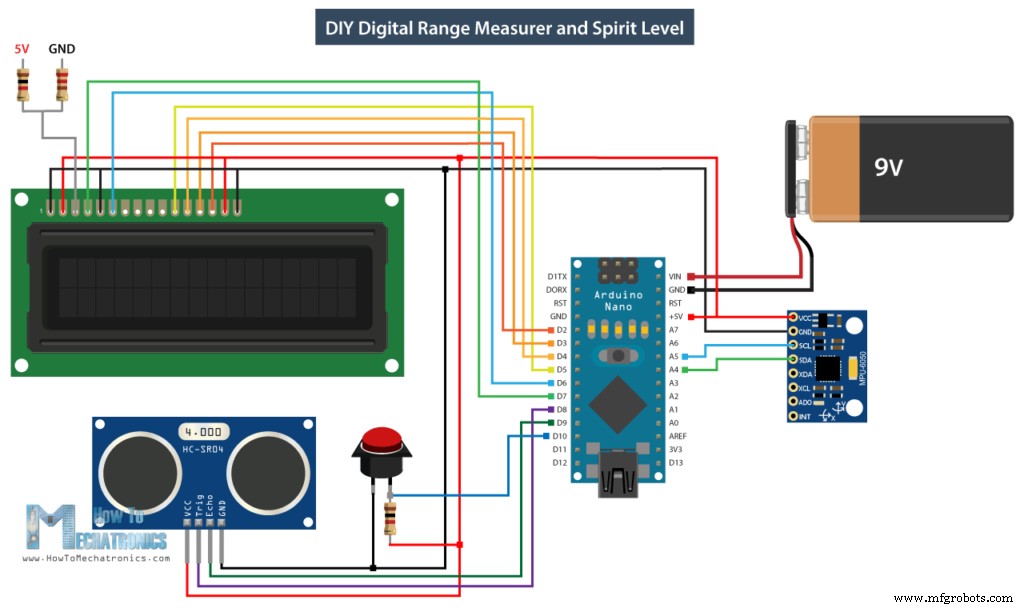
Aquí está el esquema del circuito de este proyecto Arduino.
Tenga en cuenta que ya tengo tutoriales detallados sobre cómo funciona cada uno de estos módulos, y puede consultarlos en los siguientes enlaces:tutorial de sensor ultrasónico, tutorial de LCD, tutorial de acelerómetro MEMS.
Puede obtener los componentes necesarios para este proyecto en los siguientes enlaces:
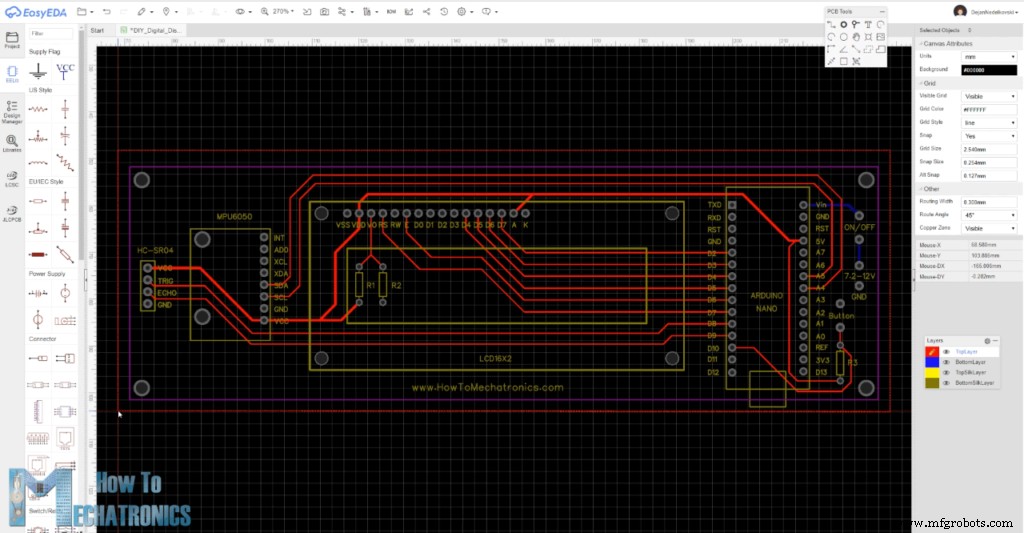
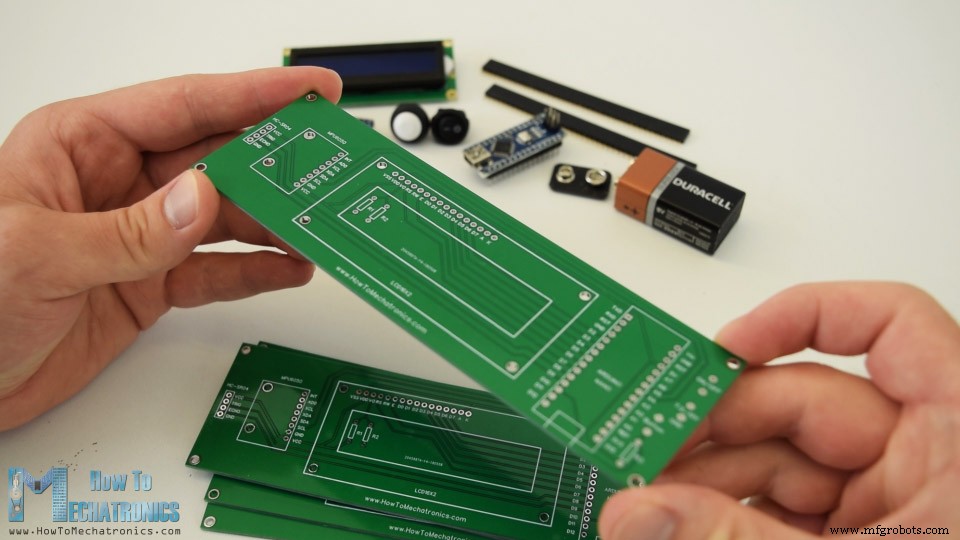
De acuerdo con el esquema del circuito, necesitamos diseñar la PCB personalizada y lo hice usando el software gratuito de diseño de circuitos en línea EasyEDA.
Una vez que terminamos el diseño aquí, simplemente podemos exportar el archivo Gerber que se usa para fabricar la PCB. Puede consultar los archivos del proyecto EasyEDA de este proyecto aquí.
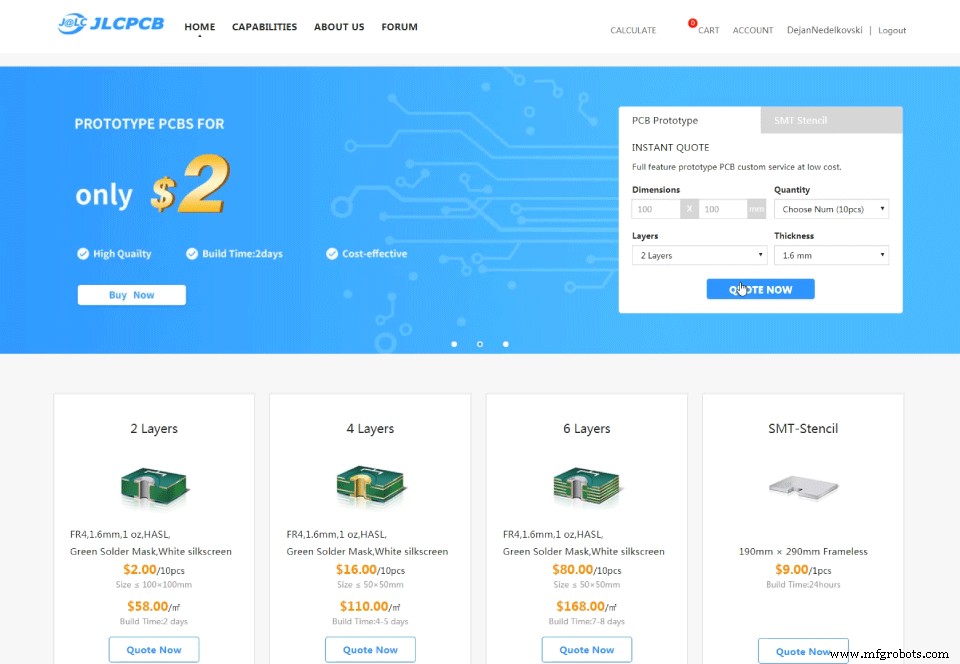
Entonces podemos pedir nuestro PCB de JLCPCB, que en realidad es el patrocinador de este proyecto.
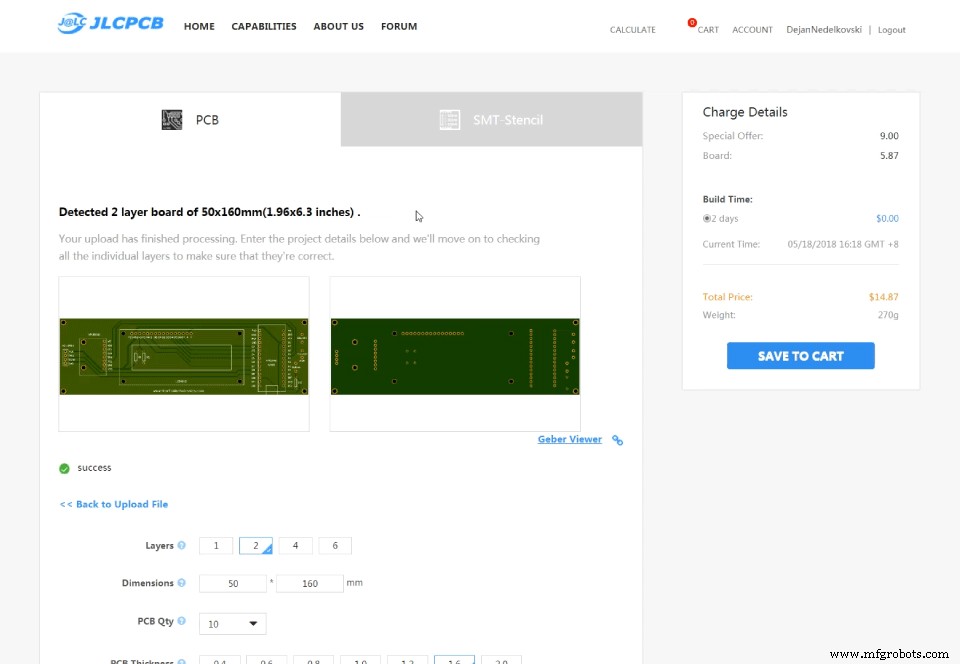
Aquí podemos simplemente arrastrar y soltar el archivo Gerber. Una vez subido podemos revisar nuestro PCB en el visor Gerber. Si todo está bien, podemos continuar, seleccionar las propiedades que queremos para nuestra PCB y luego podemos pedir nuestra PCB a un precio razonable. Tenga en cuenta que si es su primer pedido de JLCPCB, puede obtener hasta 10 PCB por solo $2.
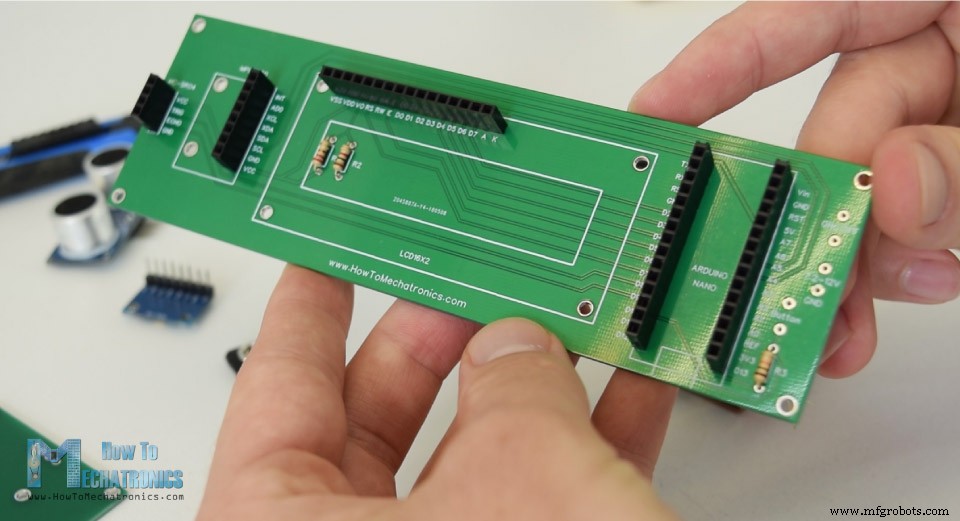
Sin embargo, después de varios días han llegado los PCB. La calidad de los PCB es excelente y todo es exactamente igual que en el diseño.
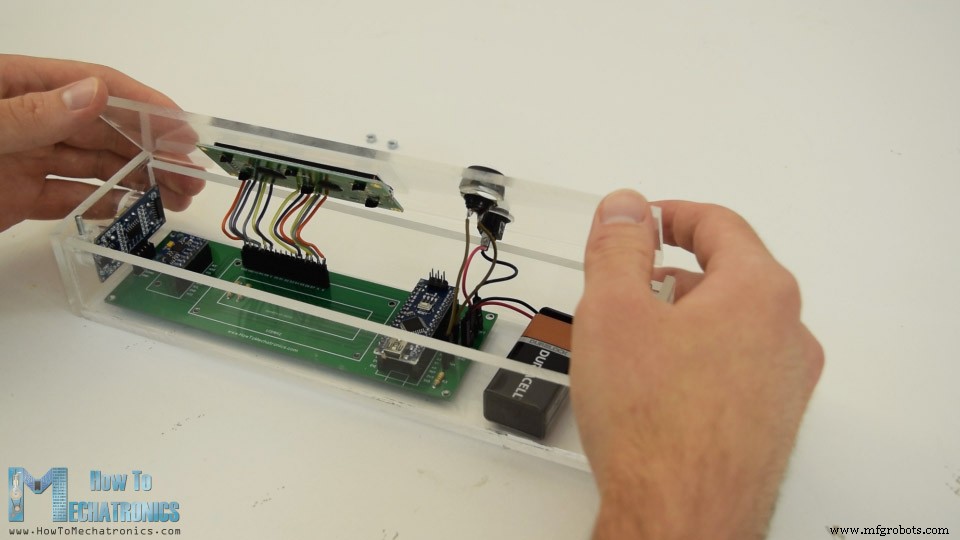
Bien, ahora podemos comenzar a ensamblar la electrónica para este proyecto. Empecé soldando los cabezales de los pines en la PCB. De esta manera podemos conectar y desconectar fácilmente los componentes cuando sea necesario.
Luego inserté y soldé las tres resistencias. Dos de ellos son para el divisor de voltaje para el contraste de LCD. La resistencia de 1k debe colocarse en R1 y la de 220 ohmios en R2. El tercero es una resistencia pull-up para el botón.
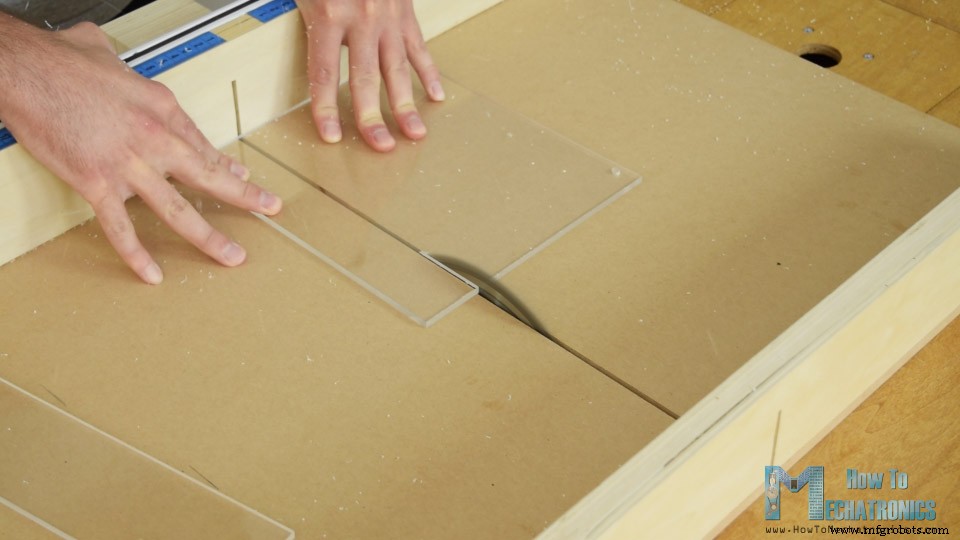
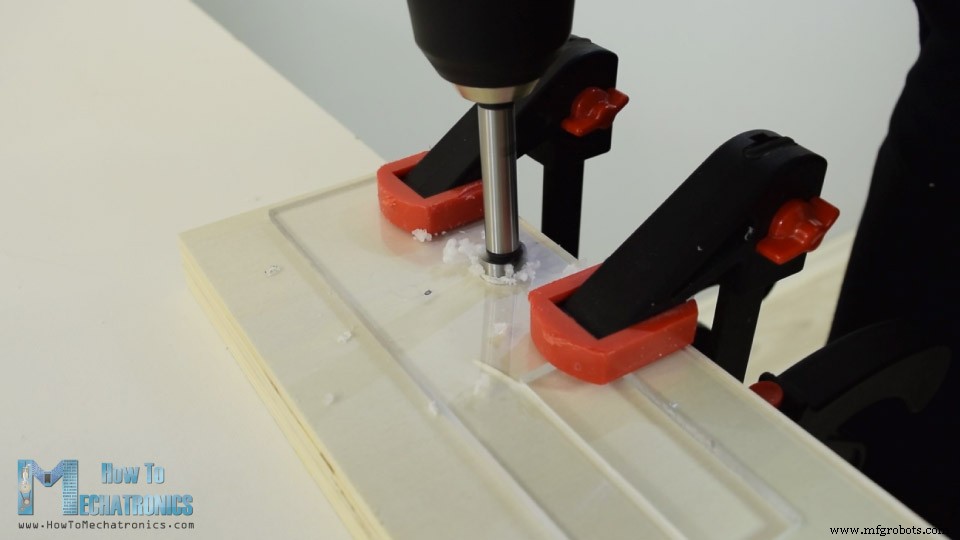
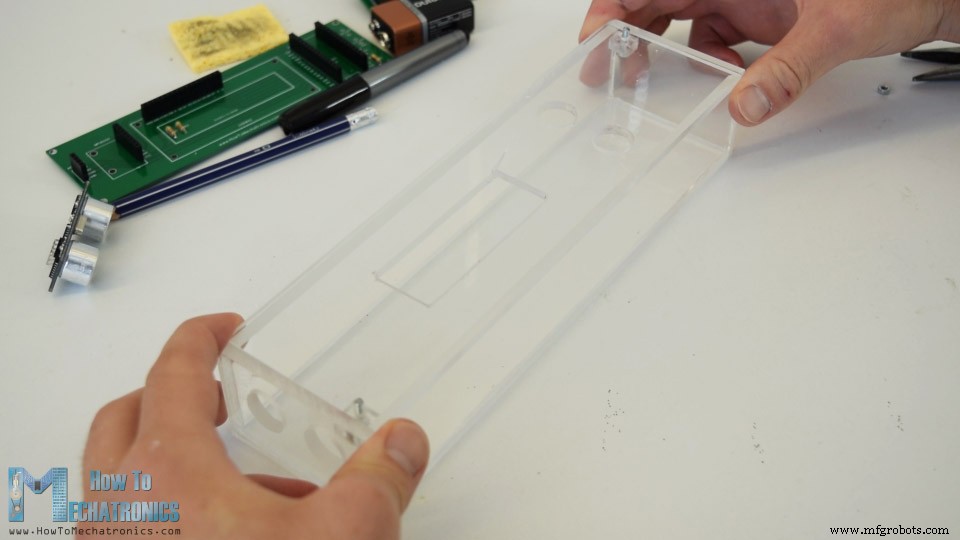
A continuación, continué con la fabricación del estuche para el dispositivo. Decidí usar acrílico transparente porque quería que la belleza de todos los componentes electrónicos fuera visible. Tenía un acrílico de garrapatas de 5 mm de un proyecto antiguo y usé una circular para cortarlo a la medida.
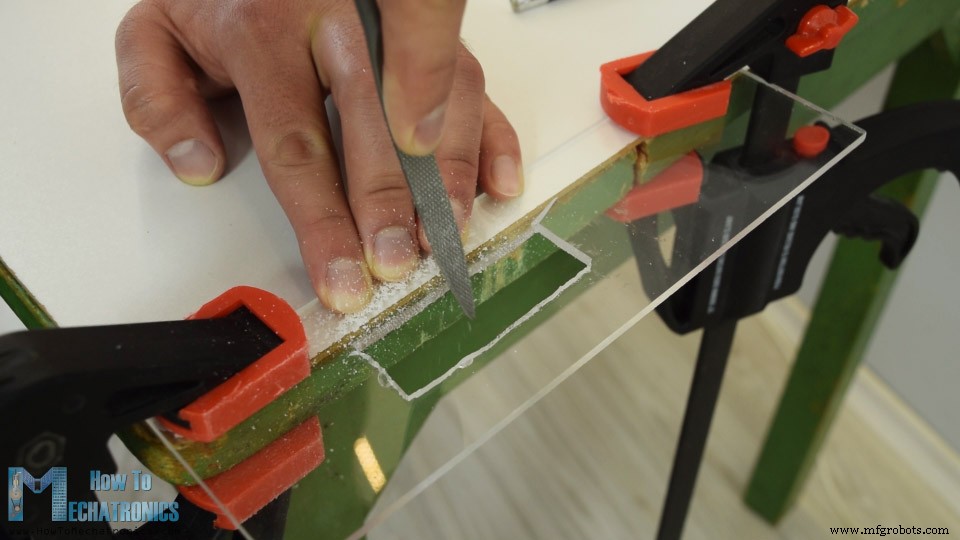
Luego tuve que hacer una abertura para la pantalla LCD en la parte superior de la caja, que en realidad es de 4 mm porque encajará mejor con la pantalla LCD. Así que primero hice dos agujeros con un taladro y luego inserté una sierra para metales a través de ellos. Usando la sierra para metales, hice la abertura de manera aproximada y luego, usando una escofina, tracé líneas rectas finas para que la pantalla LCD pueda encajar bien.
Luego, usando una broca Forstner, hice las aberturas para el interruptor de encendido, el botón de control y el sensor ultrasónico.
Una vez que tuve todas las piezas listas, usé un epoxi de 5 minutos para ensamblar la caja. En cuanto a la parte superior, inserté y pegué dos pernos a través de los cuales se puede insertar el panel superior y asegurarlo con unas tuercas en la parte superior.
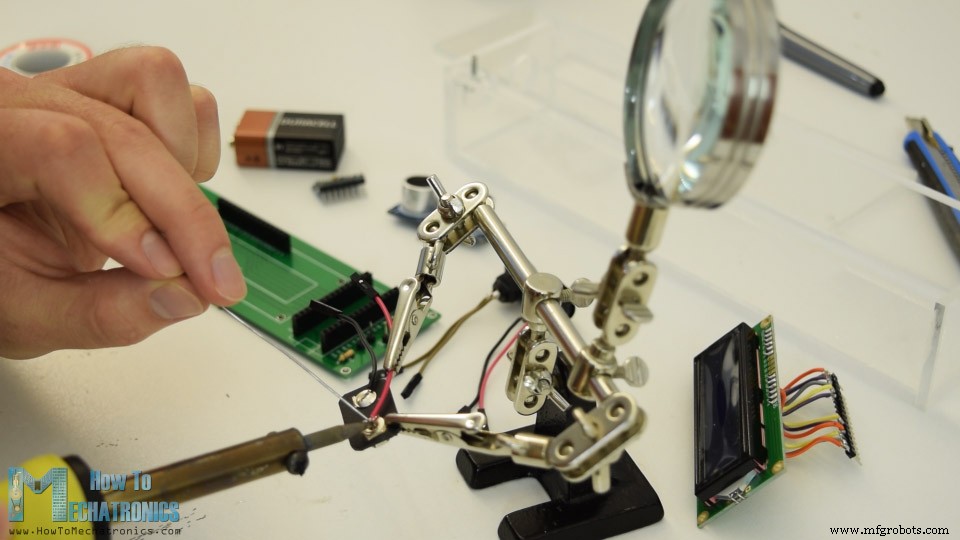
La carcasa ahora está lista, por lo que continué soldando los cabezales de los pines a la pantalla LCD para poder conectarlos fácilmente a la PCB. También soldé los cabezales de las clavijas o los cables puente al interruptor de encendido, el botón y el conector de la batería.
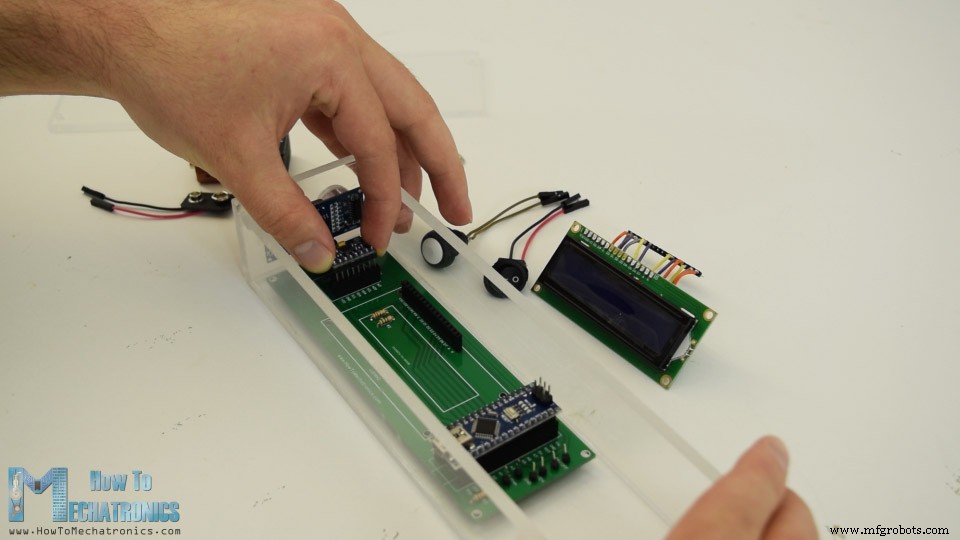
Finalmente, tenía todo listo para armar el dispositivo. Empecé insertando el sensor ultrasónico en la PCB y luego a través de los agujeros en el panel lateral. Lo siguiente fue la placa Arduino, el módulo del acelerómetro y el conector de la batería.
En el panel superior, aseguré la pantalla LCD, el interruptor de encendido y el botón, y luego los conecté a la PCB. Por último inserté la batería de 9V en el conector y fijé el panel superior con las tuercas.
Y eso es todo, el proyecto del medidor de rango de Arduino está hecho, pero lo que queda en este video es explicar cómo funciona el programa, así que echemos un vistazo al código de Arduino.
Como el código es un poco más largo, para una mejor comprensión, publicaré el código fuente del programa en secciones con descripción para cada sección. Y al final de este artículo publicaré el código fuente completo.
Entonces, primero debemos incluir la biblioteca Wire.h para la comunicación I2C del acelerómetro, así como la biblioteca LiquidCrystal.h para controlar la pantalla LCD. Luego necesitamos definir la pantalla LCD, la dirección I2C del módulo del acelerómetro MPU6050, los pines del sensor ultrasónico, así como algunas variables necesarias para el programa a continuación.
En la sección de configuración, debemos inicializar tanto la interfaz I2C del acelerómetro como la pantalla de cristal líquido, así como definir los modos de pin para el disparador del sensor ultrasónico y los pines de eco, y el pin del botón.
En la sección de bucle principal tenemos un interruptor de instrucciones a través del cual podemos alternar entre los diferentes programas de nuestro dispositivo. En el primero, o caso número 0, seleccionamos la unidad de medida. Con la función lcd.print(), imprimimos el texto en la pantalla LCD y, con las declaraciones if, alternamos entre las cuatro unidades de medida.
Debemos notar aquí que la variable unitSelect toma acción en la función personalizada getDistance(), donde realmente dice a qué unidad debemos convertir la unidad básica cm que estamos obteniendo del sensor ultrasónico.
Para seleccionar la unidad de medida y entrar también en el primer programa del dispositivo solo tenemos que mantener pulsado el botón durante más de medio segundo.
En el caso número 1 o en el programa de medición de distancia primero obtenemos la distancia al objeto más cercano usando la función personalizada getDistance().
Veamos cómo funciona esta función.
Aquí, usando el pin disparador, le decimos al sensor que genere una onda de sonido ultrasónica.
Luego, usando el pin de eco y la función pulseIn(), medimos la duración de la onda que viajó desde el sensor hasta el objeto y de regreso. Teniendo en cuenta la velocidad del sonido y el tiempo de viaje, podemos calcular fácilmente la distancia. Así que imprimimos la distancia medida junto con algún texto en la pantalla LCD y usando las declaraciones "si", si presionamos el botón, imprimimos o guardamos las dos últimas medidas.
El siguiente es el programa para calcular el área en el que estamos utilizando métodos similares. Necesitamos tomar dos medidas perpendiculares y simplemente multiplicarlas para obtener el área del cuadrado que forman.
El último caso, es el programa de medición de ángulos. Aquí necesitamos leer los datos del acelerómetro, que en realidad es la fuerza del campo gravitatorio de la Tierra en tres ejes diferentes, X, Y y Z. El valor de cada eje se almacena en 2 registros, por lo que necesitamos leer un total de 6 registros y combínelos para obtener el valor correcto.
Una vez que tenemos los valores X,Y y Z del acelerómetro podemos calcular el ángulo de Pitch, o rotación alrededor del eje Y, así como el ángulo de Roll, o rotación alrededor del eje X, usando las dos ecuaciones. Puede encontrar más detalles sobre estas ecuaciones en la nota de aplicación de Freescale Semiconductor, Detección de inclinación mediante un acelerómetro de tres ejes . Entonces, después de eso, imprimimos los valores junto con algún texto en la pantalla LCD y, al presionar el botón, cambiamos lo que mostramos en la pantalla LCD, ya sea el ángulo de cabeceo o de balanceo.
Aquí está el código fuente completo para este medidor de rango Arduino y proyecto de nivel de burbuja:
Eso sería todo, espero que hayas disfrutado este proyecto Arduino y hayas aprendido algo nuevo. No dude en hacer cualquier pregunta en la sección de comentarios a continuación.Resumen
Esquema del circuito del medidor de rango de Arduino
PCB de diseño personalizado
Ensamblaje del dispositivo
Medidor de rango Arduino y código fuente de nivel de burbuja digital
#include<Wire.h> // I2C communication library
#include <LiquidCrystal.h> // includes the LiquidCrystal Library

LiquidCrystal lcd(7, 6, 5, 4, 3, 2); // Creates an LCD object. Parameters: (rs, enable, d4, d5, d6, d7)
const int MPU = 0x68; // I2C address of the MPU6050 accelerometer

#define trigPin 8
#define echoPin 9
#define selectButton 10

int16_t AcX, AcY, AcZ;
long duration;
float distance;
int program = 0;
float d = 0;
float d1 = 0;
float d2 = 0;
float area = 0;
int axis = 0;
int angle = 0;
int unitSelect = 0;
String unit = "cm";Code language: Arduino (arduino)void setup() {
// Initialize interface to the MPU6050
Wire.begin();
Wire.beginTransmission(MPU);
Wire.write(0x6B);
Wire.write(0);
Wire.endTransmission(true);
lcd.begin(16, 2); // Initializes the interface to the LCD screen
pinMode(trigPin, OUTPUT);
pinMode(echoPin, INPUT);
pinMode(selectButton, INPUT_PULLUP);
}Code language: Arduino (arduino)switch (program) { // Switch between different programs
case 0: // Select unit of measurement
lcd.setCursor(0, 0); // Sets the location at which subsequent text written to the LCD will be displayed
lcd.print("Select Unit: ");
lcd.setCursor(13, 0);
lcd.print(unit);
lcd.print(" ");
delay(10);
// If button is pressed - change unit
if (digitalRead(selectButton) == 0) {
if (unitSelect == 0) {
unit = "in";
unitSelect = 1;
}
else if (unitSelect == 1) {
unit = "m";
unitSelect = 2;
}
else if (unitSelect == 2) {
unit = "ft";
unitSelect = 3;
}
else if (unitSelect == 3) {
unit = "cm";
unitSelect = 0;
}
// If button is held longer then half a second - change program
        delay(500);
        if (digitalRead(selectButton) == 0) {
          program = 1;
          lcd.clear();
          delay(500);
        }
      }
break;Code language: Arduino (arduino)/ Converting the units
if (unitSelect == 1) {
distance = distance; // cm to cm
unit = "cm";
}
else if (unitSelect == 2) {
distance = distance * 0.393701; // cm to in
unit = "in";
}
else if (unitSelect == 3) {
distance = distance * 0.01; // cm to m
unit = "m";
}
else if (unitSelect == 0) {
distance = distance * 0.0328; // cm to ft
unit = "ft";
}Code language: Arduino (arduino)// If button is held longer then half a second - change program
delay(500);
if (digitalRead(selectButton) == 0) {
program = 1;
lcd.clear();
delay(500);
}
}
break;Code language: Arduino (arduino)case 1: // Distance measuring program
distance = getDistance(); // Distance to the nearest object
lcd.setCursor(0, 0);
lcd.print("Dist: ");
lcd.print(distance); // Prints the distance value from the sensor
lcd.print(" ");
lcd.setCursor(14, 0);
lcd.print(unit);
delay(10);
lcd.setCursor(0, 1);
lcd.print("d:");
lcd.setCursor(8, 1);
lcd.print("d:");
delay(200);
// Save distance 1
if (digitalRead(selectButton) == 0) {
if (d == 0) {
lcd.setCursor(0, 1);
lcd.print("d: ");
lcd.setCursor(2, 1);
lcd.print(distance);
d = 1;
delay(100);
}
// Save distance 2
else if (d == 1) {
lcd.setCursor(8, 1);
lcd.print("d: ");
lcd.setCursor(10, 1);
lcd.print(distance);
d = 0;
delay(100);
}
// If button is held longer then half sencond change program
delay(500);
if (digitalRead(selectButton) == 0) {
program = 2;
d = 0;
lcd.clear();
delay(500);
}
}
break;Code language: Arduino (arduino)//===== getDistance - Custom Function
float getDistance() {
// Clears the trigPin
digitalWrite(trigPin, LOW);
// Sets the trigPin on HIGH state for 10 micro seconds
digitalWrite(trigPin, HIGH);
delayMicroseconds(10);
digitalWrite(trigPin, LOW);
// Reads the echoPin, returns the sound wave travel time in microseconds
duration = pulseIn(echoPin, HIGH);
// Calculating the distance
distance = duration * 0.034 / 2; // distance in cm
// Converting the units
if (unitSelect == 1) {
distance = distance; // cm to cm
unit = "cm";
}
else if (unitSelect == 2) {
distance = distance * 0.393701; // cm to in
unit = "in";
}
else if (unitSelect == 3) {
distance = distance * 0.01; // cm to m
unit = "m";
}
else if (unitSelect == 0) {
distance = distance * 0.0328; // cm to ft
unit = "ft";
}
return distance;
}Code language: Arduino (arduino)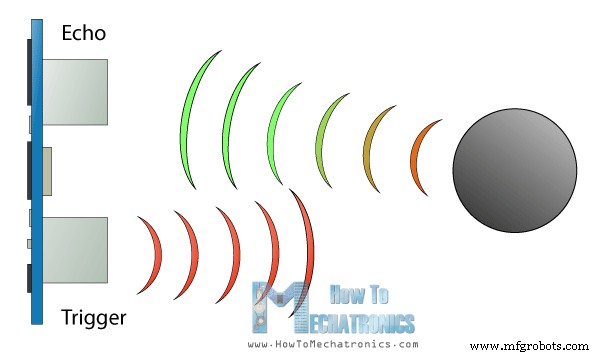
case 2: // Area measuring program
distance = getDistance();
lcd.setCursor(0, 0);
lcd.print("Area: ");
lcd.print(area); // Prints the calculated area from the two measurements
lcd.setCursor(12, 0);
lcd.print(unit); // Prints the selected unit and the square sign below
lcd.print("^2");
delay(200);
if ( d == 0) {
lcd.setCursor(0, 1);
lcd.print("d1: ");
lcd.setCursor(3, 1);
lcd.print(distance);
delay(200);
}
else if (d == 1) {
lcd.setCursor(9, 1);
lcd.print("d2: ");
lcd.setCursor(12, 1);
lcd.print(distance);
delay(200);
}
else if (d == 2) {
lcd.setCursor(6, 0);
lcd.print(area);
delay(200);
}
// Save distance 1
if (digitalRead(selectButton) == 0) {
if (d == 0) {
lcd.setCursor(0, 1);
lcd.print("d1: ");
lcd.setCursor(3, 1);
lcd.print(distance);
d = 1;
d1 = distance;
delay(100);
}
// Save distance 2
else if (d == 1) {
lcd.setCursor(9, 1);
lcd.print("d2: ");
lcd.setCursor(12, 1);
lcd.print(distance);
d = 2;
d2 = distance;
area = d1 * d2; // Calculate the area
delay(100);
}
else if (d == 2) {
lcd.clear();
d = 0;
area = 0;
delay(100);
}
// If button is held longer then half sencond change program
delay(500);
if (digitalRead(selectButton) == 0) {
program = 3;
d = 0;
lcd.clear();
delay(500);
}
}
break;Code language: Arduino (arduino)case 3: // Angle measuring program
// Read the accelerometer data
Wire.beginTransmission(MPU);
Wire.write(0x3B); // Start with register 0x3B (ACCEL_XOUT_H)
Wire.endTransmission(false);
Wire.requestFrom(MPU, 6, true); // Read 6 registers total, each axis value is stored in 2 registers
AcX = Wire.read() << 8 | Wire.read(); // X-axis value
AcY = Wire.read() << 8 | Wire.read(); // Y-axis value
AcZ = Wire.read() << 8 | Wire.read(); // Z-axis value
if ( axis == 0) {
// Calculating the Pitch angle (rotation around Y-axis)
angle = atan(-1 * AcX / sqrt(pow(AcY, 2) + pow(AcZ, 2))) * 180 / PI;
lcd.setCursor(0, 0);
lcd.print("Pitch");
}
else if (axis == 1) {
// Calculating the Roll angle (rotation around X-axis)
angle = atan(-1 * AcY / sqrt(pow(AcX, 2) + pow(AcZ, 2))) * 180 / PI;
lcd.setCursor(0, 0);
lcd.print("Roll ");
}
lcd.setCursor(0, 1);
lcd.print("Angle: ");
lcd.print(abs(angle));
lcd.print(" ");
lcd.setCursor(10, 1);
lcd.print("deg");
delay(200);
// Change axis
if (digitalRead(selectButton) == 0) {
if (axis == 0) {
axis = 1;
delay(100);
}
// Save distance 2
else if (axis == 1) {
axis = 0;
delay(100);
}
// If button is held longer then half sencond change program
delay(500);
if (digitalRead(selectButton) == 0) {
program = 0;
lcd.clear();
delay(500);
}
}
break;Code language: Arduino (arduino)/*
DIY Digital Range Measurer and Spirit Level
by Dejan Nedelkovski,
www.HowToMechatronics.com
*/
#include<Wire.h> // I2C communication library
#include <LiquidCrystal.h> // includes the LiquidCrystal Library
LiquidCrystal lcd(7, 6, 5, 4, 3, 2); // Creates an LCD object. Parameters: (rs, enable, d4, d5, d6, d7)
const int MPU = 0x68; // I2C address of the MPU6050 accelerometer
#define trigPin 8
#define echoPin 9
#define selectButton 10
int16_t AcX, AcY, AcZ;
long duration;
float distance;
int program = 0;
float d = 0;
float d1 = 0;
float d2 = 0;
float area = 0;
int axis = 0;
int angle = 0;
int unitSelect = 0;
String unit = "cm";
void setup() {
// Initialize interface to the MPU6050
Wire.begin();
Wire.beginTransmission(MPU);
Wire.write(0x6B);
Wire.write(0);
Wire.endTransmission(true);
lcd.begin(16, 2); // Initializes the interface to the LCD screen
pinMode(trigPin, OUTPUT);
pinMode(echoPin, INPUT);
pinMode(selectButton, INPUT_PULLUP);
}
void loop() {
switch (program) { // Switch between different programs
case 0: // Select unit of measurement
lcd.setCursor(0, 0); // Sets the location at which subsequent text written to the LCD will be displayed
lcd.print("Select Unit: ");
lcd.setCursor(13, 0);
lcd.print(unit);
lcd.print(" ");
delay(10);
// If button is pressed - change unit
if (digitalRead(selectButton) == 0) {
if (unitSelect == 0) {
unit = "in";
unitSelect = 1;
}
else if (unitSelect == 1) {
unit = "m";
unitSelect = 2;
}
else if (unitSelect == 2) {
unit = "ft";
unitSelect = 3;
}
else if (unitSelect == 3) {
unit = "cm";
unitSelect = 0;
}
// If button is held longer then half a second - change program
delay(500);
if (digitalRead(selectButton) == 0) {
program = 1;
lcd.clear();
delay(500);
}
}
break;
case 1: // Distance measuring program
distance = getDistance(); // Distance to the nearest object
lcd.setCursor(0, 0);
lcd.print("Dist: ");
lcd.print(distance); // Prints the distance value from the sensor
lcd.print(" ");
lcd.setCursor(14, 0);
lcd.print(unit);
delay(10);
lcd.setCursor(0, 1);
lcd.print("d:");
lcd.setCursor(8, 1);
lcd.print("d:");
delay(200);
// Save distance 1
if (digitalRead(selectButton) == 0) {
if (d == 0) {
lcd.setCursor(0, 1);
lcd.print("d: ");
lcd.setCursor(2, 1);
lcd.print(distance);
d = 1;
delay(100);
}
// Save distance 2
else if (d == 1) {
lcd.setCursor(8, 1);
lcd.print("d: ");
lcd.setCursor(10, 1);
lcd.print(distance);
d = 0;
delay(100);
}
// If button is held longer then half sencond change program
delay(500);
if (digitalRead(selectButton) == 0) {
program = 2;
d = 0;
lcd.clear();
delay(500);
}
}
break;
case 2: // Area measuring program
distance = getDistance();
lcd.setCursor(0, 0);
lcd.print("Area: ");
lcd.print(area); // Prints the calculated area from the two measurements
lcd.setCursor(12, 0);
lcd.print(unit); // Prints the selected unit and the square sign below
lcd.print("^2");
delay(200);
if ( d == 0) {
lcd.setCursor(0, 1);
lcd.print("d1: ");
lcd.setCursor(3, 1);
lcd.print(distance);
delay(200);
}
else if (d == 1) {
lcd.setCursor(9, 1);
lcd.print("d2: ");
lcd.setCursor(12, 1);
lcd.print(distance);
delay(200);
}
else if (d == 2) {
lcd.setCursor(6, 0);
lcd.print(area);
delay(200);
}
// Save distance 1
if (digitalRead(selectButton) == 0) {
if (d == 0) {
lcd.setCursor(0, 1);
lcd.print("d1: ");
lcd.setCursor(3, 1);
lcd.print(distance);
d = 1;
d1 = distance;
delay(100);
}
// Save distance 2
else if (d == 1) {
lcd.setCursor(9, 1);
lcd.print("d2: ");
lcd.setCursor(12, 1);
lcd.print(distance);
d = 2;
d2 = distance;
area = d1 * d2; // Calculate the area
delay(100);
}
else if (d == 2) {
lcd.clear();
d = 0;
area = 0;
delay(100);
}
// If button is held longer then half sencond change program
delay(500);
if (digitalRead(selectButton) == 0) {
program = 3;
d = 0;
lcd.clear();
delay(500);
}
}
break;
case 3: // Angle measuring program
// Read the accelerometer data
Wire.beginTransmission(MPU);
Wire.write(0x3B); // Start with register 0x3B (ACCEL_XOUT_H)
Wire.endTransmission(false);
Wire.requestFrom(MPU, 6, true); // Read 6 registers total, each axis value is stored in 2 registers
AcX = Wire.read() << 8 | Wire.read(); // X-axis value
AcY = Wire.read() << 8 | Wire.read(); // Y-axis value
AcZ = Wire.read() << 8 | Wire.read(); // Z-axis value
if ( axis == 0) {
// Calculating the Pitch angle (rotation around Y-axis)
angle = atan(-1 * AcX / sqrt(pow(AcY, 2) + pow(AcZ, 2))) * 180 / PI;
lcd.setCursor(0, 0);
lcd.print("Pitch");
}
else if (axis == 1) {
// Calculating the Roll angle (rotation around X-axis)
angle = atan(-1 * AcY / sqrt(pow(AcX, 2) + pow(AcZ, 2))) * 180 / PI;
lcd.setCursor(0, 0);
lcd.print("Roll ");
}
lcd.setCursor(0, 1);
lcd.print("Angle: ");
lcd.print(abs(angle));
lcd.print(" ");
lcd.setCursor(10, 1);
lcd.print("deg");
delay(200);
// Change axis
if (digitalRead(selectButton) == 0) {
if (axis == 0) {
axis = 1;
delay(100);
}
// Save distance 2
else if (axis == 1) {
axis = 0;
delay(100);
}
// If button is held longer then half sencond change program
delay(500);
if (digitalRead(selectButton) == 0) {
program = 0;
lcd.clear();
delay(500);
}
}
break;
}
}
//===== getDistance - Custom Function
float getDistance() {
  // Clears the trigPin
  digitalWrite(trigPin, LOW);
  // Sets the trigPin on HIGH state for 10 micro seconds
  digitalWrite(trigPin, HIGH);
  delayMicroseconds(10);
  digitalWrite(trigPin, LOW);
  // Reads the echoPin, returns the sound wave travel time in microseconds
  duration = pulseIn(echoPin, HIGH);
  // Calculating the distance
  distance = duration * 0.034 / 2; // distance in cm

  // Converting the units
  if (unitSelect == 1) {
    distance = distance; // cm to cm
    unit = "cm";
  }
  else if (unitSelect == 2) {
    distance = distance *  0.393701; // cm to in
    unit = "in";
  }
  else if (unitSelect == 3) {
    distance = distance * 0.01; // cm to m
    unit = "m";
  }
  else if (unitSelect == 0) {
    distance = distance * 0.0328; // cm to ft
    unit = "ft";
  }
  return distance;
}Code language: Arduino (arduino)
Proceso de manufactura
- Model Rail Digital DCC Command Station Arduino y aplicación gratuita
- Dados digitales Arduino
- Animación LCD y juegos
- Detector de frecuencia de audio
- Clon Arduino Tamagotchi - Mascota digital
- Tech-TicTacToe
- Voltímetro de bricolaje con Arduino y una pantalla Nokia 5110
- Temporizador de cuenta atrás de Arduino
- Python3 y comunicación Arduino
- Radio FM usando Arduino y RDA8057M
- Monitor de nivel de sumidero