


Proyecto de reloj despertador y reproductor de música con pantalla táctil Arduino
En este proyecto, le mostraré cómo puede hacer un reproductor de música MP3 con pantalla táctil Arduino y un reloj despertador. Puede ver el siguiente video o leer el tutorial escrito a continuación.
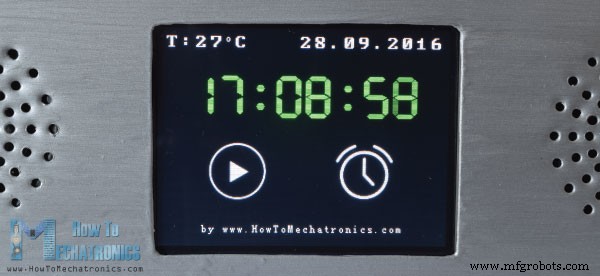
La pantalla de inicio presenta un gran reloj, información sobre la fecha y la temperatura, así como dos botones para el reproductor de música y la alarma.
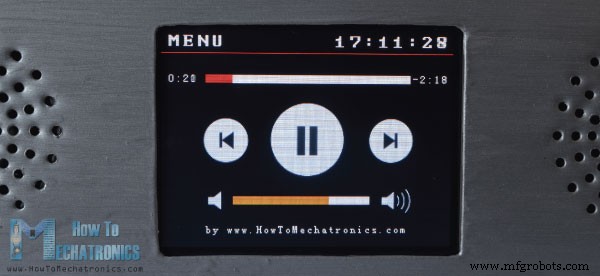
Si entramos en el reproductor de música podemos empezar a reproducir la música pulsando el botón grande de “Reproducir” en el centro de la pantalla. Justo al lado, hay dos botones más, para reproducir la canción anterior o la siguiente.
Encima de estos botones está la barra de progreso de la canción, y en la parte inferior de la pantalla tenemos una barra de volumen y dos botones para bajar y subir el volumen. En la esquina superior derecha hay un reloj y en el lado izquierdo está el botón "Menú" que nos lleva de vuelta a la pantalla de inicio.
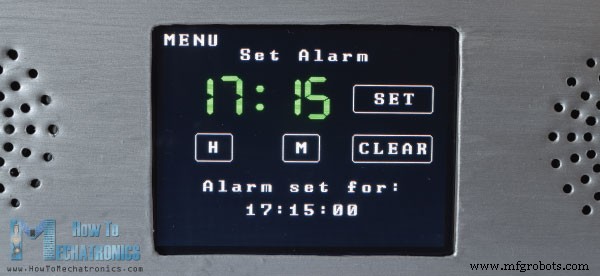
Por otro lado, si entramos en el Despertador podemos configurar una alarma utilizando los dos botones para configurar las horas y los minutos.
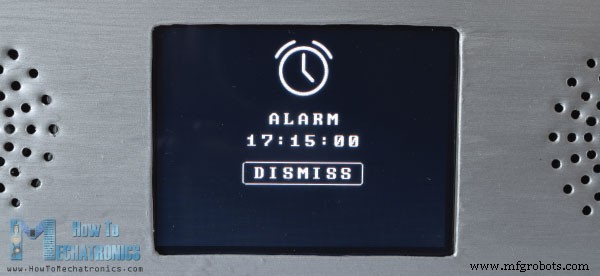
Cuando la alarma esté activada, una canción comenzará a sonar a un volumen más alto y seguirá sonando hasta que presionemos el botón "Descartar".
Ahora echemos un vistazo a cómo funciona este dispositivo. Utiliza una placa Arduino Mega y una pantalla táctil TFT de 3,2” con escudo adecuado para conectar la pantalla con la placa Arduino. Para reproducir la música, utiliza el módulo BY8001 MP3 Player y para el despertador utiliza el módulo DS3231 Real Time Clock.
Puede obtener los componentes necesarios para este proyecto Arduino desde los siguientes enlaces:
Aquí está el esquema del circuito de este proyecto:
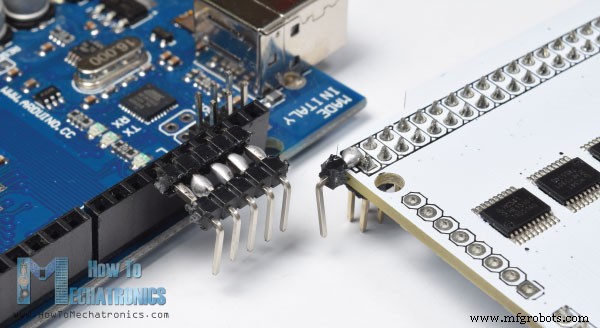
Podemos notar aquí que el escudo TFT está bloqueando los pines libres de la placa Arduino, por lo que necesitamos hacer encabezados de pines personalizados que podamos insertar entre el escudo y el Arduino.
También tenga en cuenta que para alimentar el Arduino necesitamos soldar un cabezal de pin adicional al pin de 5 V en el escudo, ya que el escudo ya usa todos los pines VCC de Arduino.
Una vez que conectemos todo, podemos proceder con la programación del Arduino. Sin embargo, antes de continuar, le sugiero que consulte mis tutoriales detallados anteriores para la pantalla táctil TFT y el módulo de reloj en tiempo real DS3231. Y en cuanto al módulo del reproductor de MP3, le daré una explicación rápida aquí en este artículo.
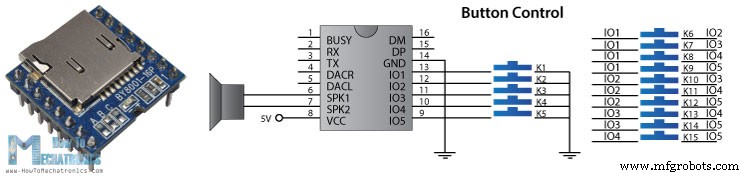
El BY8001-16P es un módulo MP3 que funciona con tarjetas MicroSD y admite archivos de formato de audio MP3 y WAV. El módulo tiene un amplificador de potencia integrado de 3 W y puede controlar directamente un único altavoz de 3 W.
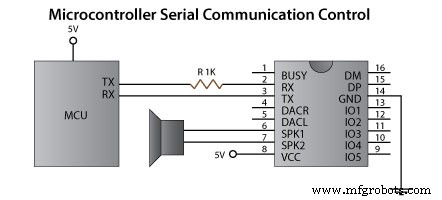
El módulo del reproductor de MP3 se puede controlar con botones usando los 5 pines de entrada o usando un microcontrolador a través de la comunicación en serie.
Tenga en cuenta aquí que los pines del puerto serie del módulo funcionan a 3,3 V, por lo que el pin RX del módulo debe conectarse a través de una resistencia de 1K al pin Arduino TX. También tenga en cuenta los 3 puertos A, B y C que se utilizan para seleccionar los modos de control. Para controlar el módulo usando un microcontrolador, se deben quitar las 3 resistencias en estos pads. Los pines número 6 y 7 se pueden usar para conectar directamente altavoces de baja potencia o los pines número 4 y 5 si se usa un amplificador externo.
En cuanto a la parte de Arduino, la forma más fácil es usar la biblioteca BY8001 que se puede descargar desde GitHub. Si abrimos algunos de sus ejemplos de demostración podemos ver cómo funciona. Entonces, después de inicializar el módulo en la sección de configuración, podemos usar cualquiera de las funciones personalizadas para controlar el módulo.
Ahora estamos listos para echar un vistazo al código de este Arduino Touch Screen MP3 Screen Music Player and Alarm Clock. Como el código es un poco más largo, para una mejor comprensión, publicaré el código fuente del programa en secciones con descripción para cada sección. Y al final de este artículo publicaré el código fuente completo.
Entonces, primero debemos incluir las bibliotecas para la pantalla táctil TFT, el reproductor de MP3 BY8001-16P y el módulo de reloj en tiempo real DS3231, así como la biblioteca para la comunicación en serie. Luego tenemos que crear los objetos apropiados y definir algunas variables necesarias para el programa.
Podemos notar aquí la definición de los mapas de bits. Algunos de los botones del programa son en realidad imágenes que se convierten en mapas de bits utilizando la herramienta ImageConverter565 que viene con la biblioteca TFT.
Por lo tanto, estos archivos ".c" deben incluirse en el directorio del archivo de código para que se carguen al iniciar el boceto. Aquí puedes descargar estas imágenes y archivos ".c".
En la sección de configuración después de inicializar los objetos, llamamos a la función personalizada drawHomeScreen() que dibuja todos los gráficos de la pantalla de inicio. También aquí establecemos los valores iniciales de algunas de las variables, como playStatus, currentTemp y Date, el valor inicial del volumen, etc.
La siguiente es la sección de bucle. La primera declaración if es verdadera ya que hemos establecido la variable currentPage en 0, lo que indica que estamos en la pantalla de inicio. Aquí, con la siguiente declaración if, verificamos si tenemos un cambio en el reloj y esto sucede cada segundo. Ahora que estamos usando la fuente de siete segmentos de las bibliotecas TFT, que no admite ningún carácter excepto números, solo tenemos que extraer los números de la cadena que viene con la función getTimeStr() para leer el reloj del DS3231 Módulo RTC.
Entonces, al usar la función substring(), obtenemos las horas, los minutos y los segundos en variables separadas y las imprimimos cada vez que ocurre un cambio en los segundos, los minutos o las horas.
A continuación, usando la función myTouch.dataAvailable() verificamos si hemos tocado la pantalla y también verificamos si es el reproductor de música o el botón de alarma. Entonces, si ese es el botón del reproductor de música, primero llamamos a la función personalizada drawFrame() que dibuja un círculo rojo alrededor del botón que indica que se presionó el botón. Además, esta función personalizada tiene un bucle while que mantiene el programa apilado hasta que soltamos el botón. Inmediatamente después, establecemos la variable currentPage en 1, limpiamos la pantalla y llamamos a la función personalizada drawMusicPlayerScreen() que dibuja todos los gráficos de la pantalla del reproductor de música. De manera similar, si presionamos el botón de alarma, establecemos la variable página actual en 2 y limpiamos la pantalla.
A continuación, veamos qué sucede en la pantalla del reproductor de música. Aquí estamos constantemente comprobando si hemos tocado la pantalla. Si tocamos el botón Reproducir y la variable playStatus actual es 0, llamaremos a la función mp3.playTrackFromFolder() que comenzará a reproducir la primera canción de la tarjeta MicroSD. Al mismo tiempo, llamamos a la función personalizada drawPauseButton() que dibuja el botón Pausa y establece la variable playStatus en 2. Usando las siguientes dos declaraciones if, dependiendo de la variable playStatues, alternamos entre reproducir y pausar la canción.
De manera similar, para cada botón presionado llamamos a las funciones apropiadas para reproducir la pista anterior o siguiente, disminuir o aumentar el volumen, así como el botón "Menú" que nos lleva de vuelta a la pantalla de inicio.
La siguiente instrucción if se usa para actualizar la barra de progreso de la pista.
Entonces, si la música se está reproduciendo, llamamos a la función personalizada trackPlayTime() que, utilizando algunas de las funciones de la biblioteca del reproductor de música, como mp3.getElapsedTrackPlaybackTime(), calcula e imprime el tiempo transcurrido y restante, así como los gráficos de la barra de progreso de la pista. Usando la función personalizada printClock() imprimimos el reloj en la esquina superior derecha.
La siguiente es la pantalla de Alarma. Aquí primero dibujamos todos los gráficos, el reloj, el texto y los botones y también configuramos la variable alarmNotSet para que sea verdadera para que podamos ingresar al siguiente ciclo while. Aquí, usando los dos botones, H y M, configuramos la alarma y una vez que hacemos clic en el botón "Establecer", el valor de la alarma se almacena en la variable alarmString.
Tenga en cuenta aquí que necesitamos ajustar esta cadena para que tenga la misma forma que la cadena que obtenemos de la función getTimeString(). De esta forma podremos compararlos y activar la alarma cuando el reloj llegue a ese mismo valor o tiempo.
Si presionamos el botón borrar, borraremos la cadena de alarma y si presionamos el botón de menú, nos sacará del ciclo while y lo enviará de vuelta a la pantalla de inicio.
Para activar la alarma, verificamos si la alarma se ha configurado y si la alarma coincide con el reloj, la primera canción en la tarjeta MicroSD comenzará a reproducirse a un volumen más alto. También dibujaremos todos los gráficos junto con el botón "Descartar" y estableceremos la variable alarmOn en verdadero. Esto nos llevará al siguiente bucle while que permitirá que la canción siga sonando hasta que presionemos el botón "Descartar".
Así es como funciona el código y puedes encontrar el código fuente completo al final del artículo.
Usando Solidworks hice el diseño y así es como se ve.
Puedes descargar este modelo para poder tomar las medidas aquí:
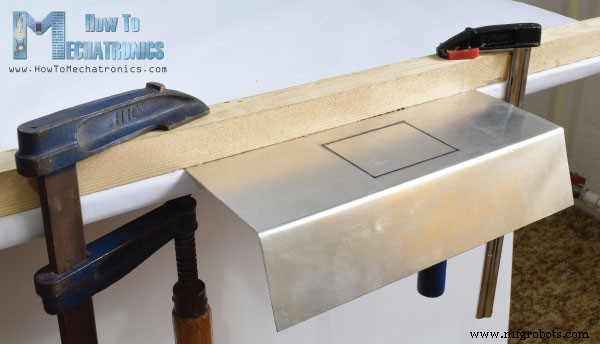
Para este proyecto, elegí usar láminas de aluminio que corté a medida con una multiherramienta. Luego en el borde de mi escritorio y con la ayuda de unas grapas y listones doblé la chapa.
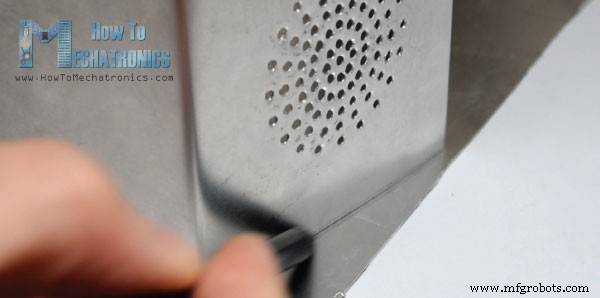
En cuanto a los altavoces, imprimí un patrón circular, lo adjunté al lugar y usando un taladro hice todos los agujeros.
Después de eso, corté los lados a la forma adecuada y los aseguré a la chapa previamente doblada con una pistola de pegamento.
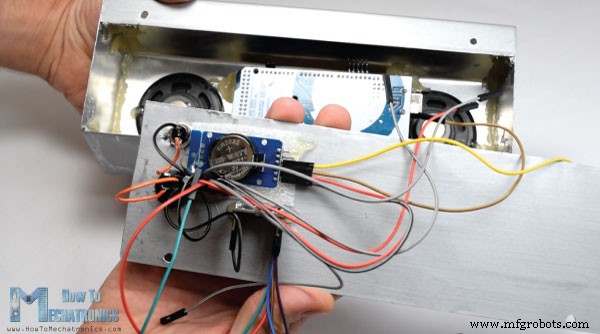
Al final pinté la caja de chapa y quedó lista para colocarle los componentes electrónicos. Nuevamente, usando una pistola de pegamento, aseguré todos los componentes, conecté todo y aseguré la tapa trasera del dispositivo con dos pernos.
Eso es todo, no dude en hacer cualquier pregunta en la sección de comentarios a continuación.
Aquí está el código fuente completo del dispositivo:
Feel free to ask any question in the comments section below and don’t forget to check out my collection of Arduino Projects.Resumen
Cómo funciona

Esquemas del circuito

Módulo de reproductor de MP3 BY8001-16P
Código fuente
#include <UTFT.h>
#include <URTouch.h>
#include <SoftwareSerial.h>
#include <BY8001.h>
#include <DS3231.h>

//==== Creating Objects
UTFT     myGLCD(SSD1289, 38, 39, 40, 41); //Parameters should be adjusted to your Display/Schield model
URTouch  myTouch( 6, 5, 4, 3, 2);


SoftwareSerial mp3Serial(11, 10);  // RX, TX
BY8001 mp3;  // creating an instance of class BY8001 and call it 'mp3'

DS3231  rtc(SDA, SCL);

//==== Defining Fonts
extern uint8_t SmallFont[];
extern uint8_t BigFont[];
extern uint8_t SevenSegNumFont[];

extern unsigned int MusicPlayerButton[0x1040];
extern unsigned int AlarmButton[0x1040];
extern unsigned int ButtonPlay[0x1AE9];
extern unsigned int ButtonPause[0x1AE9];
extern unsigned int PreviousButton[0x9C4];
extern unsigned int NextButton[0x9C4];
extern unsigned int VolumeDown[0x170];
extern unsigned int VolumeUp[0x3B8];

int x, y; // Variables for the coordinates where the display has been pressed
char currentPage, playStatus;
int iV = 15;
int trackNum = 1;
int b = 16;
int aHours = 0;
int aMinutes = 0;
boolean alarmNotSet = true;
String alarmString = "";
float currentTemperature, temperature;
static word totalTime, elapsedTime, playback, minutes, seconds, lastSeconds, minutesR, secondsR;
String currentClock, currentHours, currentMinutes, currentSeconds, currentDate;
String timeString, hoursString, minutesString, secondsString, hoursS, minutesS, secondsS, dateS;Code language: Arduino (arduino)
void setup() {
  // Initiate display
  myGLCD.InitLCD();
  myGLCD.clrScr();
  myTouch.InitTouch();
  myTouch.setPrecision(PREC_MEDIUM);

  // Initialize the rtc object
  rtc.begin();

  // Music
  Serial.begin(9600);  // set serial monitor baud rate to Arduino IDE
  mp3Serial.begin(9600);  // BY8001 set to 9600 baud (required)
  mp3.setup(mp3Serial); // tell BY8001 library which serial port to use.
  delay(800);  // allow time for BY8001 cold boot; may adjust depending on flash storage size

  drawHomeScreen();  // Draws the Home Screen
  currentPage = '0'; // Indicates that we are at Home Screen
  playStatus = '0';

  mp3.setVolume(15);
  delay(100);
  currentTemperature = rtc.getTemp();
  currentDate = rtc.getDateStr();
  currentClock = rtc.getTimeStr();
  timeString = rtc.getTimeStr();
  currentHours = timeString.substring(0, 2);
  currentMinutes = timeString.substring(3, 5);
  currentSeconds = timeString.substring(6, 8);
}Code language: Arduino (arduino)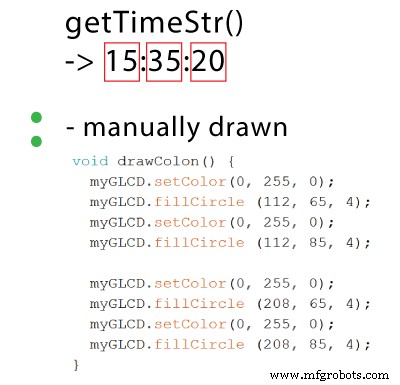
En cuanto a la fecha y la temperatura, similar , verificamos si hay un cambio en comparación con el estado anterior.void loop() {
// Homes Screen
if (currentPage == '0') {
// Checks for change of the clock
if ( currentClock != rtc.getTimeStr()) {
timeString = rtc.getTimeStr();
hoursS = timeString.substring(0, 2);
minutesS = timeString.substring(3, 5);
secondsS = timeString.substring(6, 8);
myGLCD.setFont(SevenSegNumFont);
myGLCD.setColor(0, 255, 0);
myGLCD.print(secondsS, 224, 50);
if ( currentMinutes != minutesS ) {
myGLCD.print(minutesS, 128, 50);
currentMinutes = minutesS;
}
if ( currentHours != hoursS ) {
myGLCD.print(hoursS, 32, 50);
currentHours = hoursS;
}
// Checks for change of the date
dateS = rtc.getDateStr();
delay(10);
if ( currentDate != dateS){
myGLCD.setColor(255, 255, 255); // Sets color to white
myGLCD.setFont(BigFont); // Sets font to big
myGLCD.print(rtc.getDateStr(), 153, 7);
}
// Checks for change of the temperature
temperature = rtc.getTemp();
delay(10);
if ( currentTemperature != temperature ){
myGLCD.setColor(255, 255, 255); // Sets color to white
myGLCD.setFont(BigFont); // Sets font to big
myGLCD.printNumI(temperature, 39, 7);
currentTemperature = temperature;
}
delay(10);
currentClock = rtc.getTimeStr();
}Code language: Arduino (arduino)// Checks whether the screen has been touched
if (myTouch.dataAvailable()) {
myTouch.read();
x = myTouch.getX(); // X coordinate where the screen has been pressed
y = myTouch.getY(); // Y coordinates where the screen has been pressed
// If we press the Music Player Button
if ((x >= 55) && (x <= 120) && (y >= 125) && (y <= 190)) {
drawFrame(87, 157, 33);
currentPage = '1';
myGLCD.clrScr();
delay(100);
drawMusicPlayerScreen();
delay(100);
}
// If we press the Alarm Button
if ((x >= 195) && (x <= 260) && (y >= 125) && (y <= 190)) {
drawFrame(227, 160, 29);
currentPage = '2';
myGLCD.clrScr();
}
}Code language: Arduino (arduino)// Music Player Screen
if (currentPage == '1') {
if (myTouch.dataAvailable()) {
myTouch.read();
x = myTouch.getX(); // X coordinate where the screen has been pressed
y = myTouch.getY(); // Y coordinates where the screen has been pressed
// If we press the Play Button
if ((x >= 116) && (x <= 204) && (y >= 77) && (y <= 165)) {
if (playStatus == '0') {
drawFrame(159, 121, 42);
drawPauseButton();
mp3.playTrackFromFolder(00, 001);
delay(100);
playStatus = '2';
return;
}
if (playStatus == '1') {
drawFrame(159, 121, 42);
drawPauseButton();
mp3.play();
delay(100);
playStatus = '2';
return;
}
if (playStatus == '2') {
drawFrame(159, 121, 42);
drawPlayButton();
mp3.pause();
delay(100);
playStatus = '1';
return;
}
}Code language: Arduino (arduino)// If we press the Previous Button
if ((x >= 45) && (x <= 95) && (y >= 97) && (y <= 147)) {
drawFrame(70, 121, 26);
mp3.previousTrack();
delay(100);
drawTrackBar();
}
// If we press the Next Button
if ((x >= 227) && (x <= 277) && (y >= 97) && (y <= 147)) {
drawFrame(252, 122, 26);
mp3.nextTrack();
delay(100);
drawTrackBar();
}
// If we press the VolumeDown Button
if ((x >= 35) && (x <= 75) && (y >= 165) && (y <= 209)) {
drawUnderline(45, 205, 65, 205);
if (iV >= 0 & iV <= 30) {
iV--;
drawVolume(iV);
}
mp3.decreaseVolume();
delay(100);
}
// If we press the VolumeUp Button
if ((x >= 230) && (x <= 280) && (y >= 165) && (y <= 209)) {
drawUnderline(235, 205, 275, 205);
if (iV >= 0 & iV <= 30) {
iV++;
drawVolume(iV);
}
mp3.increaseVolume();
delay(100);
}
// If we press the MENU Button
if ((x >= 0) && (x <= 75) && (y >= 0) && (y <= 30)) {
myGLCD.clrScr();
drawHomeScreen(); // Draws the Home Screen
currentPage = '0';
return;
}Code language: Arduino (arduino)// Updates the track bar
if (playStatus == '1' || playStatus == '2') {
trackPlayTime();
} // Updates the track bar
void trackPlayTime() {
totalTime = mp3.getTotalTrackPlaybackTime();
delay(10);
elapsedTime = mp3.getElapsedTrackPlaybackTime();
delay(10);
minutes = (int)elapsedTime / 60;
seconds = (((float)elapsedTime / 60) - minutes) * 60;
playback = totalTime - elapsedTime;
minutesR = (int)playback / 60;
secondsR = (((float)playback / 60) - minutesR) * 60;
myGLCD.setFont(SmallFont);
myGLCD.setColor(255, 255, 255);
myGLCD.printNumI(minutes, 8, 48);
myGLCD.print(":", 16, 48);
myGLCD.printNumI((int)seconds, 24, 48, 2, '0');
myGLCD.print("-", 276, 48);
myGLCD.printNumI(minutesR, 284, 48);
myGLCD.print(":", 292, 48);
myGLCD.printNumI((int)secondsR, 300, 48, 2, '0');
int trackBarX = map(elapsedTime, 0, totalTime, 0, 224);
myGLCD.setColor(255, 0, 0);
myGLCD.fillRect (48, 50, 48 + trackBarX, 50 + 8);
if (totalTime == elapsedTime) {
mp3.nextTrack();
delay(30);
myGLCD.setColor(255, 255, 255);
myGLCD.fillRect (48, 50, 48 + 224, 50 + 8);
}
}Code language: Arduino (arduino)// Alarm Clock Screen
if (currentPage == '2') {
myGLCD.setFont(BigFont);
myGLCD.setColor(255, 255, 255);
myGLCD.print("MENU", 5, 5);
myGLCD.print("Set Alarm", CENTER, 20);
// Draws a colon between the hours and the minutes
myGLCD.setColor(0, 255, 0);
myGLCD.fillCircle (112, 65, 4);
myGLCD.setColor(0, 255, 0);
myGLCD.fillCircle (112, 85, 4);
myGLCD.setFont(SevenSegNumFont);
myGLCD.setColor(0, 255, 0);
myGLCD.printNumI(aHours, 32, 50, 2, '0');
myGLCD.printNumI(aMinutes, 128, 50, 2, '0');
myGLCD.setColor(255, 255, 255);
myGLCD.drawRoundRect (42, 115, 82, 145);
myGLCD.drawRoundRect (138, 115, 178, 145);
myGLCD.setFont(BigFont);
myGLCD.print("H", 54, 122);
myGLCD.print("M", 150, 122);
myGLCD.drawRoundRect (215, 60, 303, 90);
myGLCD.print("SET", 236, 67);
myGLCD.drawRoundRect (215, 115, 303, 145);
myGLCD.print("CLEAR", 220, 122);
alarmNotSet = true;
while (alarmNotSet){
if (myTouch.dataAvailable()) {
myTouch.read();
x = myTouch.getX(); // X coordinate where the screen has been pressed
y = myTouch.getY(); // Y coordinates where the screen has been pressed
//Set hours button
if ((x >= 42) && (x <= 82) && (y >= 115) && (y <= 145)) {
drawRectFrame(42, 115, 82, 145);
aHours++;
if(aHours >=24){
aHours = 0;
}
myGLCD.setFont(SevenSegNumFont);
myGLCD.setColor(0, 255, 0);
myGLCD.printNumI(aHours, 32, 50, 2, '0');
}
// Set minutes buttons
if ((x >= 138) && (x <= 178) && (y >= 115) && (y <= 145)) {
drawRectFrame(138, 115, 178, 145);
aMinutes++;
if(aMinutes >=60){
aMinutes = 0;
}
myGLCD.setFont(SevenSegNumFont);
myGLCD.setColor(0, 255, 0);
myGLCD.printNumI(aMinutes, 128, 50, 2, '0');
}
// Set alarm button
if ((x >= 215) && (x <= 303) && (y >= 60) && (y <= 80)) {
drawRectFrame(215, 60, 303, 90);
if (aHours < 10 && aMinutes < 10){
alarmString = "0"+(String)aHours + ":" + "0"+ (String)aMinutes + ":" + "00";
}
else if (aHours < 10 && aMinutes > 9){
alarmString = "0"+(String)aHours + ":" + (String)aMinutes + ":" + "00";
}
else if (aHours > 9 && aMinutes < 10){
alarmString = (String)aHours + ":" + "0"+ (String)aMinutes + ":" + "00";
}
else {
alarmString = (String)aHours + ":" + (String)aMinutes + ":" + "00";
}
myGLCD.setFont(BigFont);
myGLCD.print("Alarm set for:", CENTER, 165);
myGLCD.print(alarmString, CENTER, 191);
}
// Clear alarm button
if ((x >= 215) && (x <= 303) && (y >= 115) && (y <= 145)) {
drawRectFrame(215, 115, 303, 145);
alarmString="";
myGLCD.setColor(0, 0, 0);
myGLCD.fillRect(45, 165, 275, 210);
}
// If we press the MENU Button
if ((x >= 0) && (x <= 75) && (y >= 0) && (y <= 30)) {
alarmNotSet = false;
currentPage = '0';
myGLCD.clrScr();
drawHomeScreen(); // Draws the Home Screen
}
}
}
}Code language: Arduino (arduino)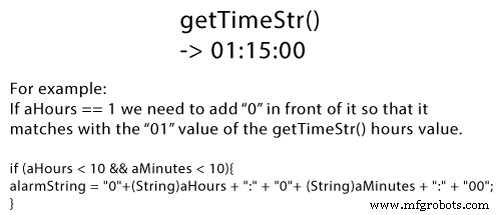
// Alarm activation
if (alarmNotSet == false) {
if (alarmString == rtc.getTimeStr()){
myGLCD.clrScr();
mp3.setVolume(25);
mp3.playTrackByIndexNumber(1);
delay(100);
myGLCD.setFont(BigFont);
myGLCD.setColor(255, 255, 255);
myGLCD.print("ALARM", CENTER, 90);
myGLCD.drawBitmap (127, 10, 65, 64, AlarmButton);
myGLCD.print(alarmString, CENTER, 114);
myGLCD.drawRoundRect (94, 146, 226, 170);
myGLCD.print("DISMISS", CENTER, 150);
boolean alarmOn = true;
while (alarmOn){
if (myTouch.dataAvailable()) {
myTouch.read();
x = myTouch.getX(); // X coordinate where the screen has been pressed
y = myTouch.getY(); // Y coordinates where the screen has been pressed
// Stop alarm button
if ((x >= 94) && (x <= 226) && (y >= 146) && (y <= 170)) {
drawRectFrame(94, 146, 226, 170);
alarmOn = false;
alarmString="";
myGLCD.clrScr();
mp3.stopPlayback();
delay(100);
currentPage = '0';
playStatus = '0';
mp3.setVolume(15);
drawHomeScreen();
}
}
}
}
}Code language: Arduino (arduino)Construyendo el dispositivo

/*
* Arduino Touch Screen MP3 Music Player and Alarm Clock
*
* Crated by Dejan Nedelkovski,
* www.HowToMechatronics.com
*
* UFTF, URTouch and DS3231 libraries made by Henning Karlsen which can be found and downloaded from his website, www.rinkydinkelectronics.com.
* BY8001 MP3 Player Library made by borland of Arduino forum, Released in public domain. Dowload link: https://github.com/r0ndL/BY8001
*/
#include <UTFT.h>
#include <URTouch.h>
#include <SoftwareSerial.h>
#include <BY8001.h>
#include <DS3231.h>
//==== Creating Objects
UTFT myGLCD(SSD1289, 38, 39, 40, 41); //Parameters should be adjusted to your Display/Schield model
URTouch myTouch( 6, 5, 4, 3, 2);
SoftwareSerial mp3Serial(11, 10); // RX, TX
BY8001 mp3; // creating an instance of class BY8001 and call it 'mp3'
DS3231 rtc(SDA, SCL);
//==== Defining Fonts
extern uint8_t SmallFont[];
extern uint8_t BigFont[];
extern uint8_t SevenSegNumFont[];
extern unsigned int MusicPlayerButton[0x1040];
extern unsigned int AlarmButton[0x1040];
extern unsigned int ButtonPlay[0x1AE9];
extern unsigned int ButtonPause[0x1AE9];
extern unsigned int PreviousButton[0x9C4];
extern unsigned int NextButton[0x9C4];
extern unsigned int VolumeDown[0x170];
extern unsigned int VolumeUp[0x3B8];
int x, y; // Variables for the coordinates where the display has been pressed
char currentPage, playStatus;
int iV = 15;
int trackNum = 1;
int b = 16;
int aHours = 0;
int aMinutes = 0;
boolean alarmNotSet = true;
String alarmString = "";
float currentTemperature, temperature;
static word totalTime, elapsedTime, playback, minutes, seconds, lastSeconds, minutesR, secondsR;
String currentClock, currentHours, currentMinutes, currentSeconds, currentDate;
String timeString, hoursString, minutesString, secondsString, hoursS, minutesS, secondsS, dateS;
void setup() {
// Initiate display
myGLCD.InitLCD();
myGLCD.clrScr();
myTouch.InitTouch();
myTouch.setPrecision(PREC_MEDIUM);
// Initialize the rtc object
rtc.begin();
// Music
Serial.begin(9600); // set serial monitor baud rate to Arduino IDE
mp3Serial.begin(9600); // BY8001 set to 9600 baud (required)
mp3.setup(mp3Serial); // tell BY8001 library which serial port to use.
delay(800); // allow time for BY8001 cold boot; may adjust depending on flash storage size
drawHomeScreen(); // Draws the Home Screen
currentPage = '0'; // Indicates that we are at Home Screen
playStatus = '0';
mp3.setVolume(15);
delay(100);
currentTemperature = rtc.getTemp();
currentDate = rtc.getDateStr();
currentClock = rtc.getTimeStr();
timeString = rtc.getTimeStr();
currentHours = timeString.substring(0, 2);
currentMinutes = timeString.substring(3, 5);
currentSeconds = timeString.substring(6, 8);
}
void loop() {
// Homes Screen
if (currentPage == '0') {
// Checks for change of the clock
if ( currentClock != rtc.getTimeStr()) {
timeString = rtc.getTimeStr();
hoursS = timeString.substring(0, 2);
minutesS = timeString.substring(3, 5);
secondsS = timeString.substring(6, 8);
myGLCD.setFont(SevenSegNumFont);
myGLCD.setColor(0, 255, 0);
myGLCD.print(secondsS, 224, 50);
if ( currentMinutes != minutesS ) {
myGLCD.print(minutesS, 128, 50);
currentMinutes = minutesS;
}
if ( currentHours != hoursS ) {
myGLCD.print(hoursS, 32, 50);
currentHours = hoursS;
}
// Checks for change of the date
dateS = rtc.getDateStr();
delay(10);
if ( currentDate != dateS){
myGLCD.setColor(255, 255, 255); // Sets color to white
myGLCD.setFont(BigFont); // Sets font to big
myGLCD.print(rtc.getDateStr(), 153, 7);
}
// Checks for change of the temperature
temperature = rtc.getTemp();
delay(10);
if ( currentTemperature != temperature ){
myGLCD.setColor(255, 255, 255); // Sets color to white
myGLCD.setFont(BigFont); // Sets font to big
myGLCD.printNumI(temperature, 39, 7);
currentTemperature = temperature;
}
delay(10);
currentClock = rtc.getTimeStr();
}
// Checks whether the screen has been touched
if (myTouch.dataAvailable()) {
myTouch.read();
x = myTouch.getX(); // X coordinate where the screen has been pressed
y = myTouch.getY(); // Y coordinates where the screen has been pressed
// If we press the Music Player Button
if ((x >= 55) && (x <= 120) && (y >= 125) && (y <= 190)) {
drawFrame(87, 157, 33);
currentPage = '1';
myGLCD.clrScr();
delay(100);
drawMusicPlayerScreen();
delay(100);
}
// If we press the Alarm Button
if ((x >= 195) && (x <= 260) && (y >= 125) && (y <= 190)) {
drawFrame(227, 160, 29);
currentPage = '2';
myGLCD.clrScr();
}
}
}
// Music Player Screen
if (currentPage == '1') {
if (myTouch.dataAvailable()) {
myTouch.read();
x = myTouch.getX(); // X coordinate where the screen has been pressed
y = myTouch.getY(); // Y coordinates where the screen has been pressed
// If we press the Play Button
if ((x >= 116) && (x <= 204) && (y >= 77) && (y <= 165)) {
if (playStatus == '0') {
drawFrame(159, 121, 42);
drawPauseButton();
mp3.playTrackFromFolder(00, 001);
delay(100);
playStatus = '2';
return;
}
if (playStatus == '1') {
drawFrame(159, 121, 42);
drawPauseButton();
mp3.play();
delay(100);
playStatus = '2';
return;
}
if (playStatus == '2') {
drawFrame(159, 121, 42);
drawPlayButton();
mp3.pause();
delay(100);
playStatus = '1';
return;
}
}
// If we press the Previous Button
if ((x >= 45) && (x <= 95) && (y >= 97) && (y <= 147)) {
drawFrame(70, 121, 26);
mp3.previousTrack();
delay(100);
drawTrackBar();
}
// If we press the Next Button
if ((x >= 227) && (x <= 277) && (y >= 97) && (y <= 147)) {
drawFrame(252, 122, 26);
mp3.nextTrack();
delay(100);
drawTrackBar();
}
// If we press the VolumeDown Button
if ((x >= 35) && (x <= 75) && (y >= 165) && (y <= 209)) {
drawUnderline(45, 205, 65, 205);
if (iV >= 0 & iV <= 30) {
iV--;
drawVolume(iV);
}
mp3.decreaseVolume();
delay(100);
}
// If we press the VolumeUp Button
if ((x >= 230) && (x <= 280) && (y >= 165) && (y <= 209)) {
drawUnderline(235, 205, 275, 205);
if (iV >= 0 & iV <= 30) {
iV++;
drawVolume(iV);
}
mp3.increaseVolume();
delay(100);
}
// If we press the MENU Button
if ((x >= 0) && (x <= 75) && (y >= 0) && (y <= 30)) {
myGLCD.clrScr();
drawHomeScreen(); // Draws the Home Screen
currentPage = '0';
return;
}
}
// Updates the track bar
    if (playStatus == '1' || playStatus == '2') {
      trackPlayTime();
    }
// Printing the clock in the upper right corner
myGLCD.setFont(BigFont);
myGLCD.setColor(255, 255, 255);
printClock(187, 5);
}
// Alarm Clock Screen
if (currentPage == '2') {
myGLCD.setFont(BigFont);
myGLCD.setColor(255, 255, 255);
myGLCD.print("MENU", 5, 5);
myGLCD.print("Set Alarm", CENTER, 20);
// Draws a colon between the hours and the minutes
myGLCD.setColor(0, 255, 0);
myGLCD.fillCircle (112, 65, 4);
myGLCD.setColor(0, 255, 0);
myGLCD.fillCircle (112, 85, 4);
myGLCD.setFont(SevenSegNumFont);
myGLCD.setColor(0, 255, 0);
myGLCD.printNumI(aHours, 32, 50, 2, '0');
myGLCD.printNumI(aMinutes, 128, 50, 2, '0');
myGLCD.setColor(255, 255, 255);
myGLCD.drawRoundRect (42, 115, 82, 145);
myGLCD.drawRoundRect (138, 115, 178, 145);
myGLCD.setFont(BigFont);
myGLCD.print("H", 54, 122);
myGLCD.print("M", 150, 122);
myGLCD.drawRoundRect (215, 60, 303, 90);
myGLCD.print("SET", 236, 67);
myGLCD.drawRoundRect (215, 115, 303, 145);
myGLCD.print("CLEAR", 220, 122);
alarmNotSet = true;
while (alarmNotSet){
if (myTouch.dataAvailable()) {
myTouch.read();
x = myTouch.getX(); // X coordinate where the screen has been pressed
y = myTouch.getY(); // Y coordinates where the screen has been pressed
//Set hours button
if ((x >= 42) && (x <= 82) && (y >= 115) && (y <= 145)) {
drawRectFrame(42, 115, 82, 145);
aHours++;
if(aHours >=24){
aHours = 0;
}
myGLCD.setFont(SevenSegNumFont);
myGLCD.setColor(0, 255, 0);
myGLCD.printNumI(aHours, 32, 50, 2, '0');
}
// Set minutes buttons
if ((x >= 138) && (x <= 178) && (y >= 115) && (y <= 145)) {
drawRectFrame(138, 115, 178, 145);
aMinutes++;
if(aMinutes >=60){
aMinutes = 0;
}
myGLCD.setFont(SevenSegNumFont);
myGLCD.setColor(0, 255, 0);
myGLCD.printNumI(aMinutes, 128, 50, 2, '0');
}
// Set alarm button
if ((x >= 215) && (x <= 303) && (y >= 60) && (y <= 80)) {
drawRectFrame(215, 60, 303, 90);
if (aHours < 10 && aMinutes < 10){
alarmString = "0"+(String)aHours + ":" + "0"+ (String)aMinutes + ":" + "00";
}
else if (aHours < 10 && aMinutes > 9){
alarmString = "0"+(String)aHours + ":" + (String)aMinutes + ":" + "00";
}
else if (aHours > 9 && aMinutes < 10){
alarmString = (String)aHours + ":" + "0"+ (String)aMinutes + ":" + "00";
}
else {
alarmString = (String)aHours + ":" + (String)aMinutes + ":" + "00";
}
myGLCD.setFont(BigFont);
myGLCD.print("Alarm set for:", CENTER, 165);
myGLCD.print(alarmString, CENTER, 191);
}
// Clear alarm button
if ((x >= 215) && (x <= 303) && (y >= 115) && (y <= 145)) {
drawRectFrame(215, 115, 303, 145);
alarmString="";
myGLCD.setColor(0, 0, 0);
myGLCD.fillRect(45, 165, 275, 210);
}
// If we press the MENU Button
if ((x >= 0) && (x <= 75) && (y >= 0) && (y <= 30)) {
alarmNotSet = false;
currentPage = '0';
myGLCD.clrScr();
drawHomeScreen(); // Draws the Home Screen
}
}
}
}
// Alarm activation
if (alarmNotSet == false) {
if (alarmString == rtc.getTimeStr()){
myGLCD.clrScr();
mp3.setVolume(25);
mp3.playTrackByIndexNumber(1);
delay(100);
myGLCD.setFont(BigFont);
myGLCD.setColor(255, 255, 255);
myGLCD.print("ALARM", CENTER, 90);
myGLCD.drawBitmap (127, 10, 65, 64, AlarmButton);
myGLCD.print(alarmString, CENTER, 114);
myGLCD.drawRoundRect (94, 146, 226, 170);
myGLCD.print("DISMISS", CENTER, 150);
boolean alarmOn = true;
while (alarmOn){
if (myTouch.dataAvailable()) {
myTouch.read();
x = myTouch.getX(); // X coordinate where the screen has been pressed
y = myTouch.getY(); // Y coordinates where the screen has been pressed
// Stop alarm button
if ((x >= 94) && (x <= 226) && (y >= 146) && (y <= 170)) {
drawRectFrame(94, 146, 226, 170);
alarmOn = false;
alarmString="";
myGLCD.clrScr();
mp3.stopPlayback();
delay(100);
currentPage = '0';
playStatus = '0';
mp3.setVolume(15);
drawHomeScreen();
}
}
}
}
}
}
void drawHomeScreen() {
myGLCD.setBackColor(0, 0, 0); // Sets the background color of the area where the text will be printed to black
myGLCD.setColor(255, 255, 255); // Sets color to white
myGLCD.setFont(BigFont); // Sets font to big
myGLCD.print(rtc.getDateStr(), 153, 7);
myGLCD.print("T:", 7, 7);
myGLCD.printNumI(rtc.getTemp(), 39, 7);
myGLCD.print("C", 82, 7);
myGLCD.setFont(SmallFont);
myGLCD.print("o", 74, 5);
if (alarmString == "" ) {
myGLCD.setColor(255, 255, 255);
myGLCD.print("by www.HowToMechatronics.com", CENTER, 215);
}
else {
myGLCD.setColor(255, 255, 255);
myGLCD.print("Alarm set for: ", 68, 215);
myGLCD.print(alarmString, 188, 215);
}
drawMusicPlayerButton();
drawAlarmButton();
drawHomeClock();
}
void drawMusicPlayerScreen() {
// Title
myGLCD.setBackColor(0, 0, 0); // Sets the background color of the area where the text will be printed to black
myGLCD.setColor(255, 255, 255); // Sets color to white
myGLCD.setFont(BigFont); // Sets font to big
myGLCD.print("MENU", 5, 5); // Prints the string on the screen
myGLCD.setColor(255, 0, 0); // Sets color to red
myGLCD.drawLine(0, 26, 319, 26); // Draws the red line
myGLCD.setColor(255, 255, 255); // Sets color to white
myGLCD.setFont(SmallFont); // Sets font to big
myGLCD.print("by www.HowToMechatronics.com", CENTER, 215); // Prints the string on the screen
// Volume Bar
myGLCD.setColor(255, 255, 255);
myGLCD.fillRect (78, 184, 78 + 150, 184 + 8);
myGLCD.setColor(240, 196, 30);
myGLCD.fillRect (78, 184, 78 + 75, 184 + 8);
// Track Bar
myGLCD.setColor(255, 255, 255);
myGLCD.fillRect (48, 50, 48 + 224, 50 + 8);
myGLCD.setFont(SmallFont);
myGLCD.setColor(255, 255, 255);
myGLCD.print("0:00", 8, 48);
myGLCD.print("-0:00", 276, 48);
drawPlayButton();
if (playStatus == '2') {
drawPauseButton();
}
drawPreviousButton();
drawNextButton();
drawVolumeDown();
drawVolumeUp();
}
void drawMusicPlayerButton() {
myGLCD.drawBitmap (55, 125, 65, 64, MusicPlayerButton);
}
void drawAlarmButton() {
myGLCD.drawBitmap (195, 125, 65, 64, AlarmButton);
}
void drawPlayButton() {
myGLCD.drawBitmap (118, 79, 83, 83, ButtonPlay);
}
void drawPauseButton() {
myGLCD.drawBitmap (118, 79, 83, 83, ButtonPause);
}
void drawNextButton() {
myGLCD.drawBitmap (227, 97, 50, 50, NextButton);
}
void drawPreviousButton() {
myGLCD.drawBitmap (45, 97, 50, 50, PreviousButton);
}
void drawVolumeDown() {
myGLCD.drawBitmap (50, 177, 16, 23, VolumeDown);
}
void drawVolumeUp() {
myGLCD.drawBitmap (241, 175, 34, 28, VolumeUp);
}
// check for if Mp3 Player is stopped
bool checkFor_mp3IsStopped() {
if (mp3Serial.available() > 0) {
if (mp3.getPlaybackStatus() == 0) {
return true;
}
}
else return false;
}
// Highlights the button when pressed
void drawFrame(int x, int y, int r) {
myGLCD.setColor(255, 0, 0);
myGLCD.drawCircle (x, y, r);
while (myTouch.dataAvailable())
myTouch.read();
myGLCD.setColor(0, 0, 0);
myGLCD.drawCircle (x, y, r);
}
void drawRectFrame(int x1, int y1, int x2, int y2) {
myGLCD.setColor(255, 0, 0);
myGLCD.drawRoundRect (x1, y1, x2, y2);
while (myTouch.dataAvailable())
myTouch.read();
myGLCD.setColor(255, 255, 255);
myGLCD.drawRoundRect (x1, y1, x2, y2);
}
void drawUnderline(int x1, int y1, int x2, int y2) {
myGLCD.setColor(255, 0, 0);
myGLCD.drawLine (x1, y1, x2, y2);
while (myTouch.dataAvailable())
myTouch.read();
myGLCD.setColor(0, 0, 0);
myGLCD.drawLine (x1, y1, x2, y2);
}
// Sound bar
void drawVolume(int x) {
myGLCD.setColor(255, 255, 255);
myGLCD.fillRect (78 + 5 * x, 184, 78 + 150, 184 + 8);
myGLCD.setColor(240, 196, 30);
myGLCD.fillRect (78, 184, 78 + 5 * x, 184 + 8);
}
// Clears the track bar
void drawTrackBar() {
myGLCD.setColor(255, 255, 255);
myGLCD.fillRect (48, 50, 48 + 224, 50 + 8);
}
// Updates the track bar
void trackPlayTime() {
totalTime = mp3.getTotalTrackPlaybackTime();
delay(10);
elapsedTime = mp3.getElapsedTrackPlaybackTime();
delay(10);
minutes = (int)elapsedTime / 60;
seconds = (((float)elapsedTime / 60) - minutes) * 60;
playback = totalTime - elapsedTime;
minutesR = (int)playback / 60;
secondsR = (((float)playback / 60) - minutesR) * 60;
myGLCD.setFont(SmallFont);
myGLCD.setColor(255, 255, 255);
myGLCD.printNumI(minutes, 8, 48);
myGLCD.print(":", 16, 48);
myGLCD.printNumI((int)seconds, 24, 48, 2, '0');
myGLCD.print("-", 276, 48);
myGLCD.printNumI(minutesR, 284, 48);
myGLCD.print(":", 292, 48);
myGLCD.printNumI((int)secondsR, 300, 48, 2, '0');
int trackBarX = map(elapsedTime, 0, totalTime, 0, 224);
myGLCD.setColor(255, 0, 0);
myGLCD.fillRect (48, 50, 48 + trackBarX, 50 + 8);
if (totalTime == elapsedTime) {
mp3.nextTrack();
delay(30);
myGLCD.setColor(255, 255, 255);
myGLCD.fillRect (48, 50, 48 + 224, 50 + 8);
}
}
void printClock(int x, int y) {
if ( currentClock != rtc.getTimeStr()) {
myGLCD.print(rtc.getTimeStr(), x, y);
currentClock = rtc.getTimeStr();
}
}
void drawColon() {
myGLCD.setColor(0, 255, 0);
myGLCD.fillCircle (112, 65, 4);
myGLCD.setColor(0, 255, 0);
myGLCD.fillCircle (112, 85, 4);
myGLCD.setColor(0, 255, 0);
myGLCD.fillCircle (208, 65, 4);
myGLCD.setColor(0, 255, 0);
myGLCD.fillCircle (208, 85, 4);
}
void drawHomeClock() {
timeString = rtc.getTimeStr();
currentHours = timeString.substring(0, 2);
currentMinutes = timeString.substring(3, 5);
currentSeconds = timeString.substring(6, 8);
myGLCD.setFont(SevenSegNumFont);
myGLCD.setColor(0, 255, 0);
myGLCD.print(currentSeconds, 224, 50);
myGLCD.print(currentMinutes, 128, 50);
myGLCD.print(currentHours, 32, 50);
drawColon();
}Code language: Arduino (arduino)
Proceso de manufactura
- Reloj de visión pov de Arduino
- Reloj maestro
- Arduino Temp. Monitor y reloj en tiempo real con pantalla 3.2
- Reproducir audio en Arduino
- TM1637 Reloj digital con configuración de hora y funcionalidad de alarma
- Arduino - Reproductor de MP3 basado en la web
- Tech-TicTacToe
- Voltímetro de bricolaje con Arduino y una pantalla Nokia 5110
- Temporizador de cuenta atrás de Arduino
- eDOT - Reloj de precisión y estación meteorológica basados en Arduino
- Reloj despertador simple con DS1302 RTC