


Tutorial de pantalla táctil de Arduino | LCD TFT
En este tutorial de pantalla táctil Arduino, aprenderemos a usar la pantalla táctil TFT LCD con Arduino. Puede ver el siguiente video o leer el tutorial escrito a continuación.
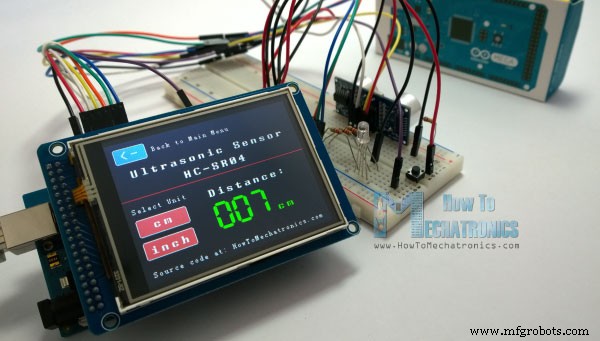
Para este tutorial compuse tres ejemplos. El primer ejemplo es la medición de distancia usando un sensor ultrasónico. La salida del sensor, o la distancia, se imprime en la pantalla y mediante la pantalla táctil podemos seleccionar las unidades, ya sean centímetros o pulgadas.
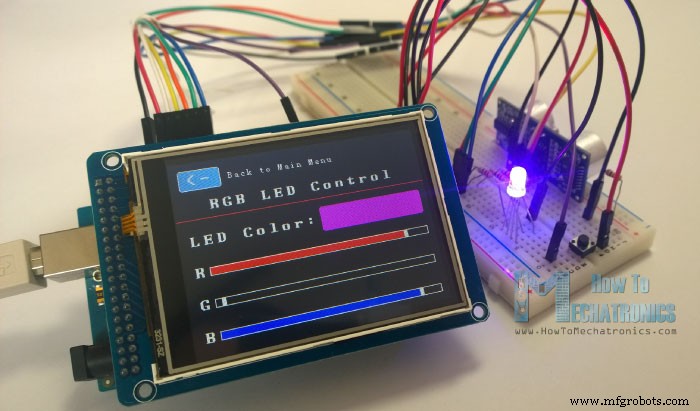
El siguiente ejemplo es controlar un LED RGB utilizando estos tres controles deslizantes RGB. Por ejemplo si empezamos a deslizar el deslizador azul, el LED se encenderá en azul y aumentará la luz como iríamos al valor máximo. Por lo tanto, los controles deslizantes pueden moverse de 0 a 255 y, con su combinación, podemos establecer cualquier color en el LED RGB, pero tenga en cuenta que el LED no puede representar los colores con tanta precisión.
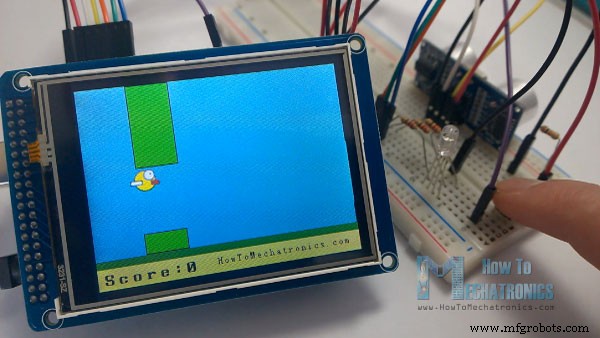
El tercer ejemplo es un juego. En realidad es una réplica del popular juego Flappy Bird para smartphones. Podemos jugar al juego mediante el pulsador o incluso mediante la propia pantalla táctil.
Ahora repasaremos cada uno de estos ejemplos y explicaremos paso a paso los códigos detrás de ellos.
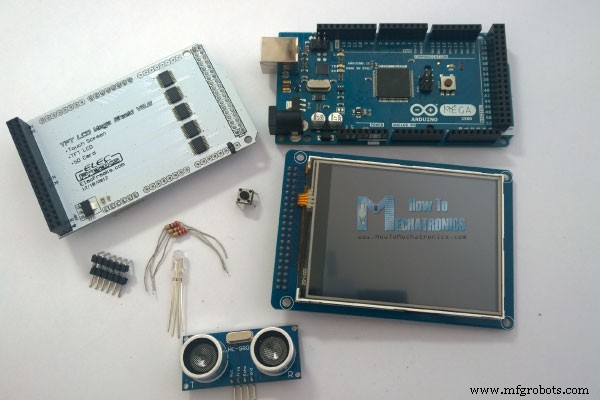
Como ejemplo, estoy usando una pantalla táctil TFT de 3,2” en combinación con un Arduino Mega Shield TFT LCD. Necesitamos un escudo porque la pantalla TFT Touch funciona a 3.3V y las salidas de Arduino Mega son de 5 V. Para el primer ejemplo tengo el sensor ultrasónico HC-SR04, luego para el segundo ejemplo un LED RGB con tres resistencias y un botón pulsador para el ejemplo del juego. También tuve que hacer un cabezal de clavija personalizado como este, soldando los cabezales de clavija y doblándolos para poder insertarlos entre la placa Arduino y el escudo TFT.
Puede obtener estos componentes en cualquiera de los siguientes sitios:
Aquí está el esquema del circuito. Usaremos el pin GND, los pines digitales del 8 al 13, así como el pin número 14. Como los pines de 5V ya son usados por la pantalla TFT, usaré el pin número 13 como VCC, poniéndolo inmediatamente alto en la sección de configuración del código.
Como el código es un poco más largo y para una mejor comprensión, publicaré el código fuente del programa en secciones con descripción para cada sección. Y al final de este artículo publicaré el código fuente completo.
Usaré las bibliotecas UTFT y URTouch creadas por Henning Karlsen. Aquí me gustaría darle las gracias por el increíble trabajo que ha realizado. Las bibliotecas permiten un uso realmente fácil de las pantallas TFT y funcionan con muchos tamaños, protectores y controladores de pantallas TFT diferentes. Puede descargar estas bibliotecas desde su sitio web, RinkyDinkElectronics.com y también encontrar muchos ejemplos de demostración y documentación detallada sobre cómo usarlas.
Después de incluir las bibliotecas, necesitamos crear objetos UTFT y URTouch. Los parámetros de estos objetos dependen del modelo de TFT Screen and Shield y estos detalles también se pueden encontrar en la documentación de las bibliotecas.
A continuación, debemos definir las fuentes que vienen con las bibliotecas y también definir algunas variables necesarias para el programa. En la sección de configuración, debemos iniciar la pantalla y el toque, definir los modos de pin para el sensor conectado, el LED y el botón, e inicialmente llamar a la función personalizada drawHomeSreen(), que dibujará la pantalla de inicio del programa.
Así que ahora explicaré cómo podemos hacer la pantalla de inicio del programa. Con la función setBackColor() necesitamos establecer el color de fondo del texto, negro en nuestro caso. Luego, debemos configurar el color en blanco, configurar la fuente grande y usar la función imprimir (), imprimiremos la cadena "Arduino TFT Tutorial" en el centro de la pantalla y 10 píxeles hacia abajo en el eje Y de la pantalla. A continuación, estableceremos el color en rojo y dibujaremos la línea roja debajo del texto. Después de eso, debemos volver a establecer el color en blanco e imprimir las otras dos cadenas, "por HowToMechatronics.com" con la fuente pequeña y "Seleccionar ejemplo" con la fuente grande.
El siguiente es el botón del sensor de distancia. Primero necesitamos establecer el color y luego usando la función fillRoundRect() dibujaremos el rectángulo redondeado. Luego, volveremos a establecer el color en blanco y, usando la función drawRoundRect(), dibujaremos otro rectángulo redondeado encima del anterior, pero este no tendrá relleno, por lo que la apariencia general del botón parecerá que tiene un marco. . Encima del botón imprimiremos el texto usando la fuente grande y el mismo color de fondo que el relleno del botón. El mismo procedimiento se aplica a los otros dos botones.
Ahora necesitamos hacer que los botones sean funcionales para que cuando los presionemos nos envíen al ejemplo apropiado. En la sección de configuración, establecemos el carácter '0' en la variable página actual, lo que indicará que estamos en la pantalla de inicio. Entonces, si eso es cierto, y si presionamos en la pantalla, esta declaración if se volvería verdadera y usando estas líneas aquí obtendremos las coordenadas X e Y donde se presionó la pantalla. Si esa es el área que cubre el primer botón, llamaremos a la función personalizada drawDistanceSensor() que activará el ejemplo del sensor de distancia. También estableceremos el carácter '1' en la variable currentPage, lo que indicará que estamos en el primer ejemplo. La función personalizada drawFrame() se usa para resaltar el botón cuando se presiona. El mismo procedimiento se aplica a los otros dos botones.
Por lo tanto, la función personalizada drawDistanceSensor() debe llamarse solo una vez cuando se presiona el botón para dibujar todos los gráficos de este ejemplo de manera similar a como lo describimos para la pantalla de inicio. Sin embargo, la función personalizada getDistance() debe llamarse repetidamente para imprimir los últimos resultados de la distancia medida por el sensor.
Aquí está esa función que usa el sensor ultrasónico para calcular la distancia e imprimir los valores con fuente SevenSegNum en color verde, ya sea en centímetros o pulgadas. Si necesita más detalles sobre cómo funciona el sensor ultrasónico, puede consultar mi tutorial particular para eso. De vuelta en la sección de bucle, podemos ver lo que sucede cuando presionamos los botones de selección de unidades, así como el botón de retroceso.
Ok, el siguiente es el ejemplo de control de LED RGB. Si presionamos el segundo botón, la función personalizada drawLedControl() se llamará solo una vez para dibujar el gráfico de ese ejemplo y la función personalizada setLedColor() se llamará repetidamente. En esta función usamos la pantalla táctil para establecer los valores de los 3 controles deslizantes de 0 a 255. Con las declaraciones if limitamos el área de cada control deslizante y obtenemos el valor X del control deslizante. Entonces, los valores de la coordenada X de cada control deslizante son de 38 a 310 píxeles y debemos asignar estos valores a valores de 0 a 255 que se usarán como una señal PWM para encender el LED. Si necesita más detalles sobre cómo funciona el LED RGB, puede consultar mi tutorial particular para eso. El resto del código en esta función personalizada es para dibujar los controles deslizantes. De vuelta en la sección de bucle, solo tenemos el botón Atrás que también apaga el LED cuando se presiona.
El siguiente es el ejemplo del juego Arduino, pero lo dejaré para mi próximo tutorial para que podamos entenderlo mejor, ya que es un poco más complejo.
Para que el código funcione y compile, deberá incluir un archivo adicional ".c" en el mismo directorio con el boceto de Arduino. Este archivo es para el ejemplo del tercer juego y es un mapa de bits del pájaro. Para más detalles sobre cómo funciona esta parte del código, puedes consultar mi tutorial particular. Aquí puede descargar ese archivo:
Aquí está el código fuente completo del programa: Resumen
Piezas necesarias para esta pantalla táctil Arduino
Código de pantalla táctil de Arduino
#include <UTFT.h>
#include <URTouch.h>

//==== Creating Objects
UTFT    myGLCD(SSD1289,38,39,40,41); //Parameters should be adjusted to your Display/Schield model
URTouch  myTouch( 6, 5, 4, 3, 2);

//==== Defining Variables
extern uint8_t SmallFont[];
extern uint8_t BigFont[];
extern uint8_t SevenSegNumFont[];

extern unsigned int bird01[0x41A];

int x, y;

char currentPage, selectedUnit;

//Ultrasonic Sensor
const int VCC = 13;
const int trigPin = 11;
const int echoPin = 12;

long duration;
int distanceInch, distanceCm;

// RGB LEDs
const int redLed = 10;
const int greenLed = 9;
const int blueLed = 8;
int xR=38;
int xG=38;
int xB=38;

// Floppy Bird
int xP = 319;
int yP = 100;
int yB = 30;
int fallRateInt = 0;
float fallRate =0;
int score=0;
const int button = 14;
int buttonState = 0;

void setup() {
// Initial setup
  myGLCD.InitLCD();
  myGLCD.clrScr();
  myTouch.InitTouch();
  myTouch.setPrecision(PREC_MEDIUM);

  // Defining Pin Modes
  pinMode(VCC, OUTPUT); // VCC
  pinMode(trigPin, OUTPUT); // Sets the trigPin as an Output
  pinMode(echoPin, INPUT); // Sets the echoPin as an Input
  pinMode(redLed, OUTPUT);
  pinMode(greenLed, OUTPUT);
  pinMode(blueLed, OUTPUT);
  pinMode(button, INPUT);
  digitalWrite(VCC, HIGH); // +5V - Pin 13 as VCC

  drawHomeScreen();  // Draws the Home Screen
  currentPage = '0'; // Indicates that we are at Home Screen
  selectedUnit = '0'; // Indicates the selected unit for the first example, cms or inches
}Code language: Arduino (arduino)// drawHomeScreen - Custom Function
void drawHomeScreen() {
// Title
myGLCD.setBackColor(0,0,0); // Sets the background color of the area where the text will be printed to black
myGLCD.setColor(255, 255, 255); // Sets color to white
myGLCD.setFont(BigFont); // Sets font to big
myGLCD.print("Arduino TFT Tutorial", CENTER, 10); // Prints the string on the screen
myGLCD.setColor(255, 0, 0); // Sets color to red
myGLCD.drawLine(0,32,319,32); // Draws the red line
myGLCD.setColor(255, 255, 255); // Sets color to white
myGLCD.setFont(SmallFont); // Sets the font to small
myGLCD.print("by HowToMechatronics.com", CENTER, 41); // Prints the string
myGLCD.setFont(BigFont);
myGLCD.print("Select Example", CENTER, 64);
// Button - Distance Sensor
myGLCD.setColor(16, 167, 103); // Sets green color
myGLCD.fillRoundRect (35, 90, 285, 130); // Draws filled rounded rectangle
myGLCD.setColor(255, 255, 255); // Sets color to white
myGLCD.drawRoundRect (35, 90, 285, 130); // Draws rounded rectangle without a fill, so the overall appearance of the button looks like it has a frame
myGLCD.setFont(BigFont); // Sets the font to big
myGLCD.setBackColor(16, 167, 103); // Sets the background color of the area where the text will be printed to green, same as the button
myGLCD.print("DISTANCE SENSOR", CENTER, 102); // Prints the string
// Button - RGB LED Control
myGLCD.setColor(16, 167, 103);
myGLCD.fillRoundRect (35, 140, 285, 180);
myGLCD.setColor(255, 255, 255);
myGLCD.drawRoundRect (35, 140, 285, 180);
myGLCD.setFont(BigFont);
myGLCD.setBackColor(16, 167, 103);
myGLCD.print("RGB LED CONTROL", CENTER, 152);
// Button - Birduino
myGLCD.setColor(16, 167, 103);
myGLCD.fillRoundRect (35, 190, 285, 230);
myGLCD.setColor(255, 255, 255);
myGLCD.drawRoundRect (35, 190, 285, 230);
myGLCD.setFont(BigFont);
myGLCD.setBackColor(16, 167, 103);
myGLCD.print("BIRDUINO GAME", CENTER, 202);
}Code language: Arduino (arduino)//========== The loop section ========
void loop() {
// Home Screen
if (currentPage == '0') {
if (myTouch.dataAvailable()) {
myTouch.read();
x=myTouch.getX(); // X coordinate where the screen has been pressed
y=myTouch.getY(); // Y coordinates where the screen has been pressed
// If we press the Distance Sensor Button
if ((x>=35) && (x<=285) && (y>=90) && (y<=130)) {
drawFrame(35, 90, 285, 130); // Custom Function -Highlighs the buttons when it's pressed
currentPage = '1'; // Indicates that we are the first example
myGLCD.clrScr(); // Clears the screen
drawDistanceSensor(); // It is called only once, because in the next iteration of the loop, this above if statement will be false so this funtion won't be called. This function will draw the graphics of the first example.
}
// If we press the RGB LED Control Button
if ((x>=35) && (x<=285) && (y>=140) && (y<=180)) {
drawFrame(35, 140, 285, 180);
currentPage = '2';
myGLCD.clrScr();
drawLedControl();
}
// If we press the Birduino Game Button
if ((x>=35) && (x<=285) && (y>=190) && (y<=230)) {
drawFrame(35, 190, 285, 230);
currentPage = '3';
myGLCD.clrScr();
myGLCD.setColor(114, 198, 206);
myGLCD.fillRect(0,0,319,239);
drawGround();
drawPilars(xP,yP);
drawBird(30);
delay(1000);
}
}
}
// Distance Sensor Example
if (currentPage == '1') {
getDistance(); // Gets distance from the sensor and this function is repeatedly called while we are at the first example in order to print the lasest results from the distance sensor
if (myTouch.dataAvailable()) {
myTouch.read();
x=myTouch.getX();
y=myTouch.getY();
// If we press the Centimeters Button
if ((x>=10) && (x<=135) &&(y>=90) && (y<=163)) {
selectedUnit = '0';
}
// If we press the Inches Button
if ((x>=10) && (x<=135) &&(y>=173) && (y<=201)) {
selectedUnit = '1';
}
// If we press the Back Button
if ((x>=10) && (x<=60) &&(y>=10) && (y<=36)) {
drawFrame(10, 10, 60, 36);
currentPage = '0'; // Indicates we are at home screen
myGLCD.clrScr();
drawHomeScreen(); // Draws the home screen
}
}
}
// RGB LED Control
if (currentPage == '2') {
setLedColor();
if (myTouch.dataAvailable()) {
myTouch.read();
x=myTouch.getX();
y=myTouch.getY();
//Back button
if ((x>=10) && (x<=60) &&(y>=10) && (y<=36)) {
drawFrame(10, 10, 60, 36);
currentPage = '0';
myGLCD.clrScr();
drawHomeScreen();
// Turns the LED off
analogWrite(redLed, 0);
analogWrite(greenLed, 0);
analogWrite(blueLed, 0);
}
}
}
//==== This section of the code, for the game example, is explained in my next tutorial
// Birduino Game
if (currentPage == '3') {
//delay(1);
xP=xP-3;
drawPilars(xP, yP);
yB+=fallRateInt;
fallRate=fallRate+0.4;
fallRateInt= int(fallRate);
if (yB>=220) {
yB=220;
}
if(yB>=180 || yB<=0){
restartGame();
}
if((xP<=85) && (xP>=30) && (yB<=yP-2)){
restartGame();
}
if((xP<=85) && (xP>=30) && (yB>=yP+60)){
restartGame();
}
drawBird(yB);
if (xP<=-51){
xP=319;
yP = rand() % 100+20;
score++;
}
if (myTouch.dataAvailable()) {
myTouch.read();
x=myTouch.getX();
y=myTouch.getY();
if ((x>=0) && (x<=319) &&(y>=50) && (y<=239)) {
fallRate=-5;
}
}
buttonState = digitalRead(button);
if (buttonState == HIGH) {
fallRate=-5;
}
}
if (myTouch.dataAvailable()) {
myTouch.read();
x=myTouch.getX();
y=myTouch.getY();
if ((x>=10) && (x<=60) &&(y>=10) && (y<=36)) {
drawFrame(10, 10, 60, 36);
currentPage = '0';
myGLCD.clrScr();
drawHomeScreen();
analogWrite(redLed, 0);
analogWrite(greenLed, 0);
analogWrite(blueLed, 0);
}
}
}Code language: Arduino (arduino)//===== getDistance() - Custom Function
void getDistance() {
// Clears the trigPin
digitalWrite(trigPin, LOW);
delayMicroseconds(2);
// Sets the trigPin on HIGH state for 10 micro seconds
digitalWrite(trigPin, HIGH);
delayMicroseconds(10);
digitalWrite(trigPin, LOW);
// Reads the echoPin, returns the sound wave travel time in microseconds
duration = pulseIn(echoPin, HIGH);
// Calculating the distance
distanceCm= duration*0.034/2;
distanceInch= distanceCm/2.53;
// Prints the distance in centimeters
if (selectedUnit == '0' && distanceCm <=400) {
myGLCD.setFont(SevenSegNumFont);
myGLCD.setColor(0, 255, 0);
myGLCD.setBackColor(0, 0, 0);
myGLCD.printNumI(distanceCm,130, 145, 3,'0');
myGLCD.setFont(BigFont);
myGLCD.print("cm ", 235, 178);
}
// Prints the distance in inches
if (selectedUnit == '1' && distanceCm <=160) {
myGLCD.setFont(SevenSegNumFont);
myGLCD.setColor(0, 255, 0);
myGLCD.setBackColor(0, 0, 0);
myGLCD.printNumI(distanceInch,130, 145, 3,'0');
myGLCD.setFont(BigFont);
myGLCD.print("inch", 235, 178);
}
delay(10);
}Code language: Arduino (arduino)//============= setLedColor() - Custom Funtion
void setLedColor() {
if (myTouch.dataAvailable()) {
myTouch.read();
x=myTouch.getX();
y=myTouch.getY();
// Area of the Red color slider
if( (y>=130) && (y<=156)) {
xR=x; // Stores the X value where the screen has been pressed in to variable xR
if (xR<=38) { // Confines the area of the slider to be above 38 pixels
xR=38;
}
if (xR>=303){ /// Confines the area of the slider to be under 310 pixels
xR=303;
}
}
// Area of the Green color slider
if( (y>=170) && (y<=196)) {
xG=x;
if (xG<=38) {
xG=38;
}
if (xG>=303){
xG=303;
}
}
// Area of the Blue color slider
if( (y>=210) && (y<=236)) {
xB=x;
if (xB<=38) {
xB=38;
}
if (xB>=303){
xB=303;
}
}
}
// Maps the values of the X - Axis from 38 to 0 and 310 to 255, because we need values from 0 to 255 for turning on the led
int xRC = map(xR,38,310,0,255);
int xGC = map(xG,38,310,0,255);
int xBC = map(xB,38,310,0,255);
// Sends PWM signal to the pins of the led
analogWrite(redLed, xRC);
analogWrite(greenLed, xGC);
analogWrite(blueLed, xBC);
// Draws a rectangle with the latest color combination
myGLCD.setColor(xRC, xGC, xBC);
myGLCD.fillRoundRect(175, 87, 310, 119);
// Draws the positioners
myGLCD.setColor(255, 255, 255);
myGLCD.fillRect(xR,139,(xR+4),147); // Positioner
myGLCD.setColor(xRC, 0, 0);
myGLCD.fillRect(31, 139, (xR-1), 147);
myGLCD.setColor(0, 0, 0);
myGLCD.fillRect((xR+5), 139, 309, 147);
myGLCD.setColor(255, 255, 255);
myGLCD.fillRect(xG,179,(xG+4),187);
myGLCD.setColor(0, xGC, 0);
myGLCD.fillRect(31, 179, (xG-1), 187);
myGLCD.setColor(0, 0, 0);
myGLCD.fillRect((xG+5), 179, 309, 187);
myGLCD.setColor(255, 255, 255);
myGLCD.fillRect(xB,219,(xB+4),227);
myGLCD.setColor(0, 0, xBC);
myGLCD.fillRect(31, 219, (xB-1), 227);
myGLCD.setColor(0, 0, 0);
myGLCD.fillRect((xB+5), 219, 309, 227);
}Code language: Arduino (arduino)Código fuente completo del programa
Archivos Tutoriales Arduino TFT
1 archivo(s) 6.07 KB Descargar /* Arduino TFT Tutorial
* Program made by Dejan Nedelkovski,
* www.HowToMechatronics.com
*/
/* This program uses the UTFT and URTouch libraries
* made by Henning Karlsen.
* You can find and download them at:
* www.RinkyDinkElectronics.com
*/
#include <UTFT.h>
#include <URTouch.h>
//==== Creating Objects
UTFT myGLCD(SSD1289,38,39,40,41); //Parameters should be adjusted to your Display/Schield model
URTouch myTouch( 6, 5, 4, 3, 2);
//==== Defining Variables
extern uint8_t SmallFont[];
extern uint8_t BigFont[];
extern uint8_t SevenSegNumFont[];
extern unsigned int bird01[0x41A];
int x, y;
char currentPage, selectedUnit;
//Ultrasonic Sensor
const int VCC = 13;
const int trigPin = 11;
const int echoPin = 12;
long duration;
int distanceInch, distanceCm;
// RGB LEDs
const int redLed = 10;
const int greenLed = 9;
const int blueLed = 8;
int xR=38;
int xG=38;
int xB=38;
// Floppy Bird
int xP = 319;
int yP = 100;
int yB = 30;
int fallRateInt = 0;
float fallRate =0;
int score=0;
const int button = 14;
int buttonState = 0;
void setup() {
// Initial setup
myGLCD.InitLCD();
myGLCD.clrScr();
myTouch.InitTouch();
myTouch.setPrecision(PREC_MEDIUM);
// Defining Pin Modes
pinMode(VCC, OUTPUT); // VCC
pinMode(trigPin, OUTPUT); // Sets the trigPin as an Output
pinMode(echoPin, INPUT); // Sets the echoPin as an Input
pinMode(redLed, OUTPUT);
pinMode(greenLed, OUTPUT);
pinMode(blueLed, OUTPUT);
pinMode(button, INPUT);
digitalWrite(VCC, HIGH); // +5V - Pin 13 as VCC
drawHomeScreen(); // Draws the Home Screen
currentPage = '0'; // Indicates that we are at Home Screen
selectedUnit = '0'; // Indicates the selected unit for the first example, cms or inches
}
void loop() {
// Home Screen
if (currentPage == '0') {
if (myTouch.dataAvailable()) {
myTouch.read();
x=myTouch.getX(); // X coordinate where the screen has been pressed
y=myTouch.getY(); // Y coordinates where the screen has been pressed
// If we press the Distance Sensor Button
if ((x>=35) && (x<=285) && (y>=90) && (y<=130)) {
drawFrame(35, 90, 285, 130); // Custom Function -Highlighs the buttons when it's pressed
currentPage = '1'; // Indicates that we are the first example
myGLCD.clrScr(); // Clears the screen
drawDistanceSensor(); // It is called only once, because in the next iteration of the loop, this above if statement will be false so this funtion won't be called. This function will draw the graphics of the first example.
}
// If we press the RGB LED Control Button
if ((x>=35) && (x<=285) && (y>=140) && (y<=180)) {
drawFrame(35, 140, 285, 180);
currentPage = '2';
myGLCD.clrScr();
drawLedControl();
}
// If we press the Birduino Game Button
if ((x>=35) && (x<=285) && (y>=190) && (y<=230)) {
drawFrame(35, 190, 285, 230);
currentPage = '3';
myGLCD.clrScr();
myGLCD.setColor(114, 198, 206);
myGLCD.fillRect(0,0,319,239);
drawGround();
drawPilars(xP,yP);
drawBird(30);
delay(1000);
}
}
}
// Distance Sensor Example
if (currentPage == '1') {
getDistance(); // Gets distance from the sensor and this function is repeatedly called while we are at the first example in order to print the lasest results from the distance sensor
if (myTouch.dataAvailable()) {
myTouch.read();
x=myTouch.getX();
y=myTouch.getY();
// If we press the Centimeters Button
if ((x>=10) && (x<=135) &&(y>=90) && (y<=163)) {
selectedUnit = '0';
}
// If we press the Inches Button
if ((x>=10) && (x<=135) &&(y>=173) && (y<=201)) {
selectedUnit = '1';
}
// If we press the Back Button
if ((x>=10) && (x<=60) &&(y>=10) && (y<=36)) {
drawFrame(10, 10, 60, 36);
currentPage = '0'; // Indicates we are at home screen
myGLCD.clrScr();
drawHomeScreen(); // Draws the home screen
}
}
}
// RGB LED Control
if (currentPage == '2') {
setLedColor();
if (myTouch.dataAvailable()) {
myTouch.read();
x=myTouch.getX();
y=myTouch.getY();
//Back button
if ((x>=10) && (x<=60) &&(y>=10) && (y<=36)) {
drawFrame(10, 10, 60, 36);
currentPage = '0';
myGLCD.clrScr();
drawHomeScreen();
// Turns the LED off
analogWrite(redLed, 0);
analogWrite(greenLed, 0);
analogWrite(blueLed, 0);
}
}
}
//==== This section of the code, for the game example, is explained in my next tutorial
// Birduino Game
if (currentPage == '3') {
//delay(1);
xP=xP-3;
drawPilars(xP, yP);
yB+=fallRateInt;
fallRate=fallRate+0.4;
fallRateInt= int(fallRate);
if (yB>=220) {
yB=220;
}
if(yB>=180 || yB<=0){
restartGame();
}
if((xP<=85) && (xP>=30) && (yB<=yP-2)){
restartGame();
}
if((xP<=85) && (xP>=30) && (yB>=yP+60)){
restartGame();
}
drawBird(yB);
if (xP<=-51){
xP=319;
yP = rand() % 100+20;
score++;
}
if (myTouch.dataAvailable()) {
myTouch.read();
x=myTouch.getX();
y=myTouch.getY();
if ((x>=0) && (x<=319) &&(y>=50) && (y<=239)) {
fallRate=-5;
}
}
buttonState = digitalRead(button);
if (buttonState == HIGH) {
fallRate=-5;
}
}
if (myTouch.dataAvailable()) {
myTouch.read();
x=myTouch.getX();
y=myTouch.getY();
if ((x>=10) && (x<=60) &&(y>=10) && (y<=36)) {
drawFrame(10, 10, 60, 36);
currentPage = '0';
myGLCD.clrScr();
drawHomeScreen();
analogWrite(redLed, 0);
analogWrite(greenLed, 0);
analogWrite(blueLed, 0);
}
}
}
// ====== Custom Funtions ======
// drawHomeScreen - Custom Function
void drawHomeScreen() {
// Title
myGLCD.setBackColor(0,0,0); // Sets the background color of the area where the text will be printed to black
myGLCD.setColor(255, 255, 255); // Sets color to white
myGLCD.setFont(BigFont); // Sets font to big
myGLCD.print("Arduino TFT Tutorial", CENTER, 10); // Prints the string on the screen
myGLCD.setColor(255, 0, 0); // Sets color to red
myGLCD.drawLine(0,32,319,32); // Draws the red line
myGLCD.setColor(255, 255, 255); // Sets color to white
myGLCD.setFont(SmallFont); // Sets the font to small
myGLCD.print("by HowToMechatronics.com", CENTER, 41); // Prints the string
myGLCD.setFont(BigFont);
myGLCD.print("Select Example", CENTER, 64);
// Button - Distance Sensor
myGLCD.setColor(16, 167, 103); // Sets green color
myGLCD.fillRoundRect (35, 90, 285, 130); // Draws filled rounded rectangle
myGLCD.setColor(255, 255, 255); // Sets color to white
myGLCD.drawRoundRect (35, 90, 285, 130); // Draws rounded rectangle without a fill, so the overall appearance of the button looks like it has a frame
myGLCD.setFont(BigFont); // Sets the font to big
myGLCD.setBackColor(16, 167, 103); // Sets the background color of the area where the text will be printed to green, same as the button
myGLCD.print("DISTANCE SENSOR", CENTER, 102); // Prints the string
// Button - RGB LED Control
myGLCD.setColor(16, 167, 103);
myGLCD.fillRoundRect (35, 140, 285, 180);
myGLCD.setColor(255, 255, 255);
myGLCD.drawRoundRect (35, 140, 285, 180);
myGLCD.setFont(BigFont);
myGLCD.setBackColor(16, 167, 103);
myGLCD.print("RGB LED CONTROL", CENTER, 152);
// Button - Birduino
myGLCD.setColor(16, 167, 103);
myGLCD.fillRoundRect (35, 190, 285, 230);
myGLCD.setColor(255, 255, 255);
myGLCD.drawRoundRect (35, 190, 285, 230);
myGLCD.setFont(BigFont);
myGLCD.setBackColor(16, 167, 103);
myGLCD.print("BIRDUINO GAME", CENTER, 202);
}
// Highlights the button when pressed
void drawFrame(int x1, int y1, int x2, int y2) {
myGLCD.setColor(255, 0, 0);
myGLCD.drawRoundRect (x1, y1, x2, y2);
while (myTouch.dataAvailable())
myTouch.read();
myGLCD.setColor(255, 255, 255);
myGLCD.drawRoundRect (x1, y1, x2, y2);
}
//====================================================
void drawDistanceSensor() {
myGLCD.setColor(100, 155, 203);
myGLCD.fillRoundRect (10, 10, 60, 36);
myGLCD.setColor(255, 255, 255);
myGLCD.drawRoundRect (10, 10, 60, 36);
myGLCD.setFont(BigFont);
myGLCD.setBackColor(100, 155, 203);
myGLCD.print("<-", 18, 15);
myGLCD.setBackColor(0, 0, 0);
myGLCD.setFont(SmallFont);
myGLCD.print("Back to Main Menu", 70, 18);
myGLCD.setFont(BigFont);
myGLCD.print("Ultrasonic Sensor", CENTER, 50);
myGLCD.print("HC-SR04", CENTER, 76);
myGLCD.setColor(255, 0, 0);
myGLCD.drawLine(0,100,319,100);
myGLCD.setBackColor(0, 0, 0);
myGLCD.setColor(255, 255, 255);
myGLCD.setFont(SmallFont);
myGLCD.print("Select Unit", 10, 114);
myGLCD.setFont(BigFont);
myGLCD.print("Distance:", 130, 120);
myGLCD.setColor(223, 77, 55);
myGLCD.fillRoundRect (10, 135, 90, 163);
myGLCD.setColor(225, 255, 255);
myGLCD.drawRoundRect (10, 135, 90, 163);
myGLCD.setBackColor(223, 77, 55);
myGLCD.setColor(255, 255, 255);
myGLCD.print("cm", 33, 140);
myGLCD.setColor(223, 77, 55);
myGLCD.fillRoundRect (10, 173, 90, 201);
myGLCD.setColor(255, 255, 255);
myGLCD.drawRoundRect (10, 173, 90, 201);
myGLCD.setBackColor(223, 77, 55);
myGLCD.setColor(255, 255, 255);
myGLCD.print("inch", 17, 180);
myGLCD.setBackColor(0, 0, 0);
myGLCD.setFont(SmallFont);
myGLCD.print("Source code at: HowToMechatronics.com", CENTER, 220);
}
//====================================================
//===== getDistance - Custom Function
void getDistance() {
// Clears the trigPin
digitalWrite(trigPin, LOW);
delayMicroseconds(2);
// Sets the trigPin on HIGH state for 10 micro seconds
digitalWrite(trigPin, HIGH);
delayMicroseconds(10);
digitalWrite(trigPin, LOW);
// Reads the echoPin, returns the sound wave travel time in microseconds
duration = pulseIn(echoPin, HIGH);
// Calculating the distance
distanceCm= duration*0.034/2;
distanceInch= distanceCm/2.53;
// Prints the distance in centimeters
if (selectedUnit == '0' && distanceCm <=400) {
myGLCD.setFont(SevenSegNumFont);
myGLCD.setColor(0, 255, 0);
myGLCD.setBackColor(0, 0, 0);
myGLCD.printNumI(distanceCm,130, 145, 3,'0');
myGLCD.setFont(BigFont);
myGLCD.print("cm ", 235, 178);
}
// Prints the distance in inches
if (selectedUnit == '1' && distanceCm <=160) {
myGLCD.setFont(SevenSegNumFont);
myGLCD.setColor(0, 255, 0);
myGLCD.setBackColor(0, 0, 0);
myGLCD.printNumI(distanceInch,130, 145, 3,'0');
myGLCD.setFont(BigFont);
myGLCD.print("inch", 235, 178);
}
delay(10);
}
//====================================================
void drawLedControl() {
myGLCD.setColor(100, 155, 203);
myGLCD.fillRoundRect (10, 10, 60, 36);
myGLCD.setColor(255, 255, 255);
myGLCD.drawRoundRect (10, 10, 60, 36);
myGLCD.setFont(BigFont);
myGLCD.setBackColor(100, 155, 203);
myGLCD.print("<-", 18, 15);
myGLCD.setBackColor(0, 0, 0);
myGLCD.setFont(SmallFont);
myGLCD.print("Back to Main Menu", 70, 18);
myGLCD.setFont(BigFont);
myGLCD.print("RGB LED Control", CENTER, 50);
myGLCD.print("LED Color:", 10, 95);
myGLCD.print("R", 10, 135);
myGLCD.print("G", 10, 175);
myGLCD.print("B", 10, 215);
myGLCD.setColor(255, 0, 0);
myGLCD.drawLine(0,75,319,75);
myGLCD.setColor(255, 255, 255);
myGLCD.drawRect(30, 138, 310, 148); // R - Slider
myGLCD.drawRect(30, 178, 310, 188);
myGLCD.drawRect(30, 218, 310, 228);
}
//====================================================
//============= setLedColor() - Custom Funtion
void setLedColor() {
if (myTouch.dataAvailable()) {
myTouch.read();
x=myTouch.getX();
y=myTouch.getY();
// Area of the Red color slider
if( (y>=130) && (y<=156)) {
xR=x; // Stores the X value where the screen has been pressed in to variable xR
if (xR<=38) { // Confines the area of the slider to be above 38 pixels
xR=38;
}
if (xR>=303){ /// Confines the area of the slider to be under 310 pixels
xR=303;
}
}
// Area of the Green color slider
if( (y>=170) && (y<=196)) {
xG=x;
if (xG<=38) {
xG=38;
}
if (xG>=303){
xG=303;
}
}
// Area of the Blue color slider
if( (y>=210) && (y<=236)) {
xB=x;
if (xB<=38) {
xB=38;
}
if (xB>=303){
xB=303;
}
}
}
// Maps the values of the X - Axis from 38 to 0 and 310 to 255, because we need values from 0 to 255 for turning on the led
int xRC = map(xR,38,310,0,255);
int xGC = map(xG,38,310,0,255);
int xBC = map(xB,38,310,0,255);
// Sends PWM signal to the pins of the led
analogWrite(redLed, xRC);
analogWrite(greenLed, xGC);
analogWrite(blueLed, xBC);
// Draws a rectangle with the latest color combination
myGLCD.setColor(xRC, xGC, xBC);
myGLCD.fillRoundRect(175, 87, 310, 119);
// Draws the positioners
myGLCD.setColor(255, 255, 255);
myGLCD.fillRect(xR,139,(xR+4),147); // Positioner
myGLCD.setColor(xRC, 0, 0);
myGLCD.fillRect(31, 139, (xR-1), 147);
myGLCD.setColor(0, 0, 0);
myGLCD.fillRect((xR+5), 139, 309, 147);
myGLCD.setColor(255, 255, 255);
myGLCD.fillRect(xG,179,(xG+4),187);
myGLCD.setColor(0, xGC, 0);
myGLCD.fillRect(31, 179, (xG-1), 187);
myGLCD.setColor(0, 0, 0);
myGLCD.fillRect((xG+5), 179, 309, 187);
myGLCD.setColor(255, 255, 255);
myGLCD.fillRect(xB,219,(xB+4),227);
myGLCD.setColor(0, 0, xBC);
myGLCD.fillRect(31, 219, (xB-1), 227);
myGLCD.setColor(0, 0, 0);
myGLCD.fillRect((xB+5), 219, 309, 227);
}
//====================================================
void drawGround() {
myGLCD.setColor(221,216,148);
myGLCD.fillRect(0, 215, 319, 239);
myGLCD.setColor(47,175,68);
myGLCD.fillRect(0, 205, 319, 214);
myGLCD.setColor(0, 0, 0);
myGLCD.setBackColor(221, 216, 148);
myGLCD.setFont(BigFont);
myGLCD.print("Score:",5,220);
myGLCD.setFont(SmallFont);
myGLCD.print("HowToMechatronics.com", 140, 220);
}
void drawPilars(int x, int y) {
if (x>=270){
myGLCD.setColor(0, 200, 20);
myGLCD.fillRect(318, 0, x, y-1);
myGLCD.setColor(0, 0, 0);
myGLCD.drawRect(319, 0, x-1, y);
myGLCD.setColor(0, 200, 20);
myGLCD.fillRect(318, y+81, x, 203);
myGLCD.setColor(0, 0, 0);
myGLCD.drawRect(319, y+80, x-1, 204);
}
else if( x<=268) {
myGLCD.setColor(114, 198, 206);
myGLCD.fillRect(x+51, 0, x+53, y);
myGLCD.setColor(0, 200, 20);
myGLCD.fillRect(x+49, 1, x+1, y-1);
myGLCD.setColor(0, 0, 0);
myGLCD.drawRect(x+50, 0, x, y);
myGLCD.setColor(114, 198, 206);
myGLCD.fillRect(x-1, 0, x-3, y);
myGLCD.setColor(114, 198, 206);
myGLCD.fillRect(x+51, y+80, x+53, 204);
myGLCD.setColor(0, 200, 20);
myGLCD.fillRect(x+49, y+81, x+1, 203);
myGLCD.setColor(0, 0, 0);
myGLCD.drawRect(x+50, y+80, x, 204);
myGLCD.setColor(114, 198, 206);
myGLCD.fillRect(x-1, y+80, x-3, 204);
}
myGLCD.setColor(0, 0, 0);
myGLCD.setBackColor(221, 216, 148);
myGLCD.setFont(BigFont);
myGLCD.printNumI(score, 100, 220);
}
//====================================================
void drawBird(int y) {
if(y<=219) {
myGLCD.drawBitmap (50, y, 35, 30, bird01);
myGLCD.setColor(114, 198, 206);
myGLCD.fillRoundRect(50,y,85,y-6);
myGLCD.fillRoundRect(50,y+30,85,y+36);
}
else if(y>=200) {
myGLCD.drawBitmap (50, 200, 35, 30, bird01);
myGLCD.setColor(114, 198, 206);
myGLCD.fillRoundRect(50,200,85,200-6);
myGLCD.fillRoundRect(50,200+30,85,200+36);
}
}
void gameOver() {
myGLCD.clrScr();
myGLCD.setColor(255, 255, 255);
myGLCD.setBackColor(0, 0, 0);
myGLCD.setFont(BigFont);
myGLCD.print("GAME OVER", CENTER, 40);
myGLCD.print("Score:", 100, 80);
myGLCD.printNumI(score,200, 80);
myGLCD.print("Restarting...", CENTER, 120);
myGLCD.setFont(SevenSegNumFont);
myGLCD.printNumI(2,CENTER, 150);
delay(1000);
myGLCD.printNumI(1,CENTER, 150);
delay(1000);
myGLCD.setColor(114, 198, 206);
myGLCD.fillRect(0,0,319,239);
drawBird(30);
drawGround();
delay(1000);
}
//====================================================
void restartGame() {
delay(1000);
gameOver();
xP=319;
yB=30;
fallRate=0;
score=0;
}
Code language: Arduino (arduino)
Proceso de manufactura
- Tutorial de bloqueo RFID de Arduino
- Piano táctil capacitivo portátil
- Animación LCD y juegos
- ¡Visualización de una imagen en una pantalla LCD TFT con Arduino UNO!
- Mostrar imágenes BMP de la tarjeta SD en el protector TFT LCD
- Interfaz y solución de problemas táctiles en TFT LCD 2.4 ″ Shield
- Estación meteorológica Arduino
- Tutorial del sensor de huellas dactilares Arduino
- Tutorial de Arduino:Mini piano
- ¡Esquiva las Defs!
- Tutorial de Arduino 01:Primeros pasos