


Arduino Game Project – Réplica de Flappy Bird para Arduino
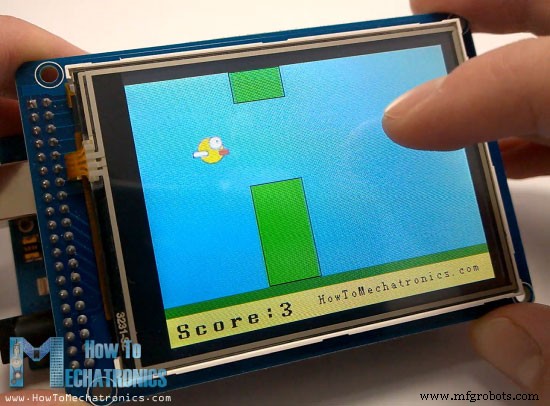
En este proyecto Arduino, crearemos un juego Arduino genial, en realidad una réplica del popular juego Flappy Bird para teléfonos inteligentes, utilizando un Arduino y una pantalla táctil TFT. Puede aprender cómo funciona viendo el siguiente video o leyendo el texto escrito a continuación.
El juego es bastante simple pero interesante y adictivo. Mediante la pantalla táctil controlamos al pájaro e intentamos esquivar los pilares móviles cuya velocidad aumenta a medida que avanzamos. Además, el juego puede almacenar tu puntuación más alta incluso si desconectas la alimentación.[/column]
En el tutorial anterior (Tutorial Arduino TFT) aprendimos en detalle cómo usar las pantallas táctiles TFT con un Arduino y dejamos el ejemplo del juego para ser explicado en este tutorial. Así que ahora, al igual que en el tutorial anterior, explicaremos paso a paso el código detrás de este juego de Arduino.
Como el código es un poco más largo y para una mejor comprensión, publicaré el código fuente del programa en secciones con descripción para cada sección. Y al final de este artículo publicaré el código fuente completo.
Usaremos las librerías UTFT y URTouch hechas por Henning Karlsen. Puede descargar estas bibliotecas desde su sitio web, www.RinkyDinkElectronics.com. También usaremos la biblioteca EEPROM para almacenar la puntuación más alta en la EEPROM. La EEPROM es una memoria que puede almacenar datos incluso cuando la placa está apagada.
Después de haber incluido las bibliotecas, necesitamos crear los objetos UTFT y URTouch, así como definir las variables necesarias para el juego. En la sección de configuración, debemos iniciar la visualización y el toque, leer la puntuación más alta de la EEPROM e iniciar el juego usando la función personalizada iniciarJuego().
Entonces, con la función personalizada iniciarJuego () dibujaremos el estado inicial del juego y así es como lo haremos. Primero debemos limpiar la pantalla, luego dibujar el fondo azul, dibujar la sección inferior, agregar el texto y llamar a la función personalizada drawBird() para dibujar el pájaro. Después de esto, necesitamos un ciclo de tiempo que evitará que el juego comience hasta que toquemos la pantalla. Entonces, mientras estamos en este estado, si presionamos la esquina superior derecha podemos restablecer la puntuación más alta a cero y si presionamos en cualquier otro lugar de la pantalla, saldremos del bucle while y entraremos en el bucle principal del código que comenzará el juego.
En la sección del bucle principal tenemos la variable xP que se usa para dibujar los pilares, así como la variable yP. Al principio la variable xP tiene el valor de 319 como el tamaño de la pantalla y la variable yP tiene el valor de 100 que es la altura del primer pilar. En cada iteración, el valor de la variable xP se reduce por el valor de la variable tasa de movimiento que al principio tiene el valor de 3 y a medida que avanzamos en el juego aumenta.
Este es el principio de funcionamiento del juego:tenemos pilares de 50 píxeles de ancho que se mueven de derecha a izquierda y cada pilar siguiente tiene una altura aleatoria diferente. Para que se muevan, lógicamente, después de cada iteración, debemos borrar la pantalla y volver a dibujar el gráfico con los pilares en su nueva posición. Sin embargo, no podemos hacerlo debido a la baja frecuencia de actualización de la pantalla, lo que provocaría parpadeo en los gráficos. Para activar todos sus píxeles, la pantalla necesita un poco más de tiempo, por lo que tendremos que improvisar y redibujar solo las cosas que se mueven.
Así que echemos un vistazo a cómo lo hará la función personalizada drawPilars(). Toma las variables xP e yP y usándolas y la función fillRect() dibujará los pilares. Entonces, cada iteración dibuja los pilares en su nueva ubicación con rectángulos azules adicionales de su lado izquierdo y derecho que limpian el pilar dibujado anteriormente y de esa manera hacemos la improvisación de simplemente volver a dibujar los pilares en movimiento. Las declaraciones if aquí son una improvisación adicional porque, por alguna razón, la función fillRect() no funcionó si su parámetro 'x2' tenía un valor fuera del tamaño de la pantalla. Además, al final de esta función personalizada, necesitamos imprimir el valor de la puntuación alcanzada.
Volviendo a la sección de bucle, tenemos la variable yB, que es la posición y del pájaro y depende de la tasa de caída que, después de cada iteración, aumenta y de esa manera obtenemos el efecto de la aceleración o la gravedad. Además, aquí verificamos si hay colisiones y usamos las instrucciones si para confinar al ave de modo que si golpea la parte superior, el suelo o los pilares, el juego terminará.
La siguiente es la función personalizada drawBird() y veamos cómo funciona. El ave es en realidad una foto que se convierte en un mapa de bits utilizando la herramienta ImageConverter565 creada por Henning Karlsen. El archivo ".c" que se crea con la herramienta debe incluirse en el directorio para que se cargue al iniciar el boceto. También tenemos que definir el mapa de bits de esta manera y usando la función drawBitmap() dibujaremos la foto en la pantalla. El pájaro tiene una coordenada X fija y la variable yB como coordenada Y. De manera similar a los pilares, aclararemos el estado anterior del pájaro dibujando dos rectángulos azules arriba y debajo del pájaro.
Volviendo al bucle, podemos ver que después de que el pilar haya pasado por la pantalla, la variable xP se restablecerá a 319, yP obtendrá un nuevo valor aleatorio de 20 a 100 para la altura de los pilares y la puntuación aumentará en uno. Con la siguiente sentencia if controlamos al pájaro. Si tocamos la pantalla, estableceremos la tasa de caída en negativo, lo que hará que el pájaro salte y la declaración else if no permitirá que suceda si solo mantenemos presionada la pantalla. La última declaración if es para la dificultad del juego y aumenta la tasa de movimiento de los pilares después de cada punto fino.
Ok, lo que queda ahora es ver cómo funciona la función personalizada gameOver(). Después de un retraso de un segundo, borrará la pantalla, imprimirá el puntaje y algún texto, si el puntaje es más alto que el puntaje más alto, lo escribirá en la EEPROM, restablecerá todas las variables a sus valores de posición inicial y al final. llamará a la función personalizada iniciarJuego() para reiniciar el juego.
Eso es todo y espero que la explicación del código haya sido lo suficientemente clara. Si tiene alguna pregunta, no dude en hacerla en la sección de comentarios a continuación.
Aquí hay un archivo de descarga con Arduino sketck, la imagen del pájaro y el archivo de mapa de bits para el pájaro.Resumen
Código fuente
 #include <UTFT.h>
#include <URTouch.h>
#include <EEPROM.h>

//==== Creating Objects
UTFT    myGLCD(SSD1289,38,39,40,41); //Parameters should be adjusted to your Display/Schield model
URTouch  myTouch( 6, 5, 4, 3, 2);

//==== Defining Fonts
extern uint8_t SmallFont[];
extern uint8_t BigFont[];
extern uint8_t SevenSegNumFont[];

extern unsigned int bird01[0x41A]; // Bird Bitmap

int x, y; // Variables for the coordinates where the display has been pressed

// Floppy Bird
int xP = 319;
int yP = 100;
int yB = 50;
int movingRate = 3;
int fallRateInt = 0;
float fallRate = 0;
int score = 0;
int lastSpeedUpScore = 0;
int highestScore;
boolean screenPressed = false;
boolean gameStarted = false;

void setup() {
  // Initiate display
  myGLCD.InitLCD();
  myGLCD.clrScr();
  myTouch.InitTouch();
  myTouch.setPrecision(PREC_MEDIUM);

  highestScore = EEPROM.read(0); // Read the highest score from the EEPROM

  initiateGame(); // Initiate the game
}Code language: Arduino (arduino)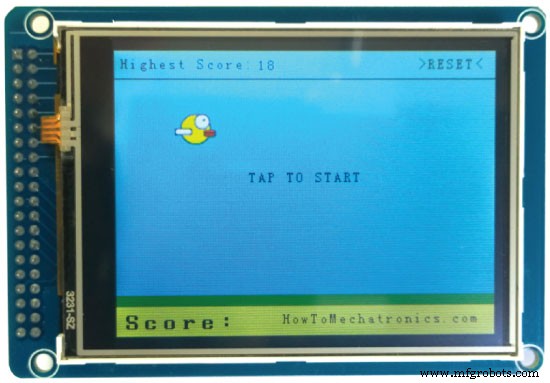
// ===== initiateGame - Custom Function
void initiateGame() {
  myGLCD.clrScr();
  // Blue background
  myGLCD.setColor(114, 198, 206);
  myGLCD.fillRect(0,0,319,239);
  // Ground
  myGLCD.setColor(221,216,148);
  myGLCD.fillRect(0, 215, 319, 239);
  myGLCD.setColor(47,175,68);
  myGLCD.fillRect(0, 205, 319, 214);
  // Text
  myGLCD.setColor(0, 0, 0);
  myGLCD.setBackColor(221, 216, 148);
  myGLCD.setFont(BigFont);
  myGLCD.print("Score:",5,220);
  myGLCD.setFont(SmallFont);
  myGLCD.print("HowToMechatronics.com", 140, 220);
  myGLCD.setColor(0, 0, 0);
  myGLCD.setBackColor(114, 198, 206);
  myGLCD.print("Highest Score: ",5,5);
  myGLCD.printNumI(highestScore, 120, 6);
  myGLCD.print(">RESET<",255,5);
  myGLCD.drawLine(0,23,319,23);
  myGLCD.print("TAP TO START",CENTER,100);

  drawBird(yB); // Draws the bird

  // Wait until we tap the sreen
  while (!gameStarted) {
    if (myTouch.dataAvailable()) {
    myTouch.read();
    x=myTouch.getX();
    y=myTouch.getY();
    // Reset higest score
    if ((x>=250) && (x<=319) &&(y>=0) && (y<=28)) {
    highestScore = 0;
    myGLCD.setColor(114, 198, 206);
    myGLCD.fillRect(120, 0, 150, 22);
    myGLCD.setColor(0, 0, 0);
    myGLCD.printNumI(highestScore, 120, 5);
    }
    if ((x>=0) && (x<=319) &&(y>=30) && (y<=239)) {
    gameStarted = true;
    myGLCD.setColor(114, 198, 206);
    myGLCD.fillRect(0, 0, 319, 32);
    }
  }
  }
  // Clears the text "TAP TO START" before the game start
  myGLCD.setColor(114, 198, 206);
  myGLCD.fillRect(85, 100, 235, 116);

}Code language: Arduino (arduino)// The Main Loop Section
void loop() {
xP=xP-movingRate; // xP - x coordinate of the pilars; range: 319 - (-51)
drawPilars(xP, yP); // Draws the pillars
// yB - y coordinate of the bird which depends on value of the fallingRate variable
yB+=fallRateInt;
fallRate=fallRate+0.4; // Each inetration the fall rate increase so that we can the effect of acceleration/ gravity
fallRateInt= int(fallRate);
// Checks for collision
if(yB>=180 || yB<=0){ // top and bottom
gameOver();
}
if((xP<=85) && (xP>=5) && (yB<=yP-2)){ // upper pillar
gameOver();
}
if((xP<=85) && (xP>=5) && (yB>=yP+60)){ // lower pillar
gameOver();
}
// Draws the bird
drawBird(yB);
// After the pillar has passed through the screen
if (xP<=-51){
xP=319; // Resets xP to 319
yP = rand() % 100+20; // Random number for the pillars height
score++; // Increase score by one
}
//==== Controlling the bird
if (myTouch.dataAvailable()&& !screenPressed) {
fallRate=-6; // Setting the fallRate negative will make the bird jump
screenPressed = true;
}
// Doesn't allow holding the screen / you must tap it
else if ( !myTouch.dataAvailable() && screenPressed){
screenPressed = false;
}
// After each five points, increases the moving rate of the pillars
if ((score - lastSpeedUpScore) == 5) {
lastSpeedUpScore = score;
movingRate++;
}
}Code language: Arduino (arduino)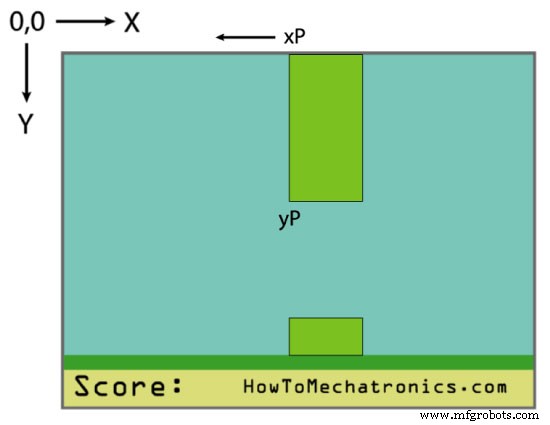
// ===== drawPlillars - Custom Function
void drawPilars(int x, int y) {
    if (x>=270){
      myGLCD.setColor(0, 200, 20);
      myGLCD.fillRect(318, 0, x, y-1);
      myGLCD.setColor(0, 0, 0);
      myGLCD.drawRect(319, 0, x-1, y);

      myGLCD.setColor(0, 200, 20);
      myGLCD.fillRect(318, y+81, x, 203);
      myGLCD.setColor(0, 0, 0);
      myGLCD.drawRect(319, y+80, x-1, 204);
    }
    else if( x<=268) {
      // Draws blue rectangle right of the pillar
      myGLCD.setColor(114, 198, 206);
      myGLCD.fillRect(x+51, 0, x+60, y);
      // Draws the pillar
      myGLCD.setColor(0, 200, 20);
      myGLCD.fillRect(x+49, 1, x+1, y-1);
      // Draws the black frame of the pillar
      myGLCD.setColor(0, 0, 0);
      myGLCD.drawRect(x+50, 0, x, y);
      // Draws the blue rectangle left of the pillar
      myGLCD.setColor(114, 198, 206);
      myGLCD.fillRect(x-1, 0, x-3, y);

      // The bottom pillar
      myGLCD.setColor(114, 198, 206);
      myGLCD.fillRect(x+51, y+80, x+60, 204);
      myGLCD.setColor(0, 200, 20);
      myGLCD.fillRect(x+49, y+81, x+1, 203);
      myGLCD.setColor(0, 0, 0);
      myGLCD.drawRect(x+50, y+80, x, 204);
      myGLCD.setColor(114, 198, 206);
      myGLCD.fillRect(x-1, y+80, x-3, 204);
  }
  // Draws the score
  myGLCD.setColor(0, 0, 0);
  myGLCD.setBackColor(221, 216, 148);
  myGLCD.setFont(BigFont);
  myGLCD.printNumI(score, 100, 220);
}Code language: Arduino (arduino)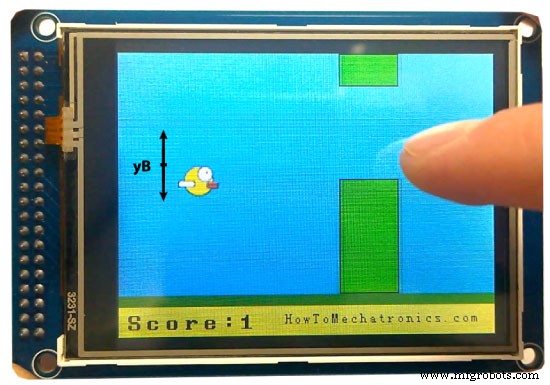
//====== drawBird() - Custom Function
void drawBird(int y) {
  // Draws the bird - bitmap
  myGLCD.drawBitmap (50, y, 35, 30, bird01);
  // Draws blue rectangles above and below the bird in order to clear its previus state
  myGLCD.setColor(114, 198, 206);
  myGLCD.fillRoundRect(50,y,85,y-6);
  myGLCD.fillRoundRect(50,y+30,85,y+36);
}Code language: Arduino (arduino)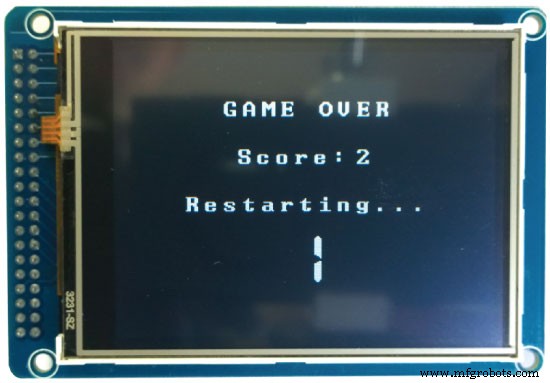
//======== gameOver() - Custom Function
void gameOver() {
  delay(1000); // 1 second
  // Clears the screen and prints the text
  myGLCD.clrScr();
  myGLCD.setColor(255, 255, 255);
  myGLCD.setBackColor(0, 0, 0);
  myGLCD.setFont(BigFont);
  myGLCD.print("GAME OVER", CENTER, 40);
  myGLCD.print("Score:", 100, 80);
  myGLCD.printNumI(score,200, 80);
  myGLCD.print("Restarting...", CENTER, 120);
  myGLCD.setFont(SevenSegNumFont);
  myGLCD.printNumI(2,CENTER, 150);
  delay(1000);
  myGLCD.printNumI(1,CENTER, 150);
  delay(1000);

  // Writes the highest score in the EEPROM
  if (score > highestScore) {
    highestScore = score;
    EEPROM.write(0,highestScore);
  }
  // Resets the variables to start position values
  xP=319;
  yB=50;
  fallRate=0;
  score = 0;
  lastSpeedUpScore = 0;
  movingRate = 3;
  gameStarted = false;
  // Restart game
  initiateGame();
}Code language: Arduino (arduino)Aquí está el código completo del juego:
/*  Arduino Game Proejct
 *  Program made by Dejan Nedelkovski,
 *  www.HowToMechatronics.com
 */

/*  This program uses the UTFT and URTouch libraries
 *  made by Henning Karlsen.
 *  You can find and download them at:
 *  www.RinkyDinkElectronics.com
 */

#include <UTFT.h>
#include <URTouch.h>
#include <EEPROM.h>

//==== Creating Objects
UTFT    myGLCD(SSD1289,38,39,40,41); //Parameters should be adjusted to your Display/Schield model
URTouch  myTouch( 6, 5, 4, 3, 2);

//==== Defining Fonts
extern uint8_t SmallFont[];
extern uint8_t BigFont[];
extern uint8_t SevenSegNumFont[];

extern unsigned int bird01[0x41A]; // Bird Bitmap

int x, y; // Variables for the coordinates where the display has been pressed

// Floppy Bird
int xP = 319;
int yP = 100;
int yB = 50;
int movingRate = 3;
int fallRateInt = 0;
float fallRate = 0;
int score = 0;
int lastSpeedUpScore = 0;
int highestScore;
boolean screenPressed = false;
boolean gameStarted = false;

void setup() {
  // Initiate display
  myGLCD.InitLCD();
  myGLCD.clrScr();
  myTouch.InitTouch();
  myTouch.setPrecision(PREC_MEDIUM);

  highestScore = EEPROM.read(0); // Read the highest score from the EEPROM

  initiateGame(); // Initiate the game
}

void loop() {
    xP=xP-movingRate; // xP - x coordinate of the pilars; range: 319 - (-51)
    drawPilars(xP, yP); // Draws the pillars

    // yB - y coordinate of the bird which depends on value of the fallingRate variable
    yB+=fallRateInt;
    fallRate=fallRate+0.4; // Each inetration the fall rate increase so that we can the effect of acceleration/ gravity
    fallRateInt= int(fallRate);

    // Checks for collision
    if(yB>=180 || yB<=0){ // top and bottom
      gameOver();
    }
    if((xP<=85) && (xP>=5) && (yB<=yP-2)){ // upper pillar
      gameOver();
    }
    if((xP<=85) && (xP>=5) && (yB>=yP+60)){ // lower pillar
      gameOver();
    }

    // Draws the bird
    drawBird(yB);

    // After the pillar has passed through the screen
    if (xP<=-51){
      xP=319; // Resets xP to 319
      yP = rand() % 100+20; // Random number for the pillars height
      score++; // Increase score by one
    }
    //==== Controlling the bird
    if (myTouch.dataAvailable()&& !screenPressed) {
       fallRate=-6; // Setting the fallRate negative will make the bird jump
       screenPressed = true;
    }
    // Doesn't allow holding the screen / you must tap it
    else if ( !myTouch.dataAvailable() && screenPressed){
      screenPressed = false;
    }

    // After each five points, increases the moving rate of the pillars
    if ((score - lastSpeedUpScore) == 5) {
      lastSpeedUpScore = score;
      movingRate++;
    }
}
// ===== initiateGame - Custom Function
void initiateGame() {
  myGLCD.clrScr();
  // Blue background
  myGLCD.setColor(114, 198, 206);
  myGLCD.fillRect(0,0,319,239);
  // Ground
  myGLCD.setColor(221,216,148);
  myGLCD.fillRect(0, 215, 319, 239);
  myGLCD.setColor(47,175,68);
  myGLCD.fillRect(0, 205, 319, 214);
  // Text
  myGLCD.setColor(0, 0, 0);
  myGLCD.setBackColor(221, 216, 148);
  myGLCD.setFont(BigFont);
  myGLCD.print("Score:",5,220);
  myGLCD.setFont(SmallFont);
  myGLCD.print("HowToMechatronics.com", 140, 220);
  myGLCD.setColor(0, 0, 0);
  myGLCD.setBackColor(114, 198, 206);
  myGLCD.print("Highest Score: ",5,5);
  myGLCD.printNumI(highestScore, 120, 6);
  myGLCD.print(">RESET<",255,5);
  myGLCD.drawLine(0,23,319,23);
  myGLCD.print("TAP TO START",CENTER,100);

  drawBird(yB); // Draws the bird

  // Wait until we tap the sreen
  while (!gameStarted) {
    if (myTouch.dataAvailable()) {
    myTouch.read();
    x=myTouch.getX();
    y=myTouch.getY();
    // Reset higest score
    if ((x>=250) && (x<=319) &&(y>=0) && (y<=28)) {
    highestScore = 0;
    myGLCD.setColor(114, 198, 206);
    myGLCD.fillRect(120, 0, 150, 22);
    myGLCD.setColor(0, 0, 0);
    myGLCD.printNumI(highestScore, 120, 5);
    }
    if ((x>=0) && (x<=319) &&(y>=30) && (y<=239)) {
    gameStarted = true;
    myGLCD.setColor(114, 198, 206);
    myGLCD.fillRect(0, 0, 319, 32);
    }
  }
  }
  // Clears the text "TAP TO START" before the game start
  myGLCD.setColor(114, 198, 206);
  myGLCD.fillRect(85, 100, 235, 116);

}
// ===== drawPlillars - Custom Function
void drawPilars(int x, int y) {
    if (x>=270){
      myGLCD.setColor(0, 200, 20);
      myGLCD.fillRect(318, 0, x, y-1);
      myGLCD.setColor(0, 0, 0);
      myGLCD.drawRect(319, 0, x-1, y);

      myGLCD.setColor(0, 200, 20);
      myGLCD.fillRect(318, y+81, x, 203);
      myGLCD.setColor(0, 0, 0);
      myGLCD.drawRect(319, y+80, x-1, 204);
    }
    else if( x<=268) {
      // Draws blue rectangle right of the pillar
      myGLCD.setColor(114, 198, 206);
      myGLCD.fillRect(x+51, 0, x+60, y);
      // Draws the pillar
      myGLCD.setColor(0, 200, 20);
      myGLCD.fillRect(x+49, 1, x+1, y-1);
      // Draws the black frame of the pillar
      myGLCD.setColor(0, 0, 0);
      myGLCD.drawRect(x+50, 0, x, y);
      // Draws the blue rectangle left of the pillar
      myGLCD.setColor(114, 198, 206);
      myGLCD.fillRect(x-1, 0, x-3, y);

      // The bottom pillar
      myGLCD.setColor(114, 198, 206);
      myGLCD.fillRect(x+51, y+80, x+60, 204);
      myGLCD.setColor(0, 200, 20);
      myGLCD.fillRect(x+49, y+81, x+1, 203);
      myGLCD.setColor(0, 0, 0);
      myGLCD.drawRect(x+50, y+80, x, 204);
      myGLCD.setColor(114, 198, 206);
      myGLCD.fillRect(x-1, y+80, x-3, 204);
  }
  // Draws the score
  myGLCD.setColor(0, 0, 0);
  myGLCD.setBackColor(221, 216, 148);
  myGLCD.setFont(BigFont);
  myGLCD.printNumI(score, 100, 220);
}

//====== drawBird() - Custom Function
void drawBird(int y) {
  // Draws the bird - bitmap
  myGLCD.drawBitmap (50, y, 35, 30, bird01);
  // Draws blue rectangles above and below the bird in order to clear its previus state
  myGLCD.setColor(114, 198, 206);
  myGLCD.fillRoundRect(50,y,85,y-6);
  myGLCD.fillRoundRect(50,y+30,85,y+36);
}
//======== gameOver() - Custom Function
void gameOver() {
  delay(3000); // 1 second
  // Clears the screen and prints the text
  myGLCD.clrScr();
  myGLCD.setColor(255, 255, 255);
  myGLCD.setBackColor(0, 0, 0);
  myGLCD.setFont(BigFont);
  myGLCD.print("GAME OVER", CENTER, 40);
  myGLCD.print("Score:", 100, 80);
  myGLCD.printNumI(score,200, 80);
  myGLCD.print("Restarting...", CENTER, 120);
  myGLCD.setFont(SevenSegNumFont);
  myGLCD.printNumI(2,CENTER, 150);
  delay(1000);
  myGLCD.printNumI(1,CENTER, 150);
  delay(1000);

  // Writes the highest score in the EEPROM
  if (score > highestScore) {
    highestScore = score;
    EEPROM.write(0,highestScore);
  }
  // Resets the variables to start position values
  xP=319;
  yB=50;
  fallRate=0;
  score = 0;
  lastSpeedUpScore = 0;
  movingRate = 3;
  gameStarted = false;
  // Restart game
  initiateGame();
}Code language: Arduino (arduino)
Proceso de manufactura
- Hacer Monitor Ambilight usando Arduino
- Juego Arduino Pong - Pantalla OLED
- Controlador de juego Arduino
- Arduino Touch Breakout Game
- Animatronics gigantes Lego Minfig Operation Game
- Detector de frecuencia de audio
- Tech-TicTacToe
- Temporizador de cuenta atrás de Arduino
- Pixel Chaser Game
- RC Porsche Car (Proyecto Arduino)
- Juego de ruleta LED