


TFT Shield para Arduino Nano - Iniciar
Componentes y suministros
 |
| × | 1 | |||
| × | 1 | ||||
| × | 1 |
Acerca de este proyecto
La historia
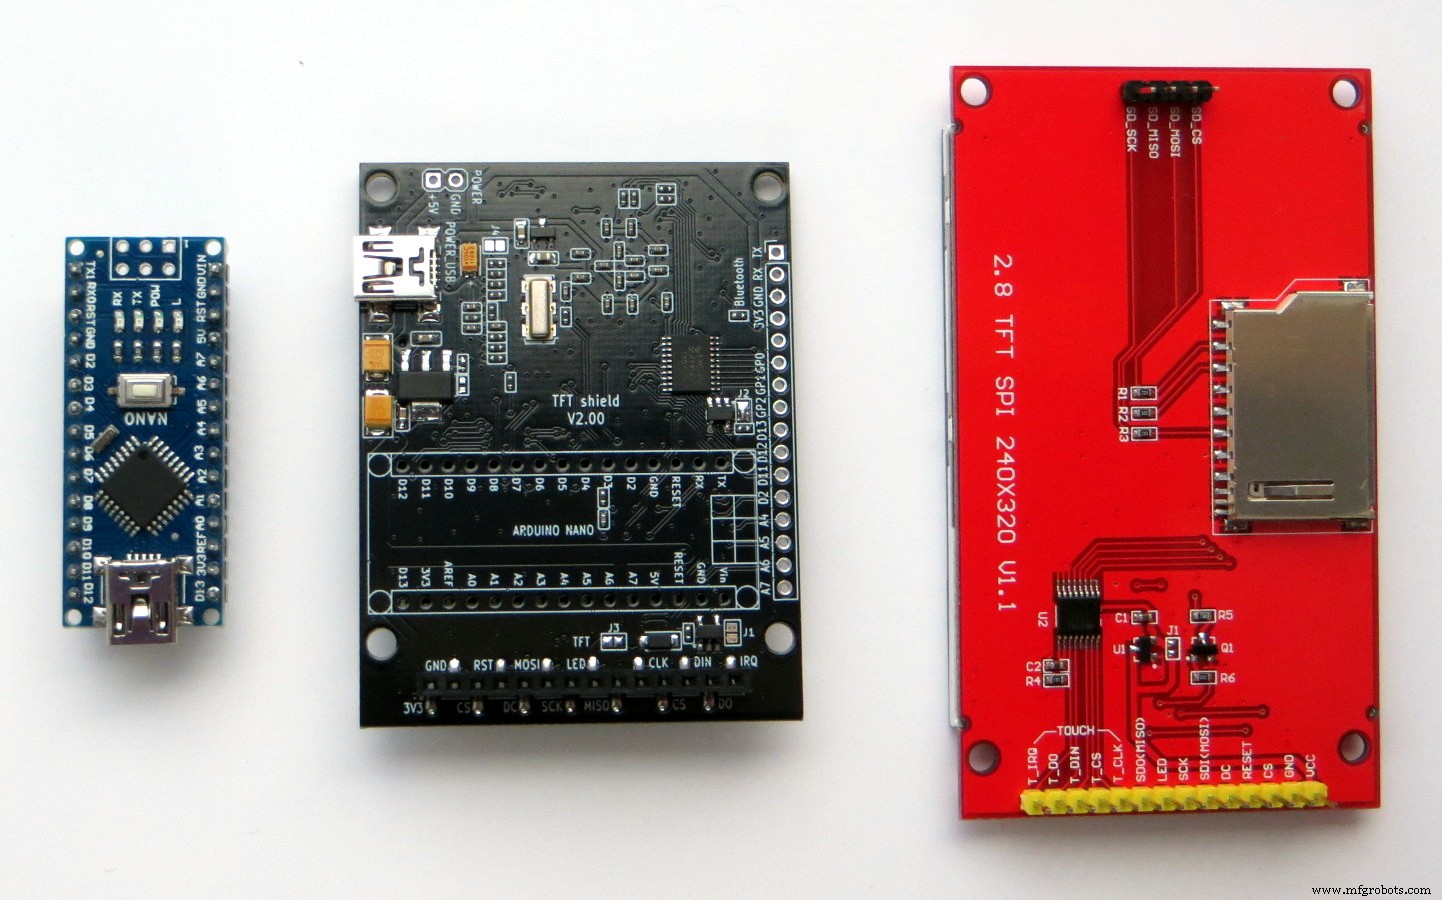
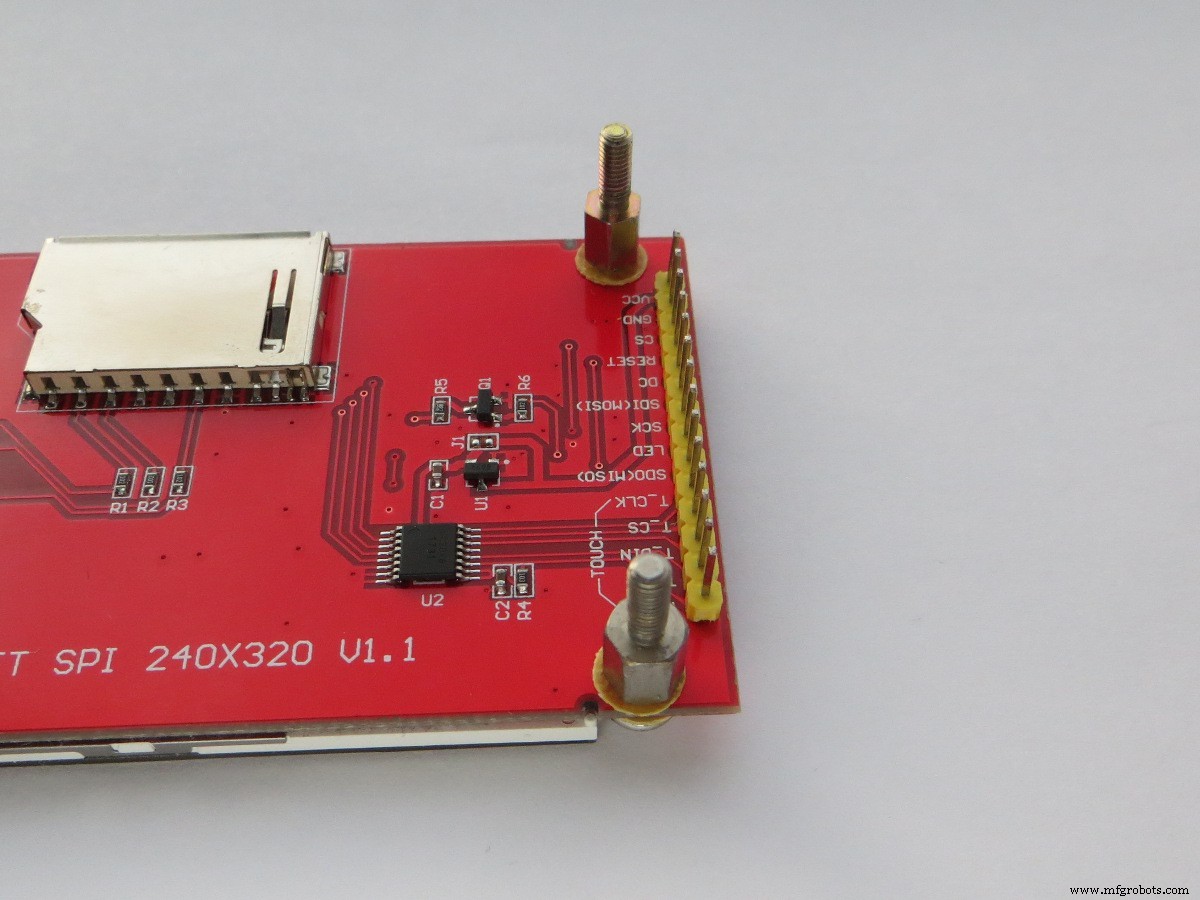
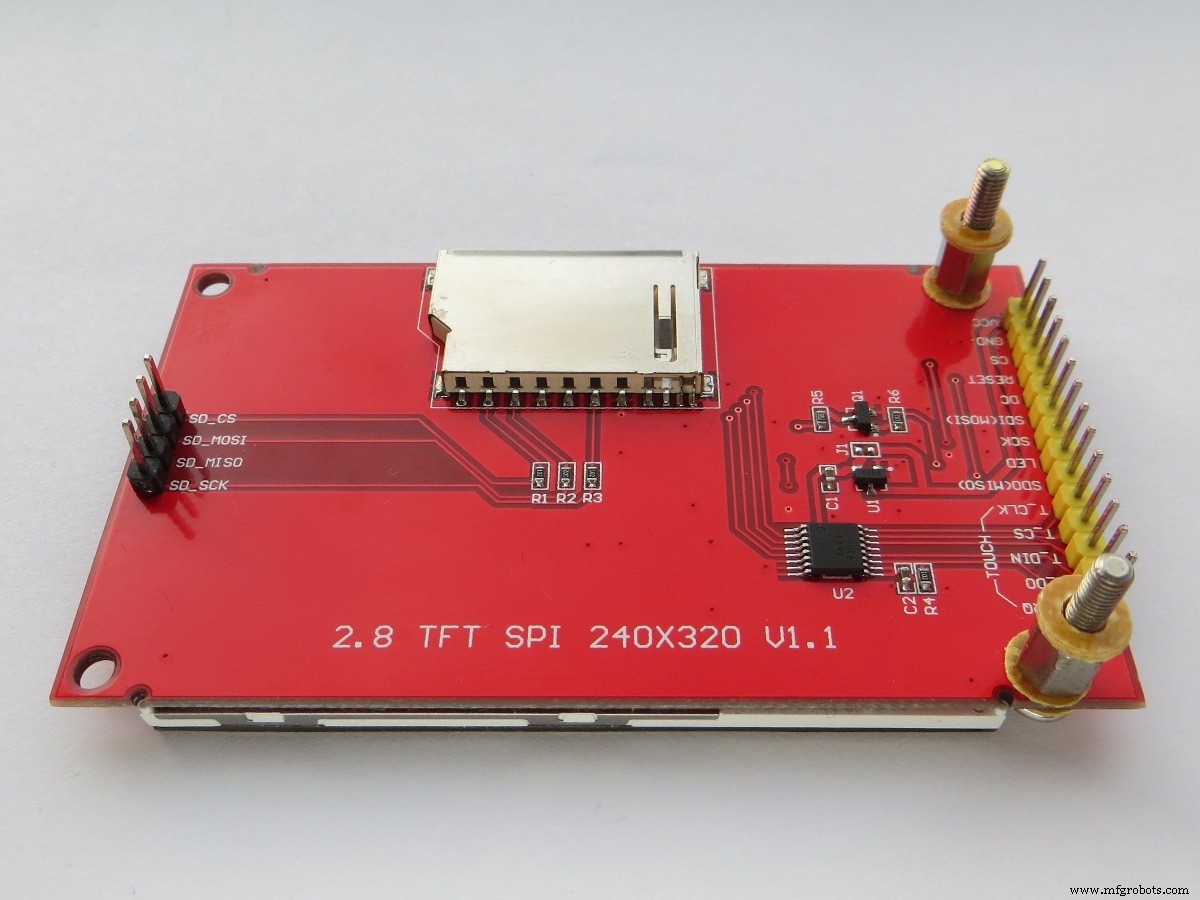
Difícilmente hay una persona que no haya visto y no sepa qué es una pantalla a color. Y, probablemente, muchos han hecho (o les gustaría hacer) algún proyecto en Arduino usando una pantalla a color. Además, estas pantallas hoy en día están muy extendidas y son asequibles. Hay muchas pantallas que difieren en resolución, tamaño de pantalla e interfaz. Me gustaría detenerme en una de estas pantallas. Nos interesará una pantalla con una interfaz de SPI, una resolución de 320x240 píxeles y un tamaño diagonal de pantalla de 2.8 "(así como 2.4" y 3.2 "). La interfaz SPI es muy conveniente para conectar a un microcontrolador, ya que Tiene una pequeña cantidad de líneas de señal. Y la velocidad de SPI te permite actualizar rápidamente el contenido de la pantalla. En general, muchas ventajas. Pero hay momentos incómodos. Por ejemplo, es necesario coordinar aún más los niveles lógicos en el caso de conectar la pantalla a las placas Arduino con alimentación de 5 voltios. Para una conexión rápida y fácil de una de estas pantallas (con la interfaz SPI) a Arduino Nano, utilizaremos una pequeña tarifa - TFT shield.
Este escudo es la segunda versión (liviana, para Arduino Nano) de TFT Shield para Arduino Uno, sobre el cual puede leer aquí, aquí y aquí.
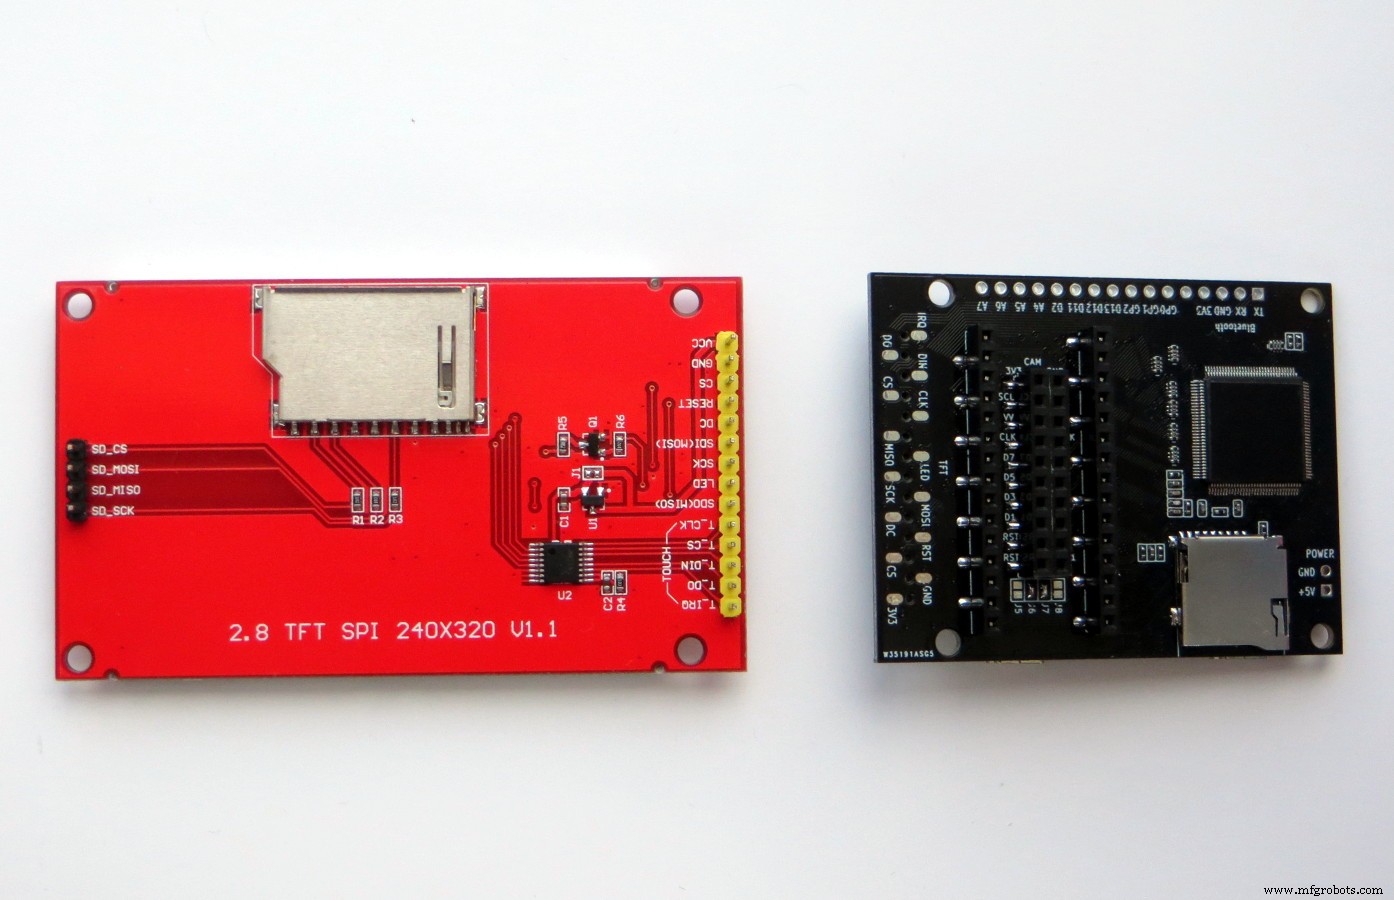
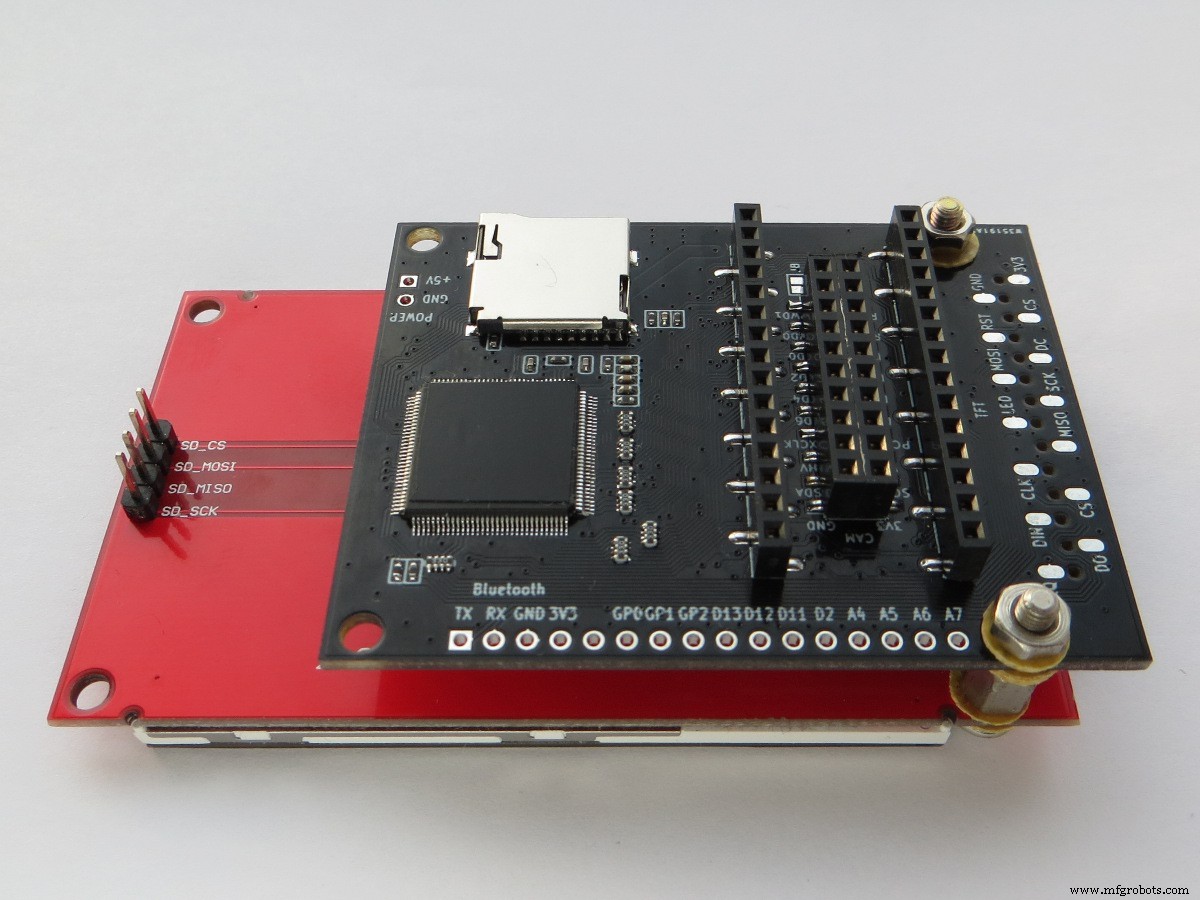
Breve descripción del escudo TFT:
- El tamaño del tablero es de 64x49 mm,
- Conector de 30 pines para conectar Arduino Nano,
- Conector de 14 pines para conectar una pantalla TFT de 320x240 con una interfaz SPI (incluida una pantalla táctil),
- Conector para tarjeta microSD,
- Conector para el módulo Bluetooth (HC-06),
- Conector de 20 pines para cámara OV7670 (y otros),
- Conector mini USB, así como un conector de 2 pines separado para fuente de alimentación de 5V.
Entonces, comencemos.
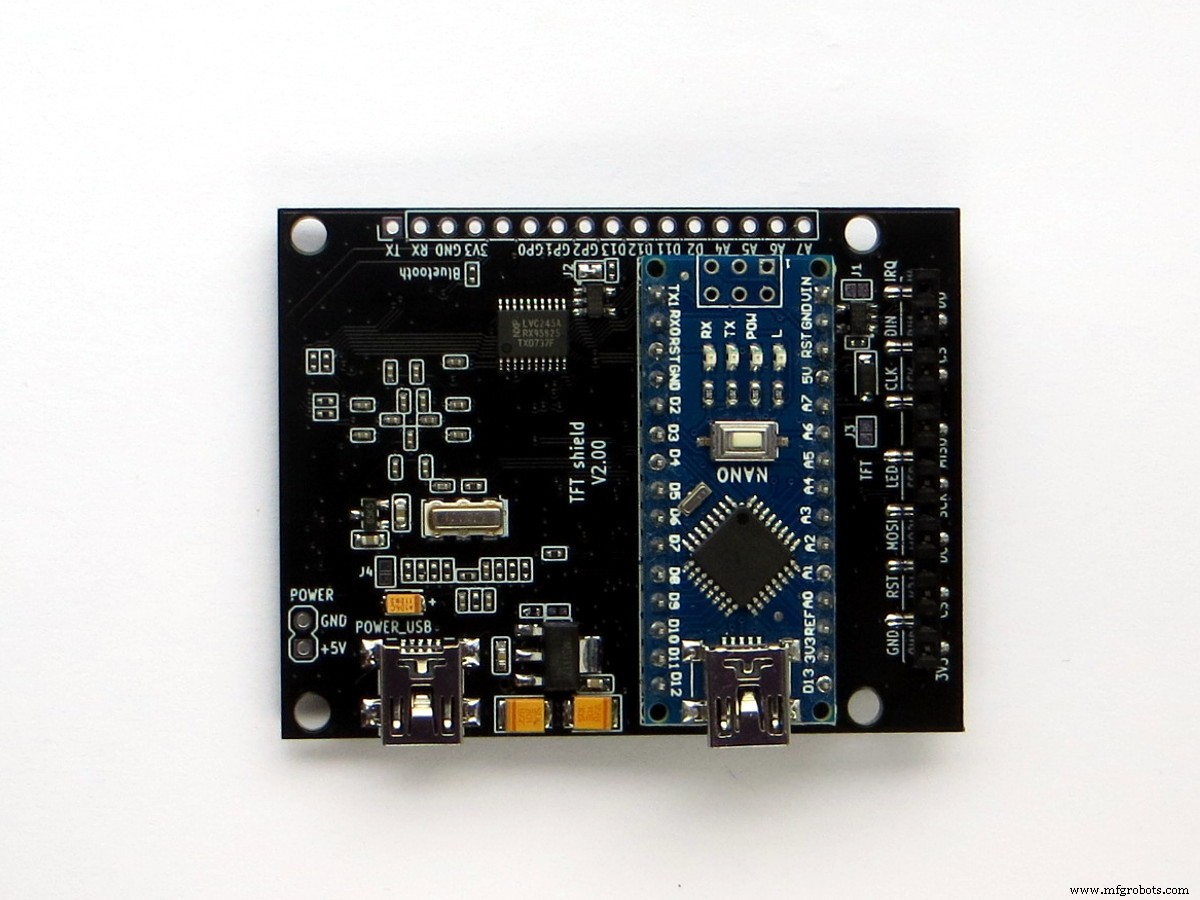
Ensamblaje
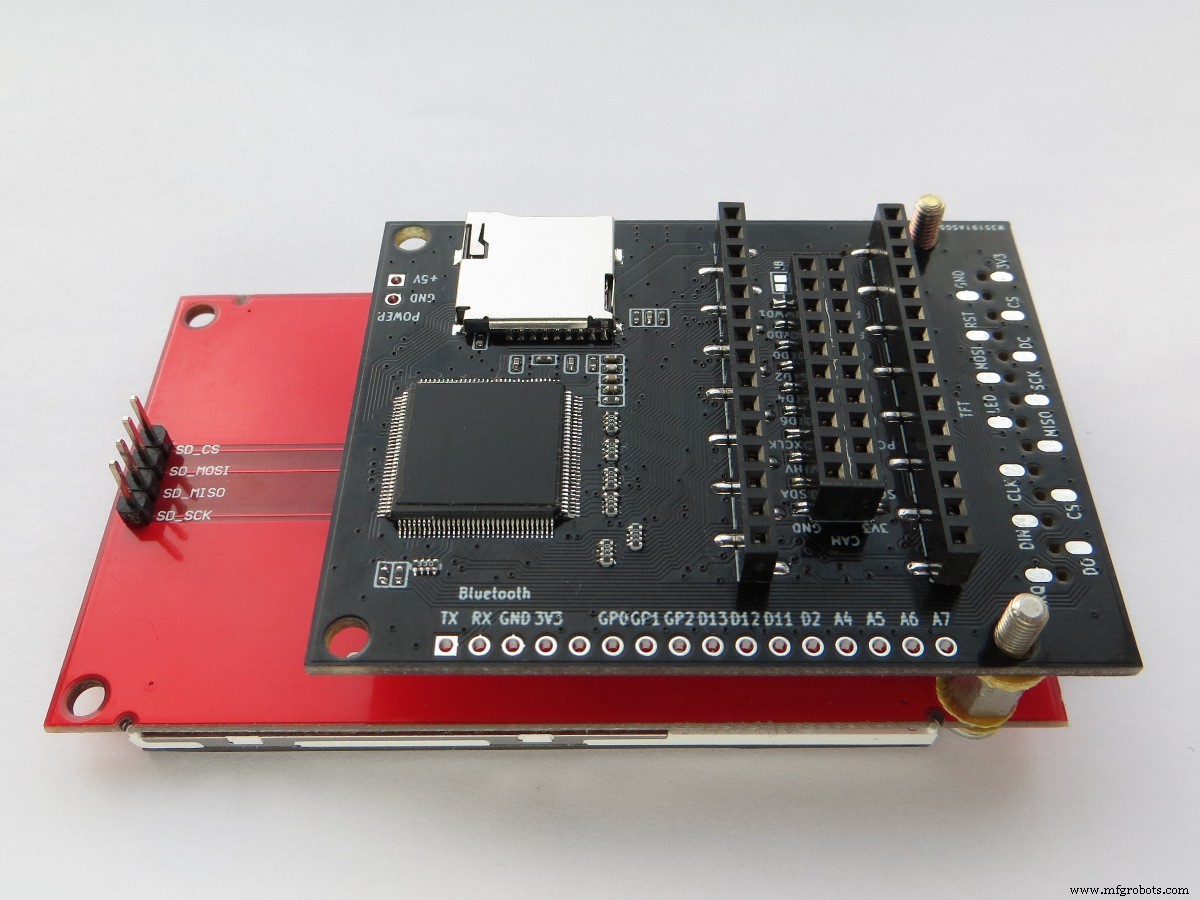
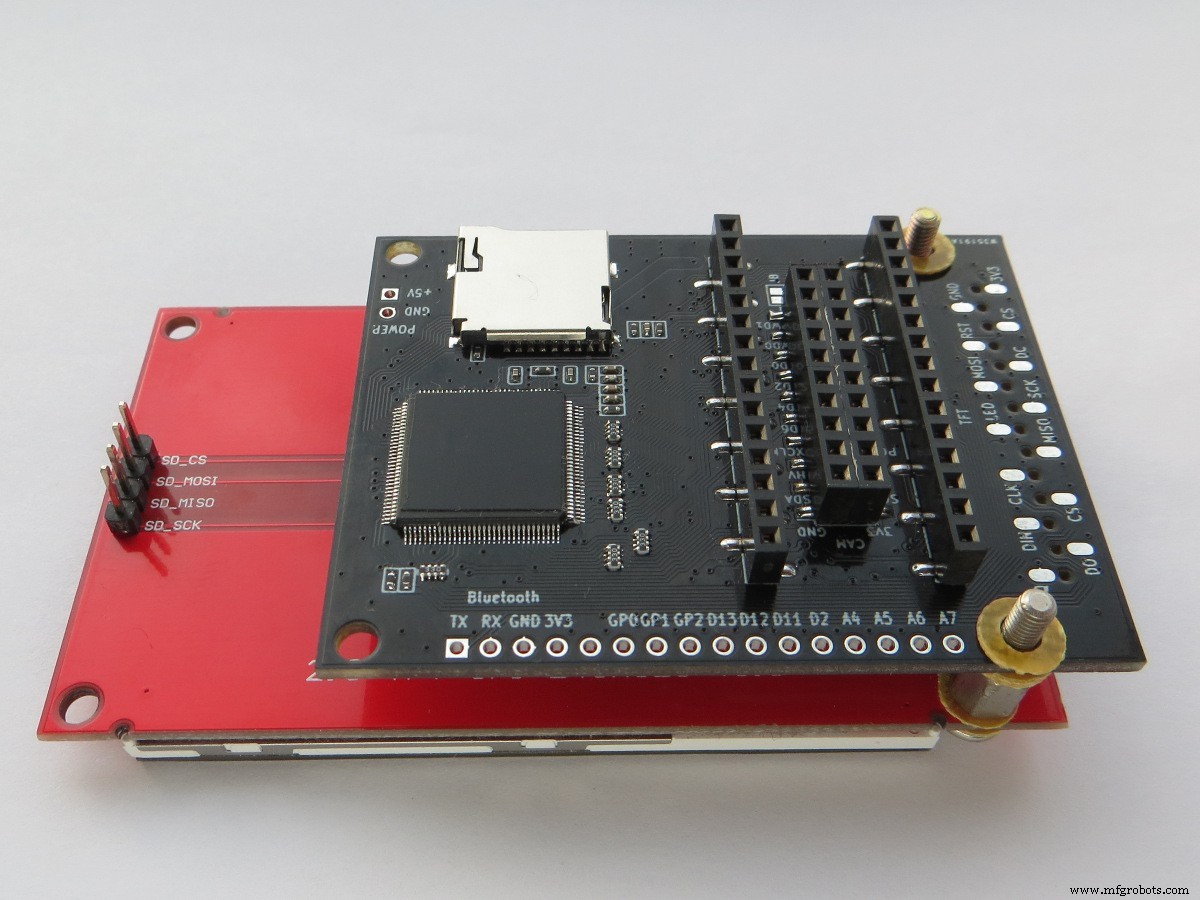
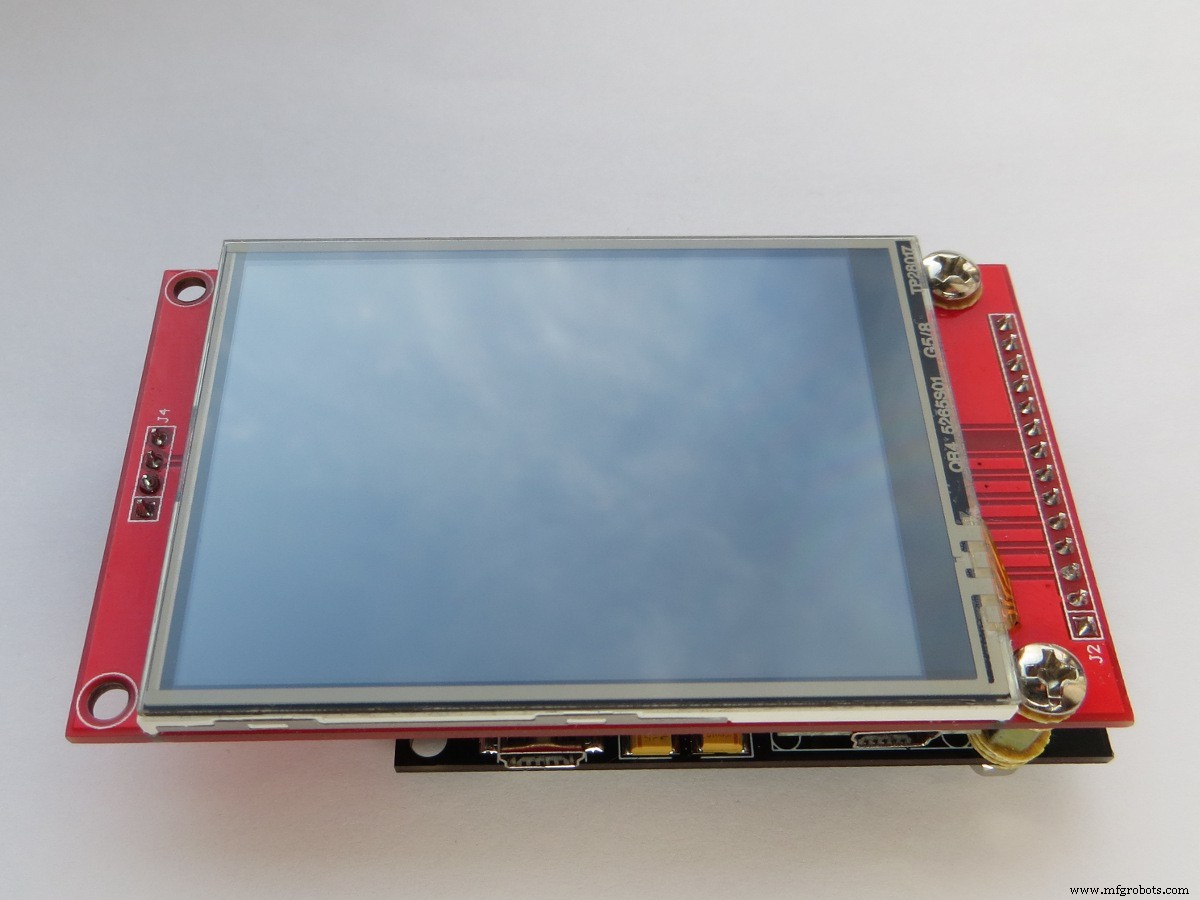
Montar tablas es muy sencillo. Pero se debe tener cuidado de leer las designaciones de los contactos antes de la instalación. Primero, debe instalar la placa Arduino Nano como se muestra en la foto. Después de eso, se conecta una pantalla, que se puede conectar a ambos en un lado de la placa ( método 1 ) y por otro ( método 2 ). Después de eso, puede conectar la alimentación con un cable mini USB. Las siguientes son fotos.
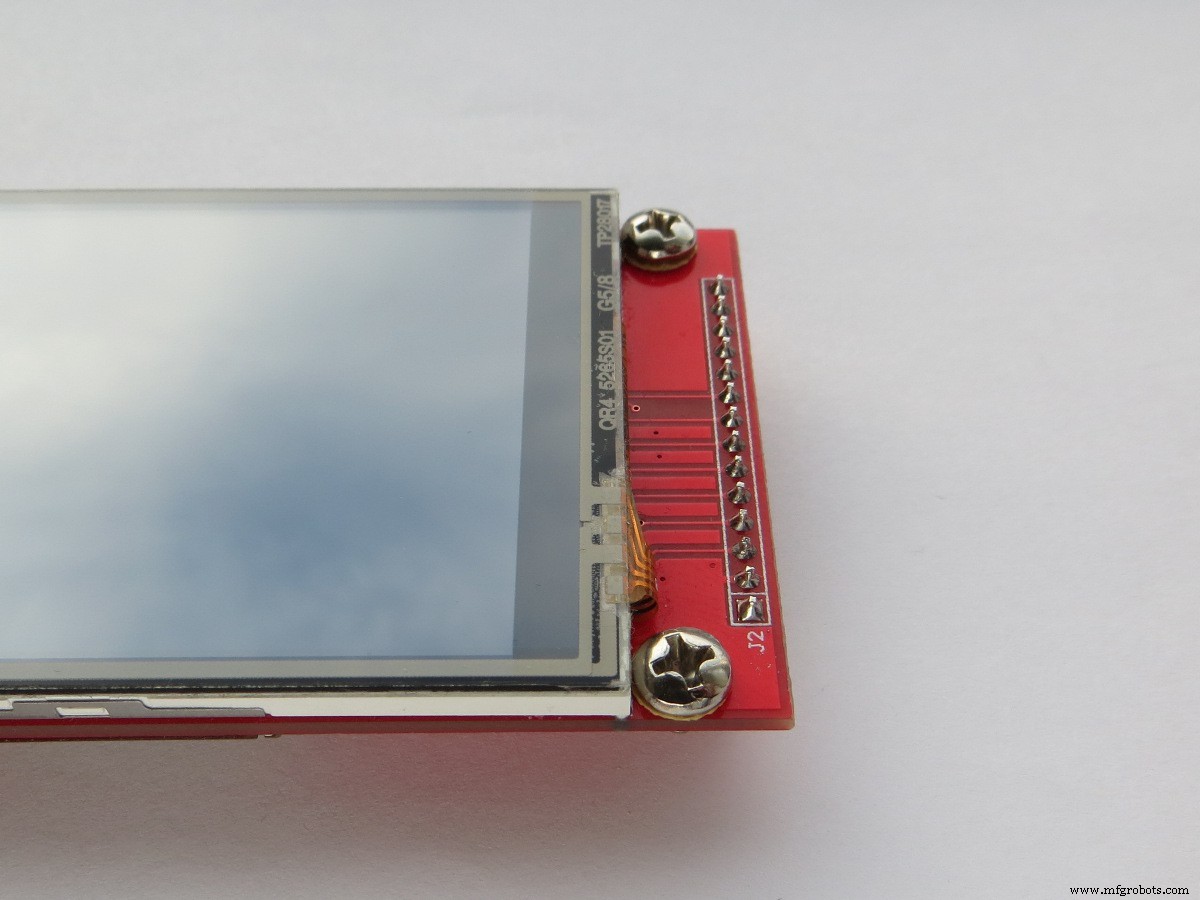
Método 1:
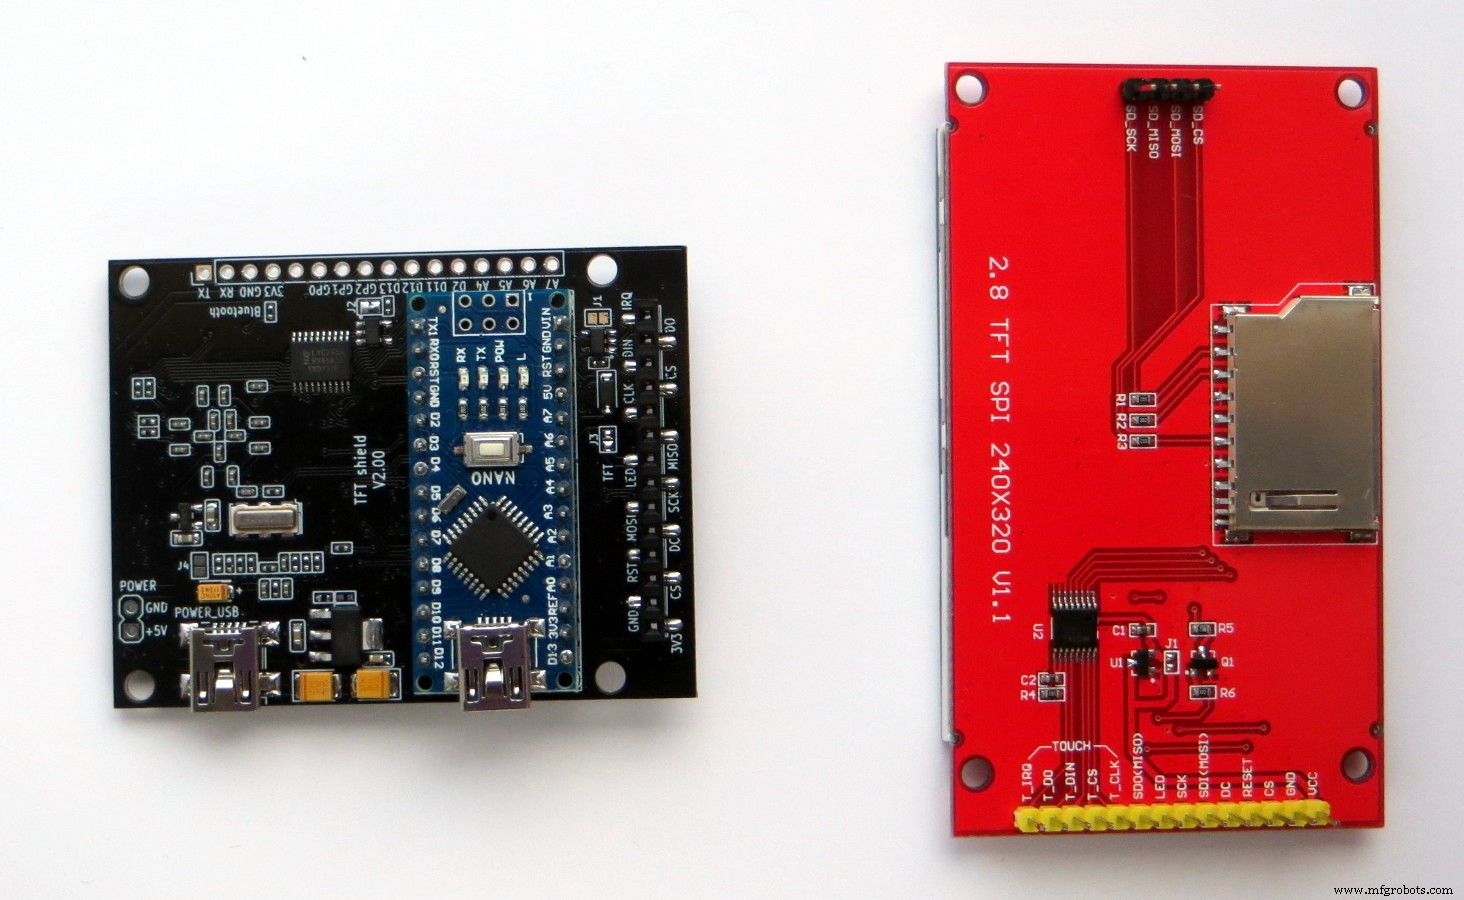
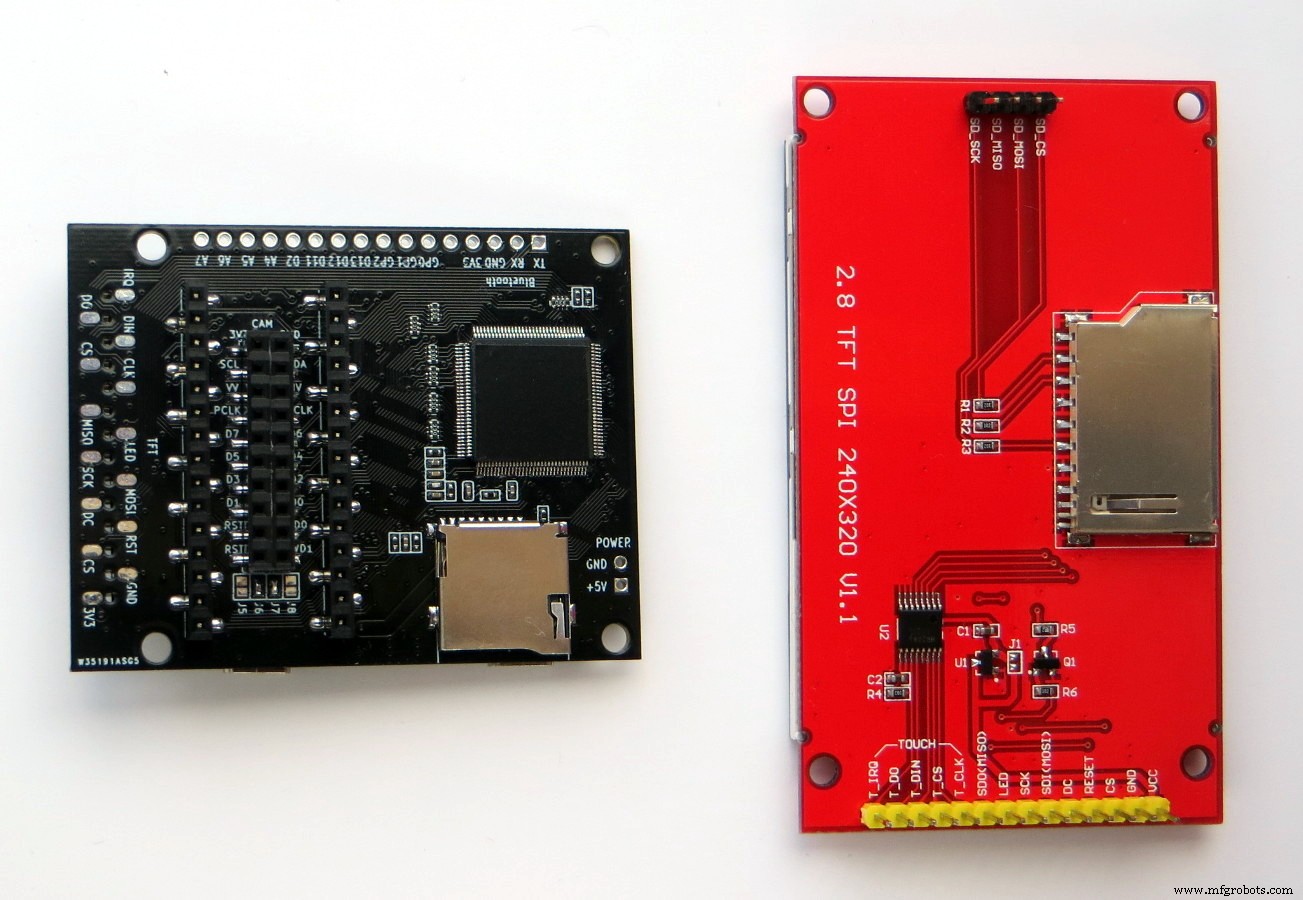


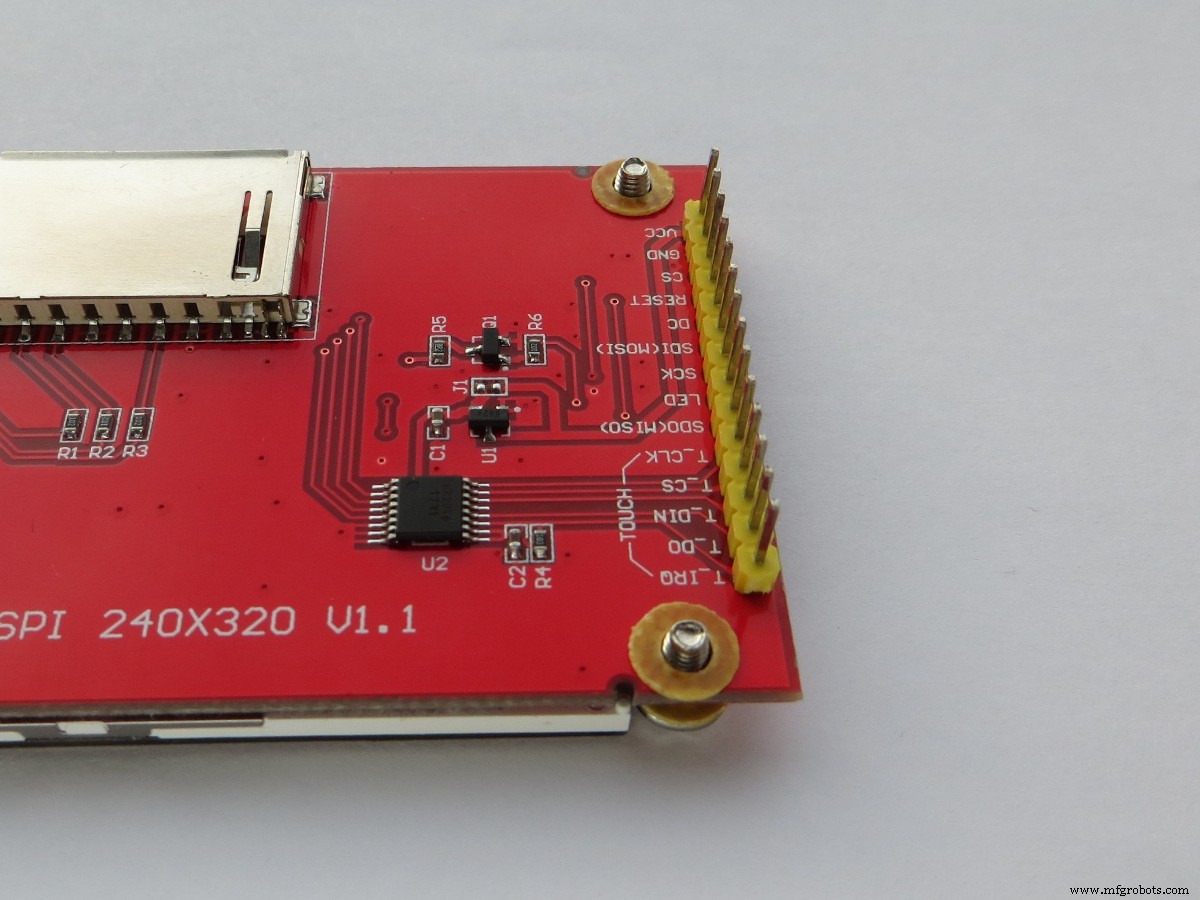
Método 2:

Después del montaje, puede proceder a la descarga de bocetos, pero antes de estos no olvide instalar la biblioteca necesaria para trabajar con el escudo TFT. La biblioteca se encuentra en el enlace:https://github.com/YATFT/YATFT.
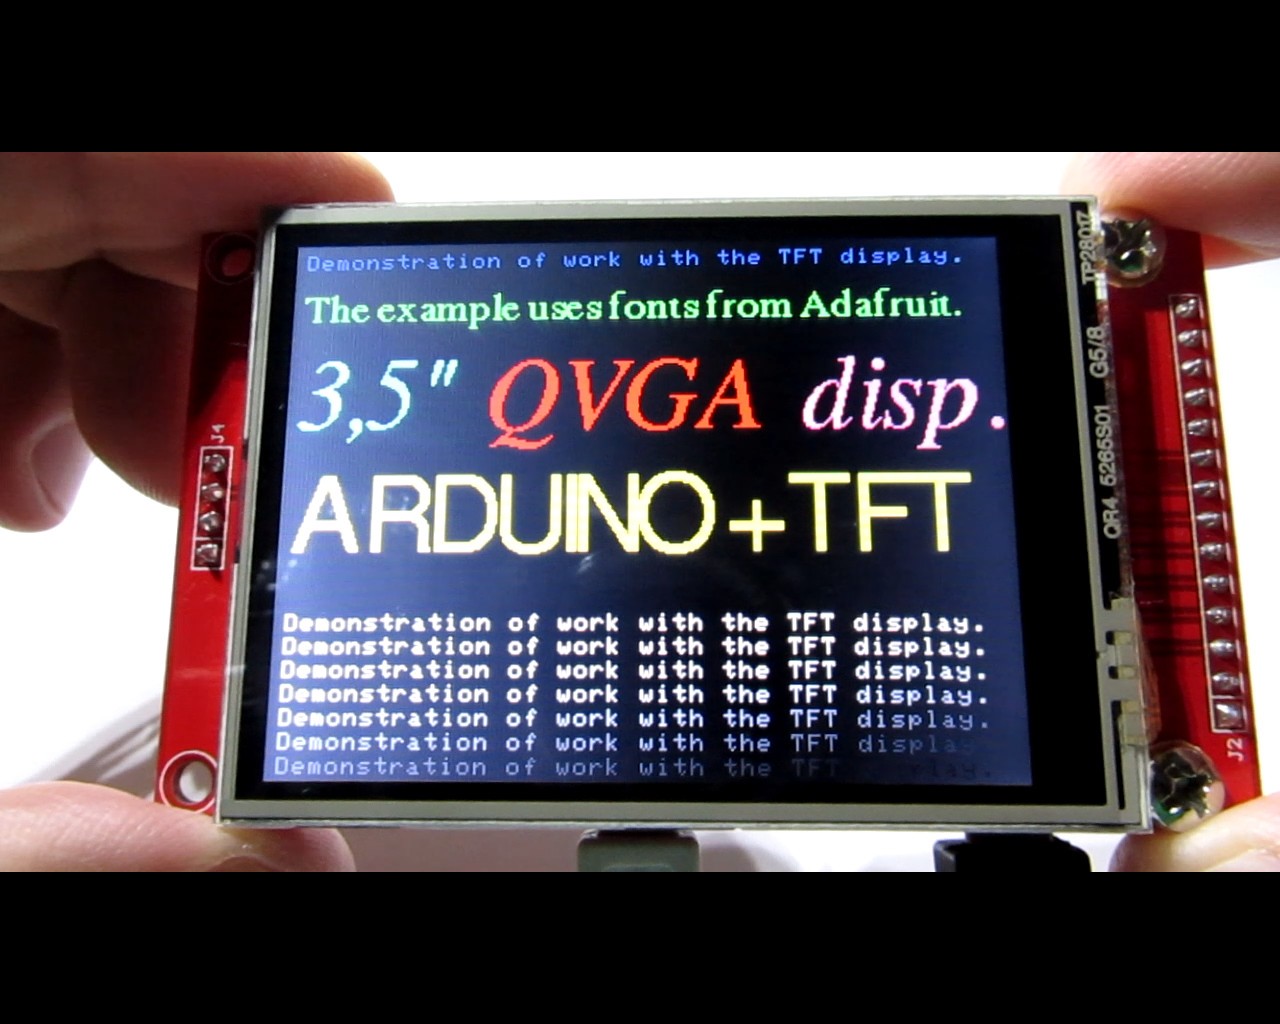
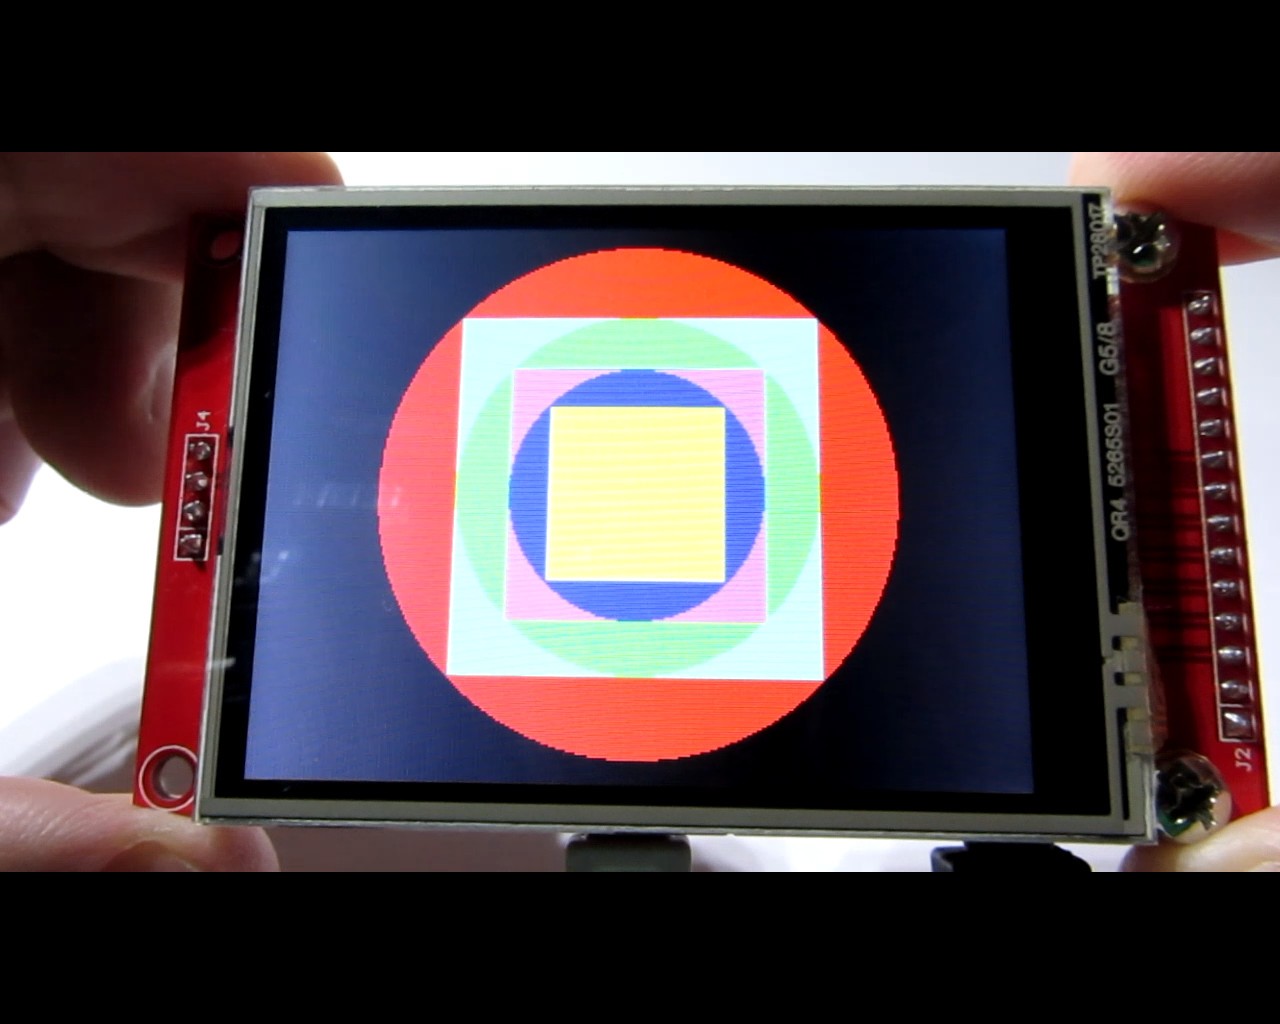
Demostración 1. Gráficos y texto.
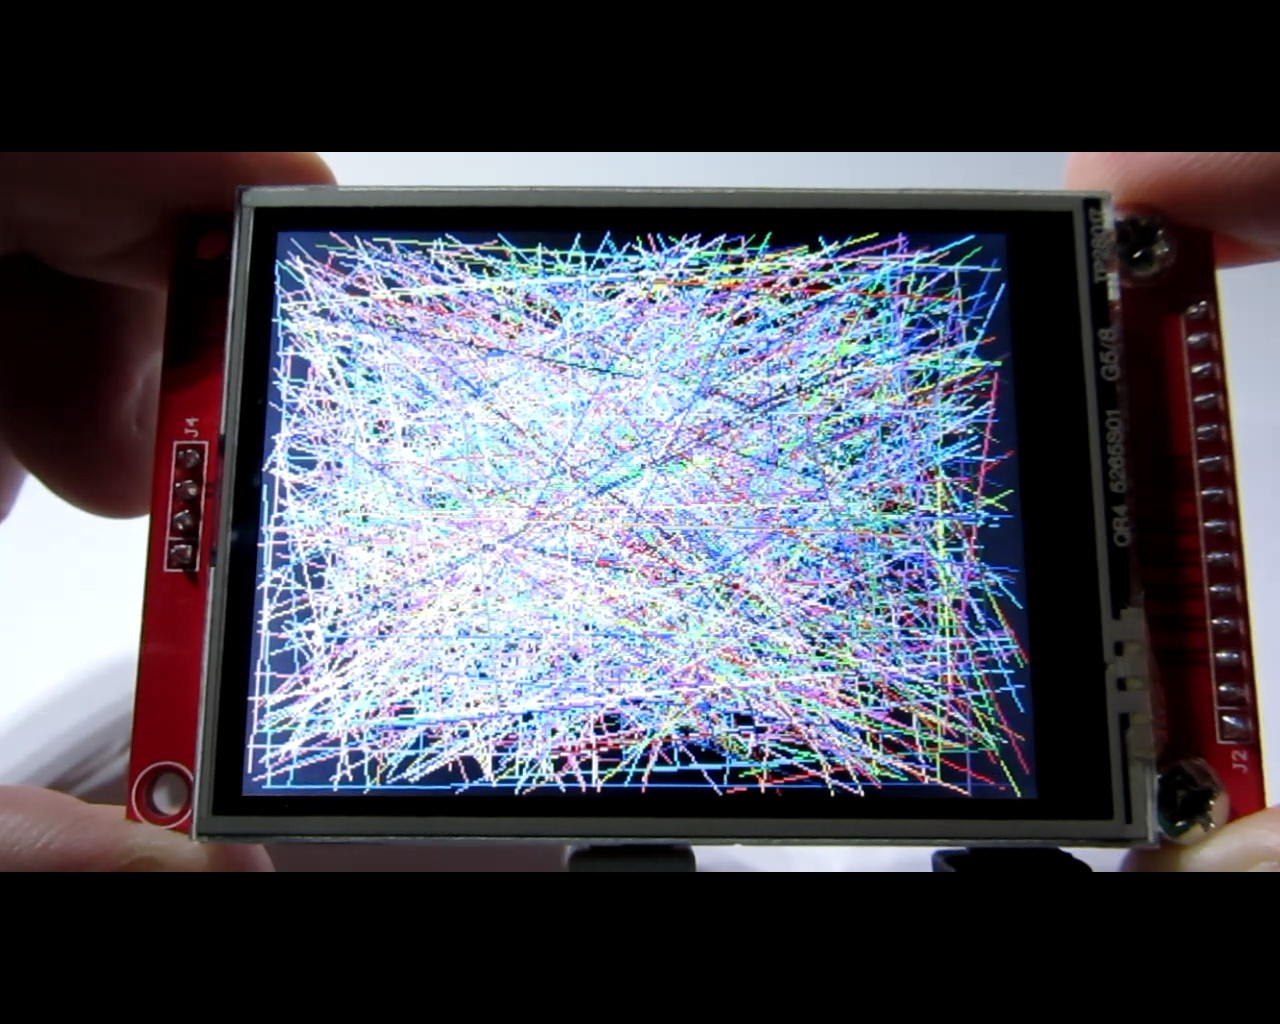
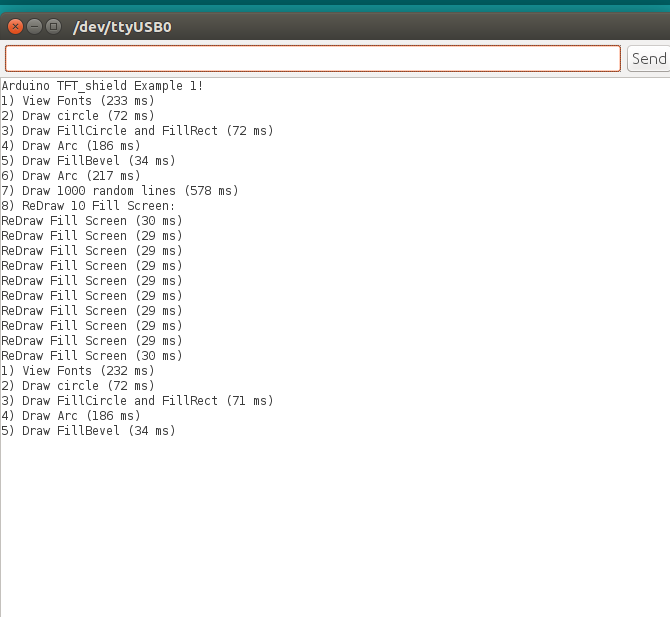
Este capítulo proporciona un ejemplo de cómo trabajar con texto, gráficos y una pantalla táctil. Por conveniencia, se recomienda que primero programe la placa Arduino Nano por separado y luego monte el dispositivo (pero también puede programar la placa como parte del dispositivo). Boceto para trabajar con texto y gráficos:
/ **************************************** *********************************** EL SOFTWARE Y LA DOCUMENTACIÓN SE PROPORCIONAN "TAL CUAL" SIN GARANTÍA DE NINGUNA * TIPO, YA SEA EXPRESA O IMPLÍCITA, INCLUYENDO, SIN LIMITACIÓN, CUALQUIER GARANTÍA * DE COMERCIABILIDAD, TÍTULO, NO INFRACCIÓN Y APTITUD PARA UN PROPÓSITO EN PARTICULAR *. EN NINGÚN CASO EL AUTOR O SUS LICENCIANTES SERÁN RESPONSABLES U * OBLIGADOS BAJO CONTRATO, NEGLIGENCIA, RESPONSABILIDAD ESTRICTA, CONTRIBUCIÓN, * INCUMPLIMIENTO DE GARANTÍA U OTRA TEORÍA LEGAL EQUITATIVA CUALQUIER DAÑO O GASTOS DIRECTOS O INDIRECTOS * O GASTOS INCLUIDOS, PERO NO SE LIMITAN A CUALQUIER , * DAÑOS INDIRECTOS, PUNITIVOS O CONSECUENTES, PÉRDIDA DE BENEFICIOS O DATOS, * COSTO DE ADQUISICIÓN DE BIENES SUSTITUTOS, TECNOLOGÍA, SERVICIOS O CUALQUIER * RECLAMO DE TERCEROS (INCLUYENDO PERO NO LIMITADO A CUALQUIER DEFENSA DE LOS MISMOS), * U OTROS COSTOS SIMILARES . *********************************************** ****************************** / # include // La biblioteca específica del hardware # incluye // Incluir la biblioteca Adafruit-GFX # include // Incluir las fuentes Adafruit # include #include YATFT tft (0); uint32_t total_time; uint16_t Color [4] ={AZUL BRILLANTE, VERDE BRILLANTE, BRILLANTE, BRILLANTEELLOW}; uint16_t Gris [7] ={GRIS0, GRIS1, GRIS2, GRIS3, GRIS4, GR AY5, GRIS6}; / ***************************************** ********************************* / void ClearScreen (void) {tft.SetColor (NEGRO); // Establecer el color del fone tft.ClearDevice (); // Llena toda la pantalla} void setup () {Serial.begin (115200); // inicializar el puerto serial Serial.println ("Arduino TFT_shield Example 1!"); tft.begin (); // inicializar la pantalla} void loop () {uint16_t x, y, x2, y2, mask_gray; uint16_t i; Pantalla clara(); // Fuentes Serial.print ("1) Ver fuentes ("); tiempo_total =milis (); tft.SetColor (AZUL BRILLANTE); tft.SetFont (NULL); tft.OutTextXY (5, 5, "Demostración del trabajo con la pantalla TFT."); tft.SetColor (VERDE BRILLANTE); tft.SetFont (&FreeSerif9pt7b); tft.OutTextXY (5, 20, "El ejemplo usa fuentes de Adafruit."); tft.SetFont (&FreeSerifItalic24pt7b); tft.SetColor (BRIGHTCYAN); tft.OutTextXY (5, 45, "3,5 ''"); tft.SetColor (BRILLANTE); tft.OutTextXY (90, 45, "QVGA"); tft.SetColor (BRIGHTMAGENTA); tft.OutTextXY (230, 45, "disp."); tft.SetColor (BRIGHTYELLOW); tft.SetFont (&FreeSans24pt7b); tft.OutTextXY (5, 100, "A R D U I N O + T F T"); tft.SetFont (NULL); para (i =0; i <7; i ++) {tft.SetColor (Gray [i]); tft.OutTextXY (5, 170 + 10 * i, "Demostración del trabajo con la pantalla TFT."); } PrintTotalTime (); retraso (3000); Pantalla clara(); // Círculo Serial.print ("2) Dibujar círculo ("); tiempo_total =milis (); tft.SetColor (BRILLANTE); para (i =10; i > 1; i + =10) {tft.DrawCirc (GetMaxX ()>> 1, GetMaxY ()>> 1, i); } PrintTotalTime (); retraso (1000); // DrawFillCircle &DrawFillRect Serial.print ("3) Dibujar FillCircle y FillRect ("); tiempo_total =milis (); tft.SetColor (BRILLANTE); tft.DrawFillCirc (GetMaxX ()>> 1, GetMaxY ()>> 1,110); tft.SetColor (BRIGHTCYAN); tft.DrawFillRect (GetMaxX () / 2-77, GetMaxY () / 2-77, GetMaxX () / 2 + 77, GetMaxY () / 2 + 77); tft.SetColor (VERDE BRILLANTE); tft.DrawFillCirc (GetMaxX ()>> 1, GetMaxY ()>> 1,77); tft.SetColor (BRIGHTMAGENTA); tft.DrawFillRect (GetMaxX () / 2-54, GetMaxY () / 2-54, GetMaxX () / 2 + 54, GetMaxY () / 2 + 54); tft.SetColor (AZUL BRILLANTE); tft.DrawFillCirc (GetMaxX ()>> 1, GetMaxY ()>> 1,54); tft.SetColor (BRIGHTYELLOW); tft.DrawFillRect (GetMaxX () / 2-37, GetMaxY () / 2-37, GetMaxX () / 2 + 37, GetMaxY () / 2 + 37); PrintTotalTime (); retraso (1000); Pantalla clara(); // Arco Serial.print ("4) Dibujar Arco ("); tiempo_total =milis (); Pantalla clara(); tft.SetColor (AZUL BRILLANTE); tft.DrawArc ((GetMaxX ()>> 1) -60, (GetMaxY ()>> 1) -60, (GetMaxX ()>> 1) +60, (GetMaxY ()>> 1) +60,20, 30,0xFF); tft.SetColor (VERDE BRILLANTE); tft.DrawArc ((GetMaxX ()>> 1) -40, (GetMaxY ()>> 1) -40, (GetMaxX ()>> 1) +40, (GetMaxY ()>> 1) +40,20, 30,0xFF); tft.SetColor (BRILLANTE); tft.DrawArc ((GetMaxX ()>> 1) -20, (GetMaxY ()>> 1) -20, (GetMaxX ()>> 1) +20, (GetMaxY ()>> 1) +20,20, 30,0xFF); PrintTotalTime (); retraso (1000); Serial.print ("5) Dibujar FillBevel ("); tiempo_total =milis (); tft.SetColor (AZUL BRILLANTE); tft.DrawFillBevel ((GetMaxX ()>> 1) -60, (GetMaxY ()>> 1) -60, (GetMaxX ()>> 1) +60, (GetMaxY ()>> 1) +60,30); tft.SetColor (VERDE BRILLANTE); tft.DrawFillBevel ((GetMaxX ()>> 1) -40, (GetMaxY ()>> 1) -40, (GetMaxX ()>> 1) +40, (GetMaxY ()>> 1) +40,30); tft.SetColor (BRILLANTE); tft.DrawFillBevel ((GetMaxX ()>> 1) -20, (GetMaxY ()>> 1) -20, (GetMaxX ()>> 1) +20, (GetMaxY ()>> 1) +20,30); PrintTotalTime (); retraso (1000); Pantalla clara(); Serial.print ("6) Dibujar arco ("); tiempo_total =milis (); para (i =0; i <4; i ++) {tft.SetColor (Color [i]); tft.DrawArc ((GetMaxX ()>> 1), (GetMaxY ()>> 1) -50, (GetMaxX ()>> 1), (GetMaxY ()>> 1) + 50,50,60,0x11 <> 1), (GetMaxY ()>> 1) -30, (GetMaxX ()>> 1), (GetMaxY ()>> 1) + 30,35,45,0x11 <> 1), (GetMaxY ()>> 1), (GetMaxX ()>> 1), (GetMaxY ()>> 1), 20,30,0x11 < Algunas capturas de pantalla:

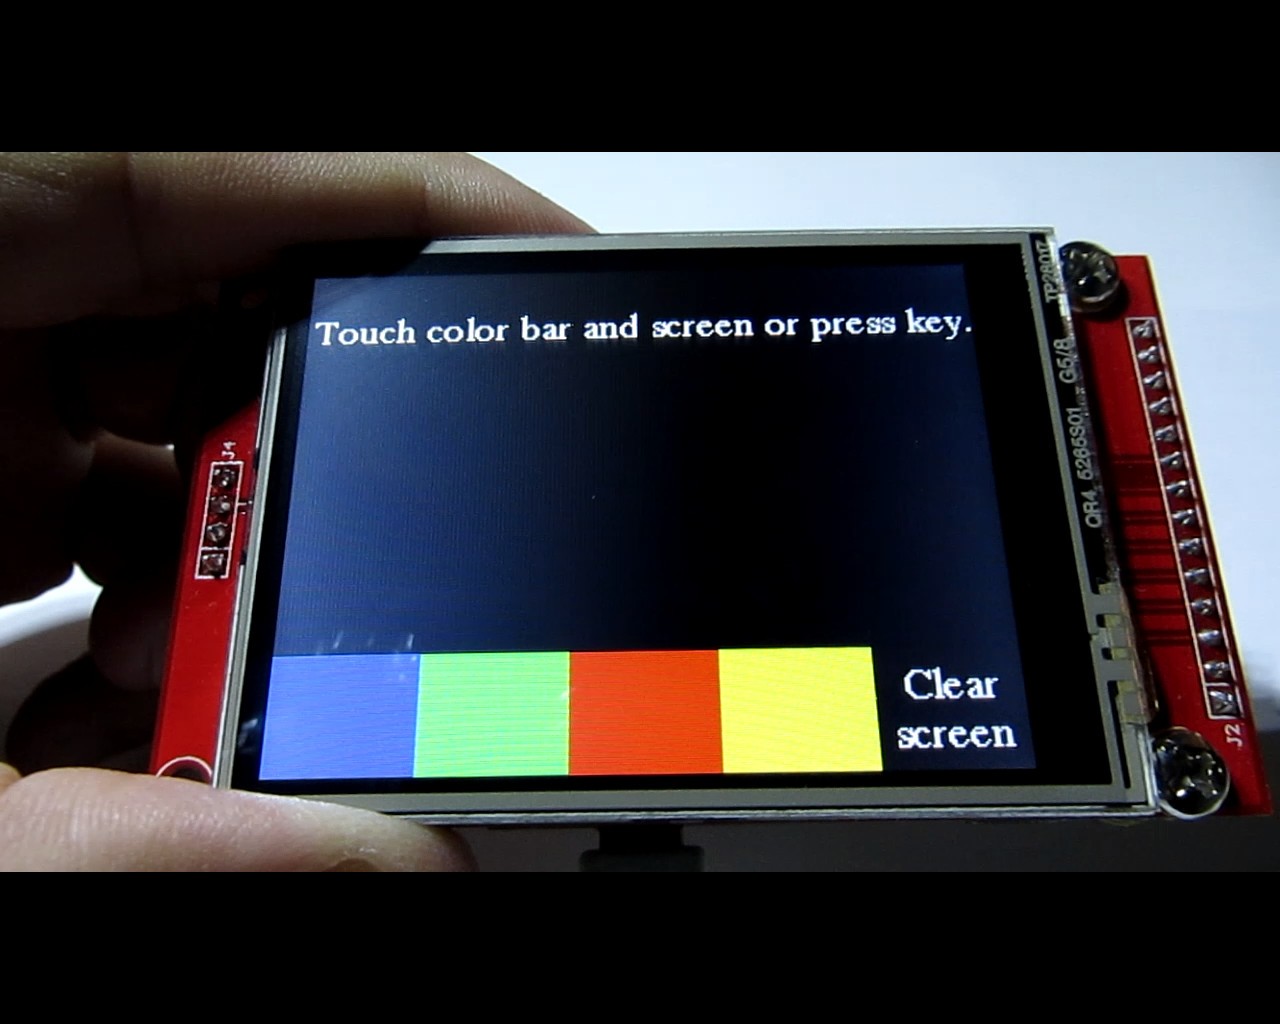
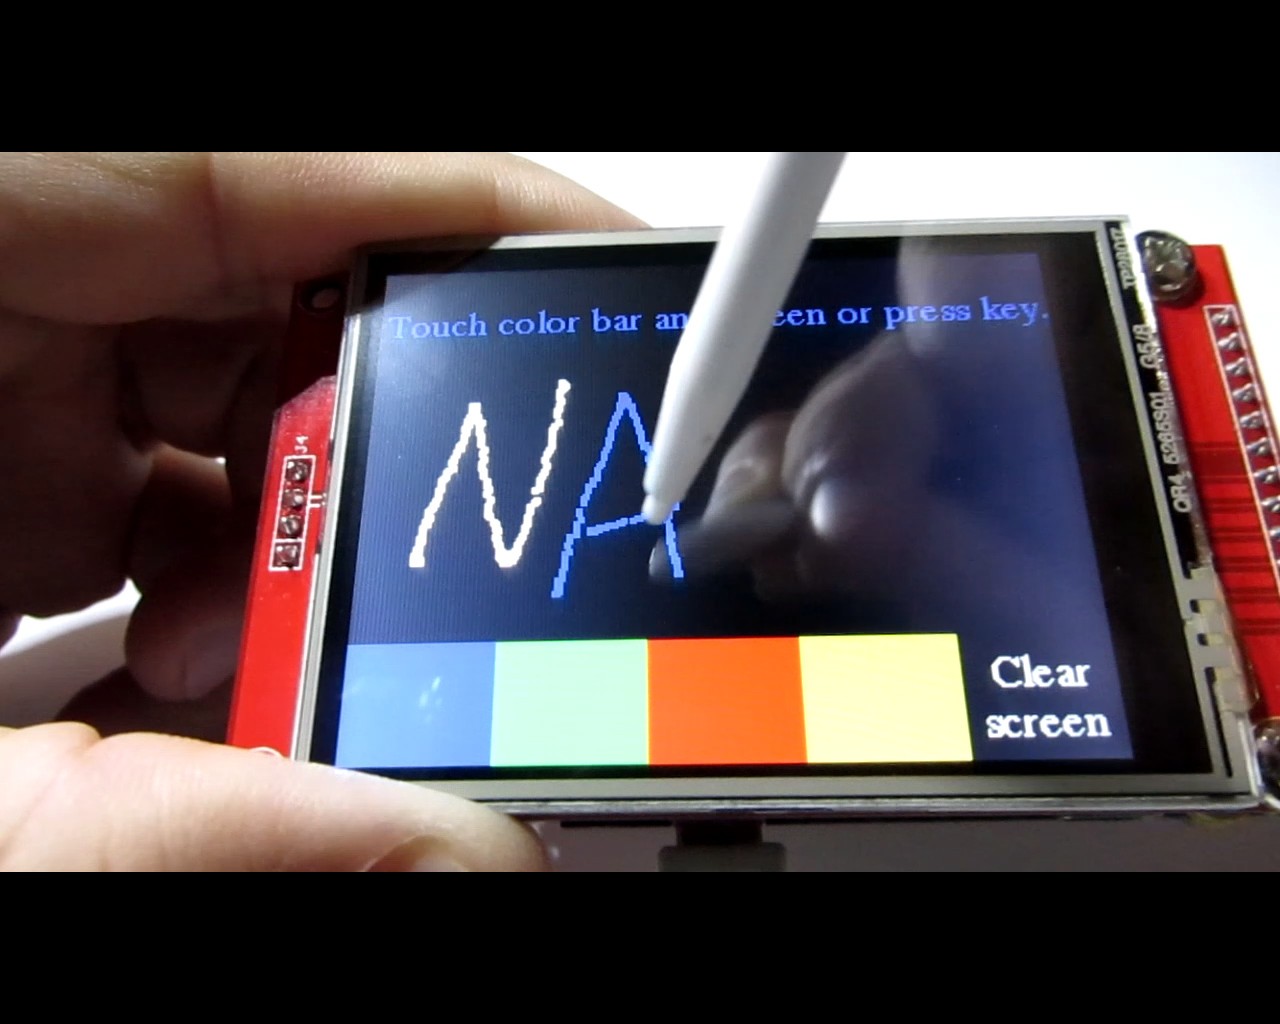
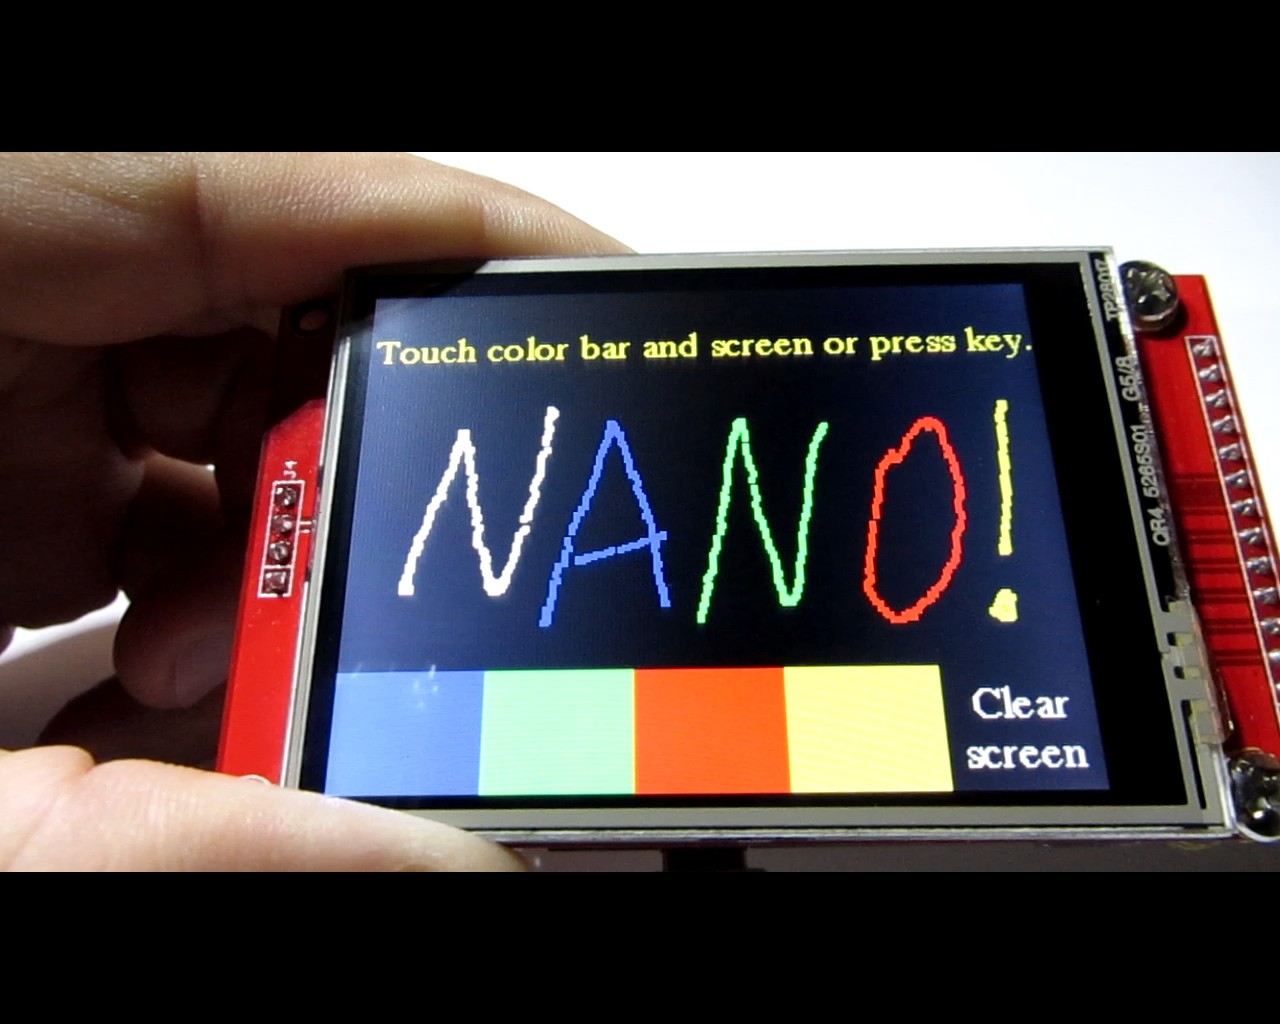
Demostración 2. Pantalla táctil.
/ **************************************** *********************************** EL SOFTWARE Y LA DOCUMENTACIÓN SE PROPORCIONAN "TAL CUAL" SIN GARANTÍA DE NINGUNA * TIPO, YA SEA EXPRESA O IMPLÍCITA, INCLUYENDO, SIN LIMITACIÓN, CUALQUIER GARANTÍA * DE COMERCIABILIDAD, TÍTULO, NO INFRACCIÓN Y APTITUD PARA UN PROPÓSITO EN PARTICULAR *. EN NINGÚN CASO EL AUTOR O SUS LICENCIANTES SERÁN RESPONSABLES U * OBLIGADOS BAJO CONTRATO, NEGLIGENCIA, RESPONSABILIDAD ESTRICTA, CONTRIBUCIÓN, * INCUMPLIMIENTO DE GARANTÍA U OTRA TEORÍA LEGAL EQUITATIVA CUALQUIER DAÑO O GASTOS DIRECTOS O INDIRECTOS * O GASTOS INCLUIDOS, PERO NO SE LIMITAN A CUALQUIER , * DAÑOS INDIRECTOS, PUNITIVOS O CONSECUENTES, PÉRDIDA DE BENEFICIOS O DATOS, * COSTO DE ADQUISICIÓN DE BIENES SUSTITUTOS, TECNOLOGÍA, SERVICIOS O CUALQUIER * RECLAMO DE TERCEROS (INCLUYENDO PERO NO LIMITADO A CUALQUIER DEFENSA DE LOS MISMOS), * U OTROS COSTOS SIMILARES . *********************************************** ****************************** / # include // La biblioteca específica del hardware # incluye // Incluir la biblioteca SPI # include // Incluir la biblioteca de la pantalla táctil # include // Incluir la biblioteca Adafruit-GFX # include // Incluir las fuentes Adafruit # include #include // Pantalla táctil:MOSI =11, MISO =12, SCK =13, CS =2 # define CS_PI N A0XPT2046_Touchscreen ts (CS_PIN, 255); YATFT tft (0); # define Y_BAR_TOP (GetMaxY () - 50) #define Y_BAR_BOT GetMaxY () / * Si usa el escudo, todas las líneas de control y datos son fijas y una declaración más simple opcionalmente se puede utilizar:* / uint16_t pos_x [] ={0,0,0,0}; uint16_t pos_y [] ={0,0,0,0}; uint8_t pos_x_cnt =0; uint8_t pos_y_cnt =0; uint16_t pos_x_mid =0; uint16_t pos_y_mid =0; uint16_t color_paint =BLANCO; uint8_t botones =0; uint16_t Color [4] ={AZUL BRILLANTE, VERDE BRILLANTE, BRILLANTE, BRILLANTEELLOW}; uint16_t Gris [7] ={GRIS0, GRIS1, GRIS2, GRIS GRIS5, GRIS6}; / ***************************************** *********************************************** *** / void ClearScreen (void) {tft.SetColor (NEGRO); // Establecer el color del fone tft.ClearDevice (); // Llena toda la pantalla} void setup () {Serial.begin (115200); // inicializar el puerto serie Serial.println ("Arduino TFT_shield Example1!"); ts.begin (); // Iniciar pantalla táctil SPI.end (); // Deshabilitar SPI para un funcionamiento correcto DB2 (SS) pin tft.begin (); // inicializar la pantalla RefreshWindow ();} void loop () {uint16_t x, y; // Toque // Cuando el pin SS se establece como SALIDA, se puede usar como // un puerto de salida de propósito general (no influye // en las operaciones SPI). SPI.begin (); if (ts.touched ()) {TS_Point p =ts.getPoint (); Serial.print (F ("Presión =")); Serial.print (p.z); Serial.print (F (", x =")); Serial.print (p.x); Serial.print (F (", y =")); Serial.print (p.y); Serial.println (); retraso (3); // Retraso para filtrar SPI.end (); // Deshabilitar SPI para un trabajo correcto pin DB2 (SS) // Calcular las coordenadas x, y del código ADC Serial.print (F ("Presión =")); Serial.print (p.z); Serial.print (F (", x =")); Serial.print (p.x); Serial.print (F (",")); Serial.print (x); Serial.print (F (", y =")); Serial.print (p.y); Serial.print (F (",")); Serial.print (y); Serial.println (); si (p.x <350) p.x =350; si (p.x> 3850) p.x =3850; si (p.y <250) p.y =250; si (p.y> 3850) p.y =3850; x =(uint16_t) (320L - ((uint32_t) p.x - 350L) * 100L / 1094L); y =(uint16_t) (240L - ((uint32_t) p.y - 250L) * 100L / 1510L); // Filtrado pos_x_mid =(pos_x [0] + pos_x [1] + pos_x [2] + pos_x [3]) / 4; pos_y_mid =(pos_y [0] + pos_y [1] + pos_y [2] + pos_y [3]) / 4; pos_x [pos_x_cnt ++] =x; pos_y [pos_y_cnt ++] =y; pos_x_cnt &=0x03; pos_y_cnt &=0x03; if (x> (pos_x_mid - 10) &&x <(pos_x_mid + 10) &&y> (pos_y_mid - 10) &&y <(pos_y_mid + 10)) {if (y> Y_BAR_TOP &&y Algunas capturas de pantalla:
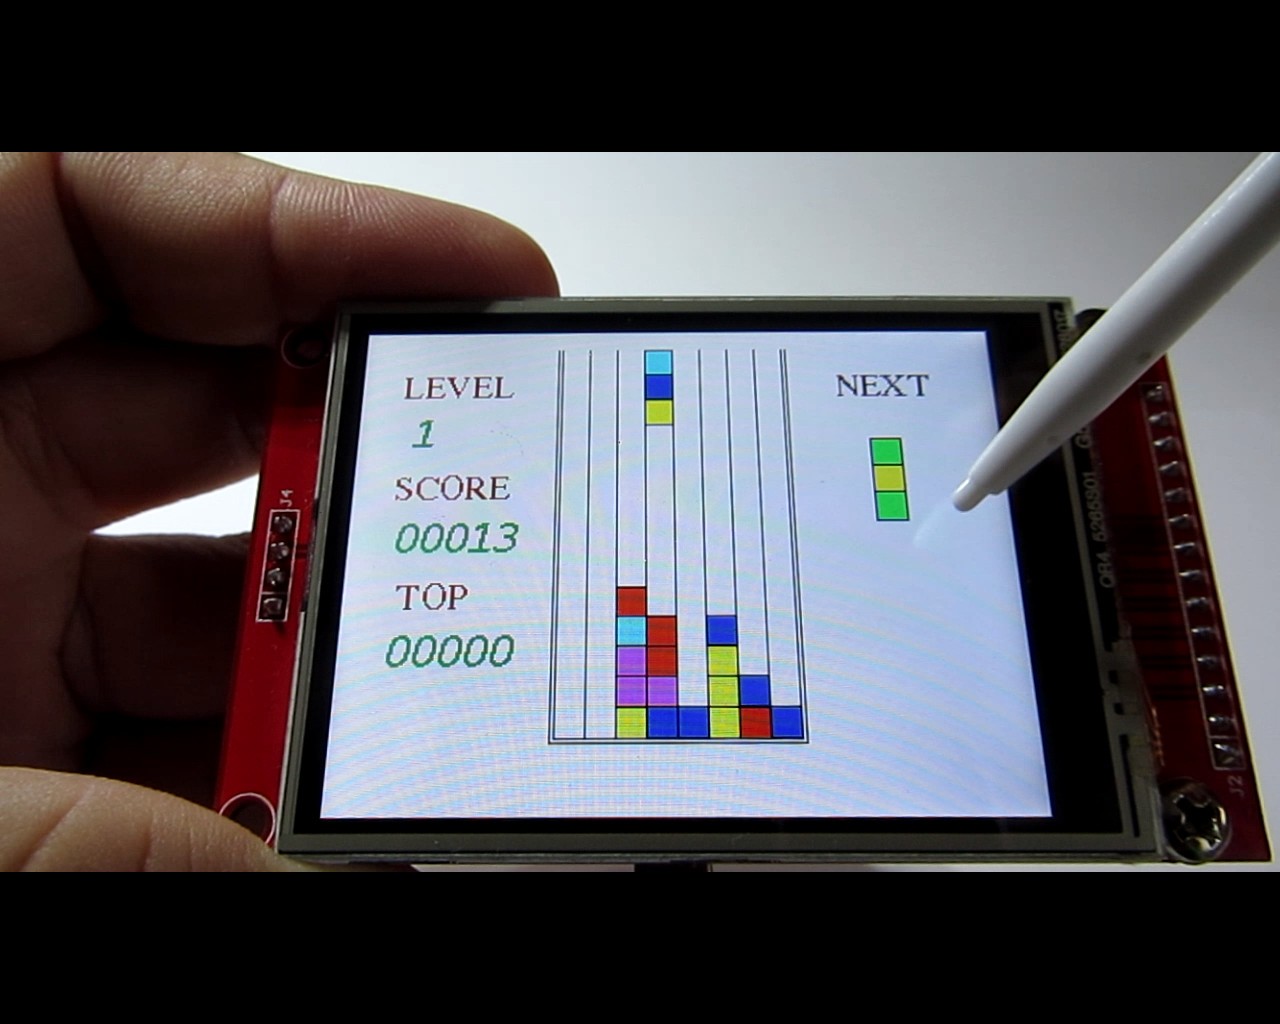
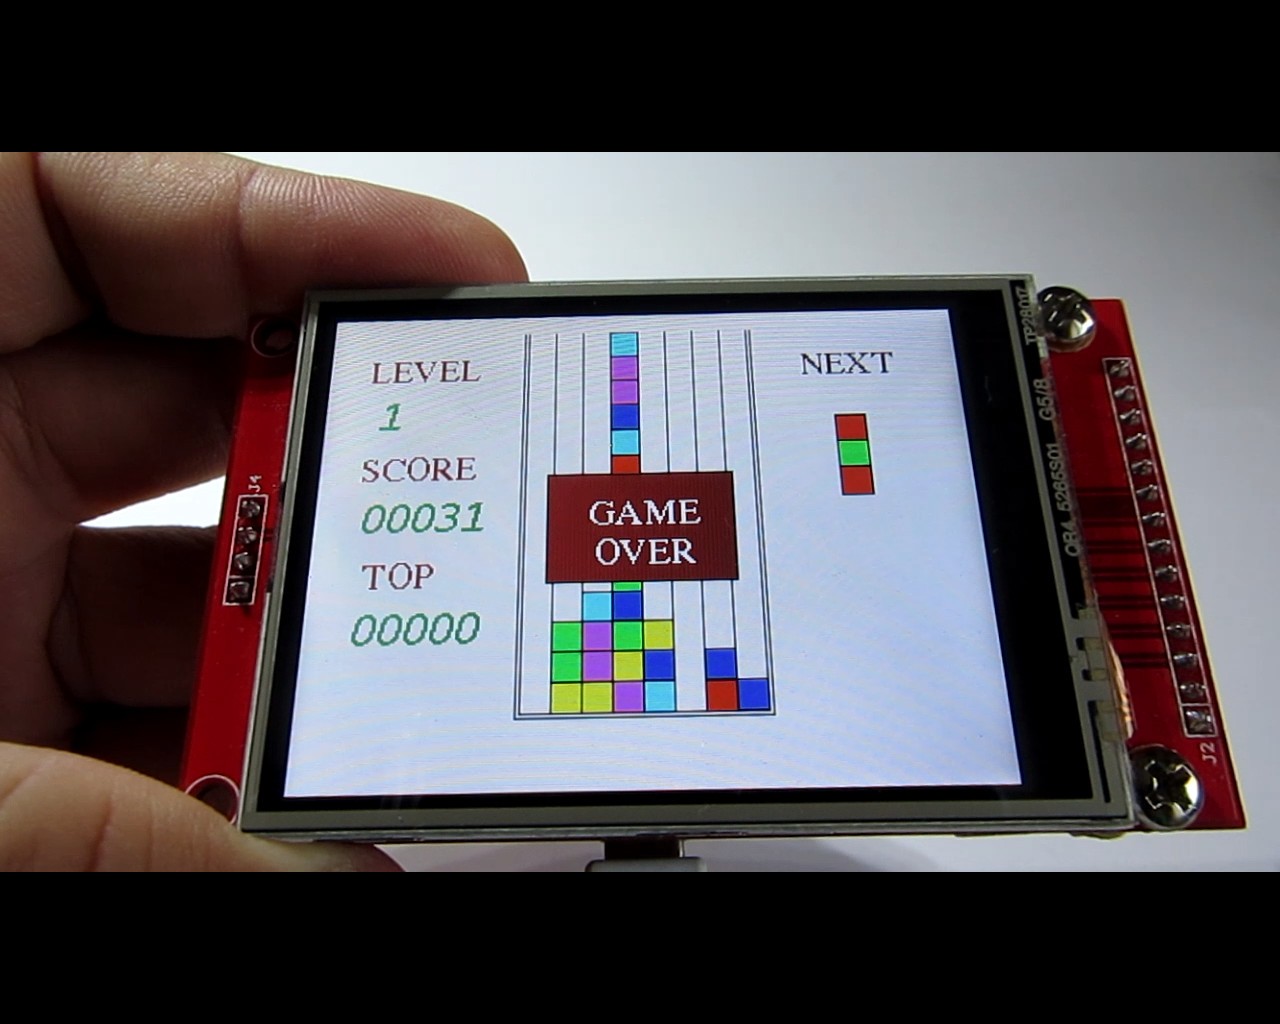
Demostración 3. Juego de lógica "Columns".
/ **************************************** *********************************** EL SOFTWARE Y LA DOCUMENTACIÓN SE PROPORCIONAN "TAL CUAL" SIN GARANTÍA DE NINGUNA * TIPO, YA SEA EXPRESA O IMPLÍCITA, INCLUYENDO, SIN LIMITACIÓN, CUALQUIER GARANTÍA * DE COMERCIABILIDAD, TÍTULO, NO INFRACCIÓN Y APTITUD PARA UN PROPÓSITO EN PARTICULAR *. EN NINGÚN CASO EL AUTOR O SUS LICENCIANTES SERÁN RESPONSABLES U * OBLIGADOS BAJO CONTRATO, NEGLIGENCIA, RESPONSABILIDAD ESTRICTA, CONTRIBUCIÓN, * INCUMPLIMIENTO DE GARANTÍA U OTRA TEORÍA LEGAL EQUITATIVA CUALQUIER DAÑO O GASTOS DIRECTOS O INDIRECTOS * O GASTOS INCLUIDOS, PERO NO SE LIMITAN A CUALQUIER , * DAÑOS INDIRECTOS, PUNITIVOS O CONSECUENTES, PÉRDIDA DE BENEFICIOS O DATOS, * COSTO DE ADQUISICIÓN DE BIENES SUSTITUTOS, TECNOLOGÍA, SERVICIOS O CUALQUIER * RECLAMO DE TERCEROS (INCLUYENDO PERO NO LIMITADO A CUALQUIER DEFENSA DE LOS MISMOS), * U OTROS COSTOS SIMILARES . *********************************************** ****************************** / # incluir #include #include #include // Biblioteca de gráficos principal # incluye #include #define CS_PIN A0 // MOSI =Pantalla 11, MISO =12, SCK =13XPT2046_Touch ts (CS_PIN, 255); YATFT tft (0); / * Si usa el escudo, todas las líneas de control y datos son fijas, y opcionalmente se puede usar una declaración más simple :* / long randNumber; #define KEY_EMPTY 0 # define KEY_SWAP 1 # define KEY_FALL 2 # define KEY_LEFT 3 # define KEY_RIGHT 4 # define DISPLAY_MAX_X 320 # define DISPLAY_MAX_Y 240 # define MaxCol 8 #define MaxRow 17 # define SmeX 3 #define razmer 15 # define LL 250 # define NumCol 6 # define MaxLevel 8 # define PeriodLevel 80 # define DISP_LEFT ((DISPLAY_MAX_X - MaxCol * razmer) / 2 - 2) #define DISP_RIGHT ((DISPLAY_MAX_X + MaxCol * razmer) / 2 + 2) #define DISP_TOP ((DISPLAY_MAX_Y - (MaxRow-4) * razmer) / 2 - 2 - 10) #define DISP_BOT ((DISPLAY_MAX_Y + (MaxRow-4) * razmer) / 2 + 2 - 10) uint8_t MasSt [MaxCol ] [MaxRow], MasTmp [MaxCol] [MaxRow], MasOld [MaxCol] [MaxRow], fignext [3]; uint8_t Level =1, OldLevel, tr, flfirst =1; uint16_t MasCol [] ={WHITE, BLACK, BRIGHTRED , BRIGHTBLUE, BRIGHTGREEN, BRIGHTYELLOW, BRIGHTMAGENTA, BRIGHTCYAN}; contador largo sin firmar, Score =0, TScore =0, Record =0, OldRecord, OldScore, myrecord; uint16_t tempspeed; bool fl, Demo =true, myfl =false, Arbeiten =falso, FlNew, FlZ =falso; int8_t VAL, Mp, x, y; int8_t mmm [4] [2] ={ {-1,0}, {0, -1}, {1,0}, {0,1}}; uint16_t MasSpeed [MaxLevel] ={500,450,400,350,300,250,200,100}; / ************ *********************************************** **** / void setup (void) {// inicializar el puerto serie Serial.begin (115200); Serial.println ("¡Ejemplo de TFT_shield_Game1!"); ts.begin (); // Iniciar pantalla táctil SPI.end (); tft.begin (); // inicializar la pantalla randomSeed (analogRead (5)); tft.SetColor (BLANCO); tft.ClearDevice (); tft.SetColor (ROJO); tft.SetFont (&FreeSerif9pt7b); tft.OutTextXY (20, 20, "NIVEL"); tft.OutTextXY (240, 20, "SIGUIENTE"); tft.OutTextXY (20, 75, "PUNTUACIÓN"); tft.OutTextXY (25, 130, "ARRIBA"); FlNew =verdadero; ViewStacan (); GetNext (); retraso (100); tft.SetColor (NEGRO); tft.DrawLine (DISP_LEFT + 1, DISP_TOP + 0, DISP_LEFT + 1, DISP_BOT - 1); tft.DrawLine (DISP_LEFT + razmer * MaxCol + 5-MaxCol, DISP_TOP + 0, DISP_LEFT + razmer * MaxCol + 5-MaxCol, DISP_BOT - 1); tft.DrawLine (DISP_LEFT + 1, DISP_BOT - 1, DISP_LEFT + 1 + razmer * MaxCol + 5-MaxCol-1, DISP_BOT - 1);} bucle vacío (void) {if (Demo) ProcDemo (); else {if (Arbeiten) {mydelay (tempspeed); figmove (0,1); } más si (mypush () ==KEY_SWAP) NewGame (); }} uint8_t mypush (void) {unsigned long tpr =millis (); uint8_t res =KEY_EMPTY; botón uint8_t =0; static uint8_t button_old; estático uint8_t cnt =0; botón =Toque (); if (botón) {cnt =5; Serial.print ("Botón de escaneo:"); Serial.print (botón, HEX); Serial.println (); if (button! =button_old) {if (button &0x01) res =KEY_SWAP; if (botón &0x02) res =KEY_FALL; if (botón &0x04) {}; if (botón &0x08) res =KEY_LEFT; if (botón &0x10) res =KEY_RIGHT; button_old =botón; }} if (! cnt) {button_old =button; } else {cnt--; } retorno (res); } void ViewQuad (uint8_t i, uint8_t j, uint8_t mycolor) {if (j <3) return; uint16_t wy =DISP_TOP + SmeY + (j-3) * razmer - j; uint16_t wx =DISP_LEFT + SmeX + i * razmer - i; if (mycolor! =0) {tft.SetColor (NEGRO); tft.DrawRect (wx, wy, wx + razmer-1, wy + razmer-1); tft.SetColor (MasCol [mycolor]); tft.DrawFillRect (wx + 1, wy + 1, wx + 1 + razmer-3, wy + 1 + razmer-3); } else {tft.SetColor (BLANCO); tft.DrawFillRect (wx + 1, wy + 0, wx + 1 + razmer-3, wy + 1 + razmer-3); }} void ViewStacan (void) {char myStr2 [5]; uint8_t h =tft.GetTextHeight (&FreeMonoBoldOblique12pt7b); tft.SetFont (&FreeMonoBoldOblique12pt7b); if (OldScore! =Score || FlNew) {sprintf (myStr2, "% 05d", Score); int16_t w =tft.GetTextWidth (myStr2 y FreeMonoBoldOblique12pt7b); tft.SetColor (BLANCO); tft.DrawFillRect (20,100,20 + w + 5,100 + h); tft.SetColor (VERDE); tft.OutTextXY (20,100, myStr2); OldScore =Puntuación; } if (OldRecord! =Record || FlNew) {sprintf (myStr2, "% 05d", Record); int16_t w =tft.GetTextWidth (myStr2 y FreeMonoBoldOblique12pt7b); tft.SetColor (BLANCO); tft.DrawFillRect (20,155,20 + w + 5,155 + h); tft.SetColor (VERDE); tft.OutTextXY (20,155, myStr2); OldRecord =Registro; } if (OldLevel! =Level || FlNew) {sprintf (myStr2, "% 01d", Level); int16_t w =tft.GetTextWidth (myStr2 y FreeMonoBoldOblique12pt7b); tft.SetColor (BLANCO); tft.DrawFillRect (25,45,25 + w + 5,45 + h); tft.SetColor (VERDE); tft.OutTextXY (25,45, myStr2); OldLevel =Nivel; } FlNew =falso; para (byte j =3; j =0 &&ny> =0 &&nx 1 || MasTmp [i] [j]> 2)) {MasTmp [nx] [ny] =3; MasTmp [i] [j] =3; } más si (modo ==3 &&MasTmp [nx] [ny] ==3) {if (MasTmp [i] [j]! =3) {MasTmp [i] [j] =3; fl =verdadero; }}}} void Sos (int i, int j, modo byte) {for (byte k =0; k <4; k ++) Sosed (i, j, mmm [k] [0], mmm [k] [1 ],modo); } bool FindFull (vacío) {byte i, j, k; bool res; res =falso; para (byte k =2; k <8; k ++) {ClearMas (MasTmp); para (j =3; j 1) Sos (i, j, 2); hacer {fl =falso; para (j =3; j 0) Sos (i, j, 3); } while (fl); para (j =3; j 0) {ViewStacan (); FlZ =verdadero; mydelay (500); } para (j =0; j MaxLevel) Nivel =MaxLevel; } tempspeed =MasSpeed [Nivel-1]; }} anular MyScore (anular) {TScore =0; while (FindFull ()) {if (TScore> 7) Score =Score + TScore + (TScore-8) * 2; más Puntuación =Puntuación + TScore; ViewStacan (); FlZ =verdadero; mydelay (1000); } FlZ =falso;} void ProcDemo (void) {Score =0; GetNext (); para (byte j =3; j MaxCol-1) return (falso); if (dx! =0) if (MasSt [x + dx] [y + dy + 2] ==0) return (verdadero); else return (falso); if (dy> 0) {if (y + dy + 2> MaxRow-1 || MasSt [x + dx] [y + dy + 2]> 0) {if (y <3) gameover (); si no fff =verdadero; } else {para (byte i =0; i <3; i ++) MasSt [x] [y + 2-i + dy] =MasSt [x] [y + 2-i]; MasSt [x] [y] =0; y =y + dy; } if (fff) {MyScore (); GetNext (); } ViewStacan (); } return (verdadero);} uint8_t Touch (void) {uint16_t x, y; botón uint8_t =0; // Toque // Cuando el pin SS se establece como SALIDA, se puede usar como // un puerto de salida de propósito general (no influye // en las operaciones SPI). SPI.begin (); if (ts.touched ()) {TS_Point p =ts.getPoint (); retraso (3); // Retraso para filtrar SPI.end (); // Calcula las coordenadas x, y del código ADC if (p.x <450) p.x =450; si (p.y <500) p.y =500; x =(uint16_t) (320L - ((uint32_t) p.x - 450L) * 10L / 106L); y =(uint16_t) (240L - ((uint32_t) p.y - 500L) * 10L / 140L); if (x <80) {// Botón izquierdo =0x08; } else if (x> 240) {// Botón derecho =0x10; } else if (y <120) {// Botón de intercambio =0x01; } botón else =0x02; // Otoño} SPI.end (); botón de retorno;} Algunas capturas de pantalla:
Video de demostración
Continuará.
¡Gracias por la atención!
Artículos anteriores:
1) Escudo TFT único para Arduino Uno - Inicio,
2) Escudo TFT único para Arduino Uno - OV7670 Cam Live View,
3) Escudo TFT único para Arduino Uno - Cámara Bluetooth Arduino (ABC).
Artículos siguientes:
4) Fotos y video RGB en pantalla TFT SPI.
Actualización 01.04.2021:
¡Hola de nuevo! Existe una biblioteca actualizada para una serie de pantallas, que actualmente consta de dos escudos y dos placas de conexión. El boceto se compila en función de la versión seleccionada (de 1 a 4) y el tipo de microcontrolador (MegaAVR o ESP-32). Fotos agregadas, ejemplos. Puede encontrar más información en https://github.com/Ekaburg/EkaTFT.
Código
Biblioteca
https://github.com/YATFT/YATFTProceso de manufactura
- Animación de mapa de bits en ILI9341 TFT Touchscreen Display Shield
- Controlador DMX operado por la web
- Arduino Spybot
- Flores - Arduino Nano, CrazyCircuits, DFRobot
- Arduino Nano:Controla 2 motores paso a paso con joystick
- INICIO:Una terminal ARduino independiente
- Contador Geiger de mano con Arduino Nano
- Monitoreo SMART de temperatura para escuelas
- Biblioteca de puertos IO de 8 bits para Arduino
- BLUE_P:Escudo de programación inalámbrico Arduino
- Matriz de teclado de prototipos de 64 teclas para Arduino