Acerca de este proyecto
Este es un juego de whac-a-mole personalizado. Por ahora está programado con un juego básico, pero es posible crear actualizaciones en la función.
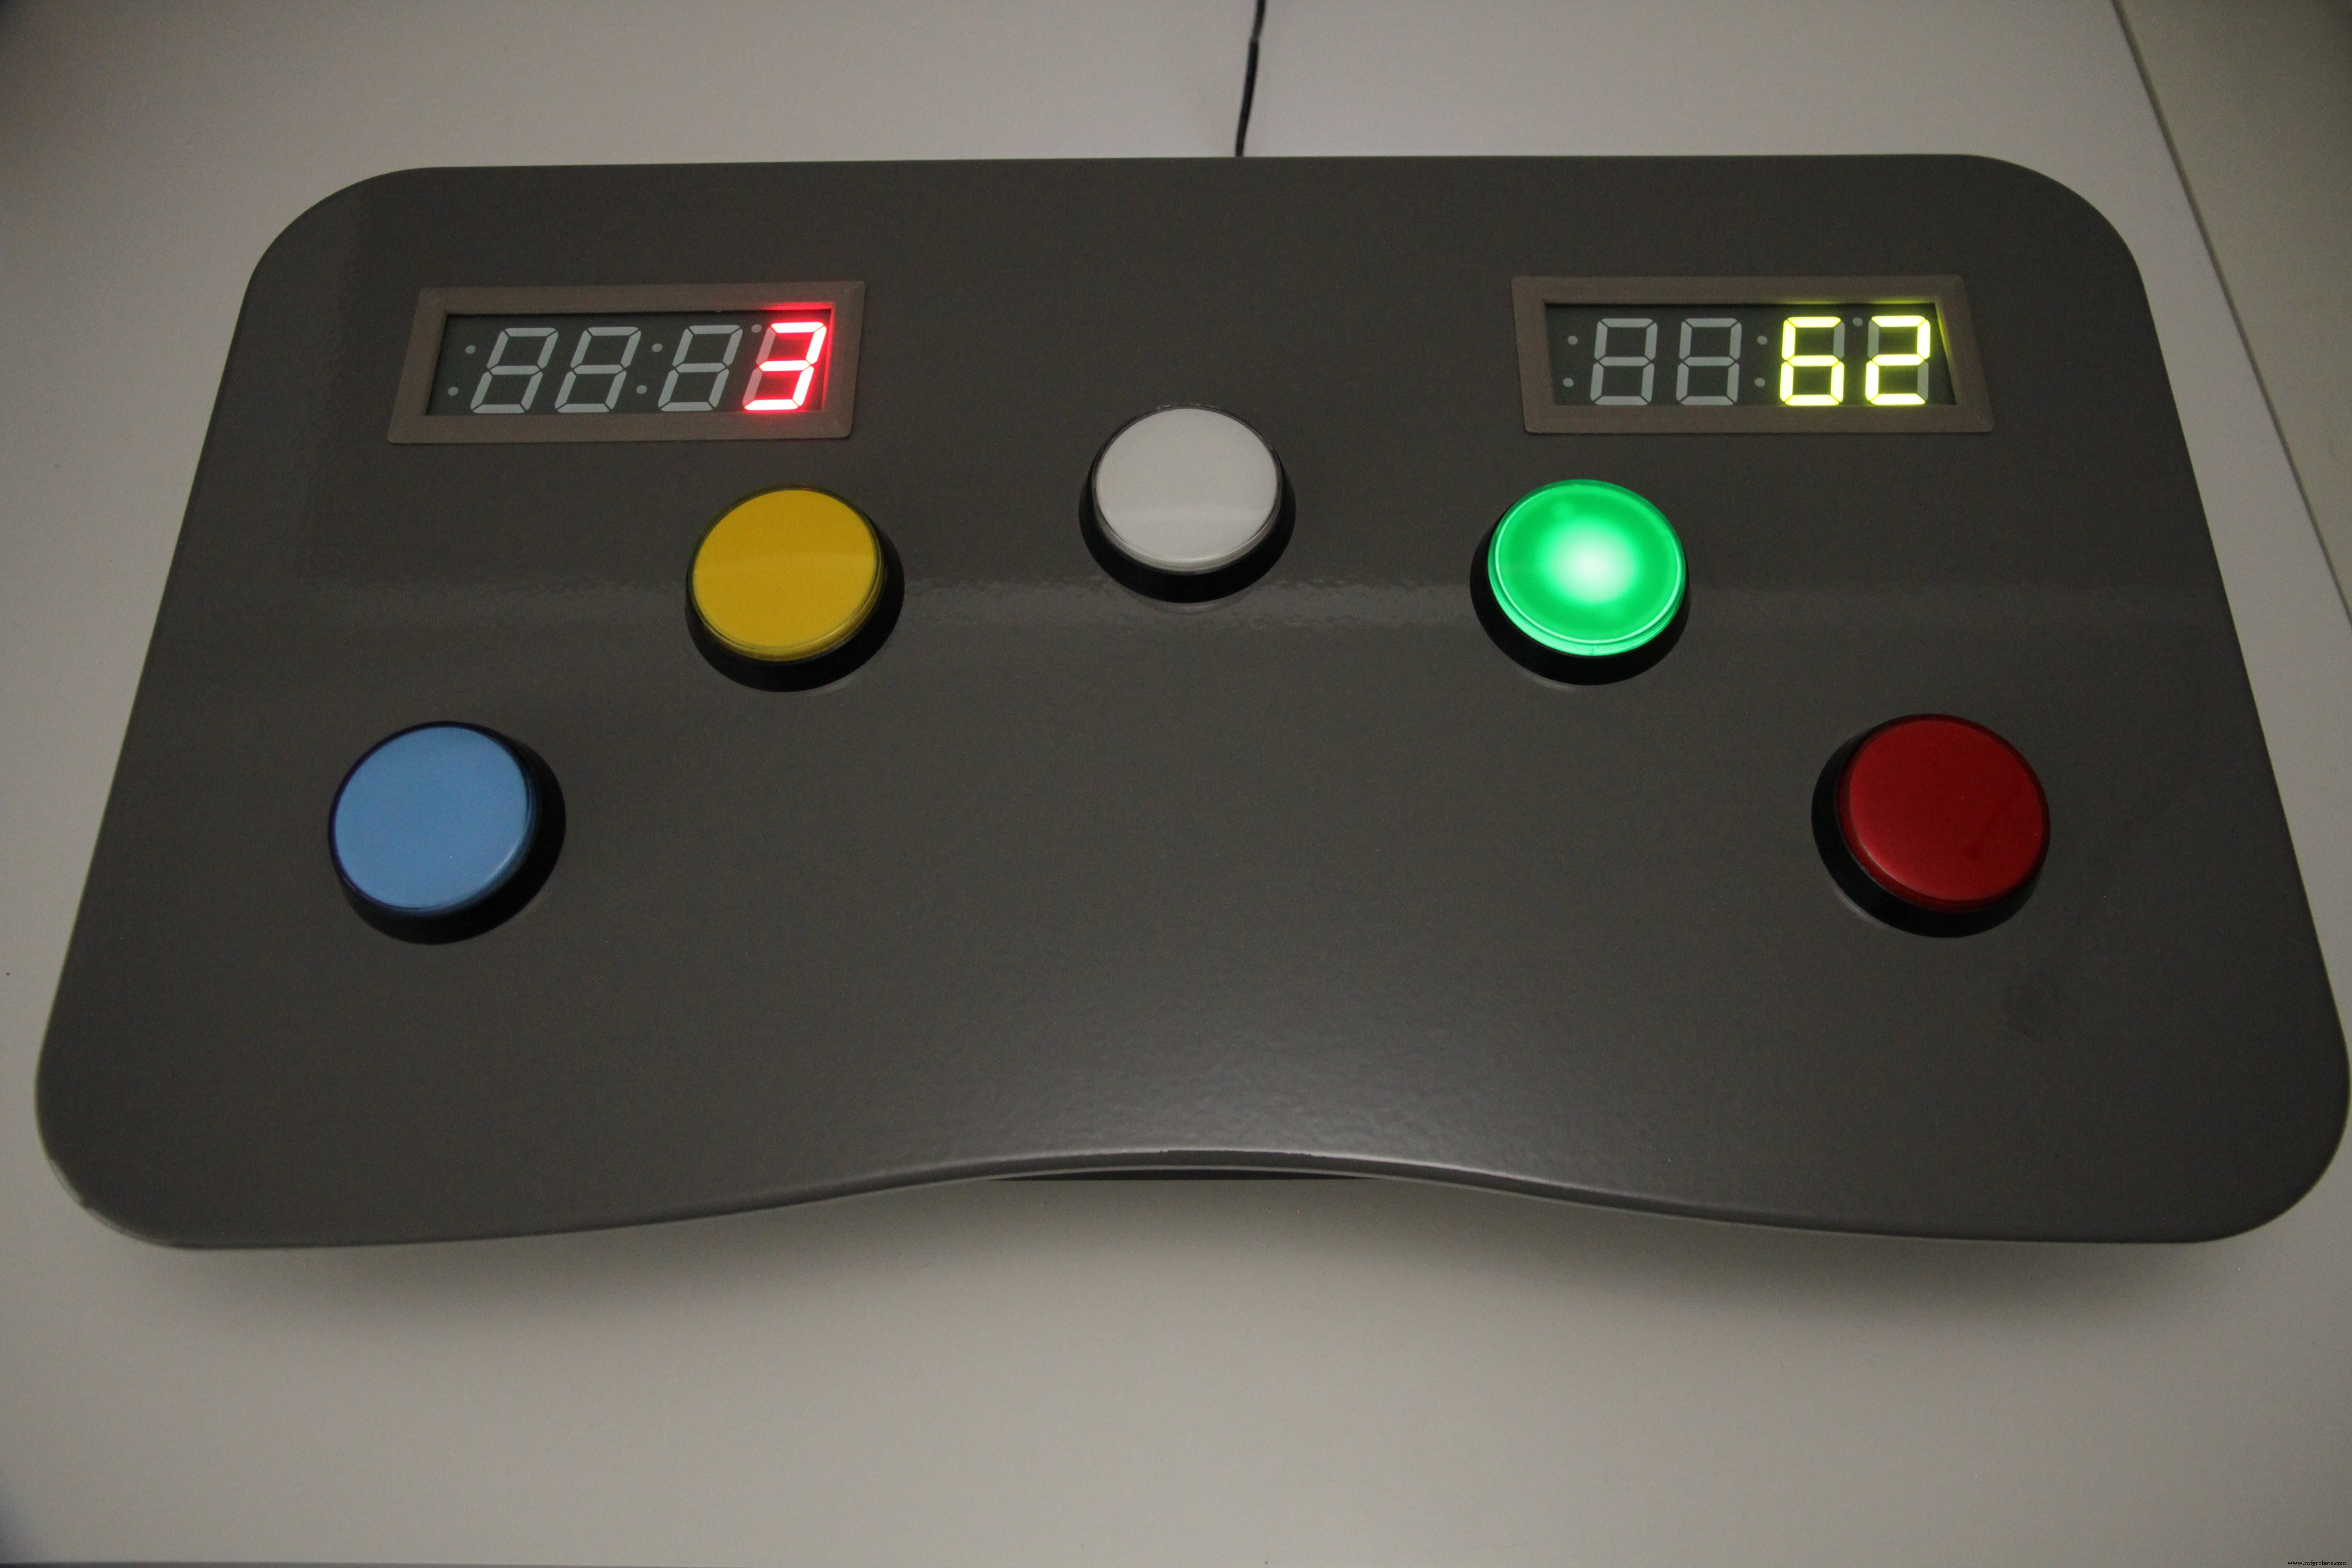
Funciones clave: - 5 botones para el juego en sí. Cada botón tiene su propio LED brillante. Los LED están controlados por PWM (utilizados para la secuencia de finalización del juego).
- 10 niveles seleccionables. Nivel 1 (fácil) a 10 (loco). Durante el juego, debes presionar el botón correcto dentro de un cierto tiempo. Esta duración es variable dentro de cada nivel (por lo que a veces tienes que presionar es más rápido que otros pasos).
- (pseudo) selección aleatoria de botones durante el juego. El siguiente paso (botón que debe presionarse) es siempre otro botón.
- Pantallas de 2 dígitos LED. Uno para la selección de puntaje / cuenta regresiva / nivel actual y otro para mostrar puntaje alto.
- control de volumen digital
- Almacenamiento de puntuaciones altas
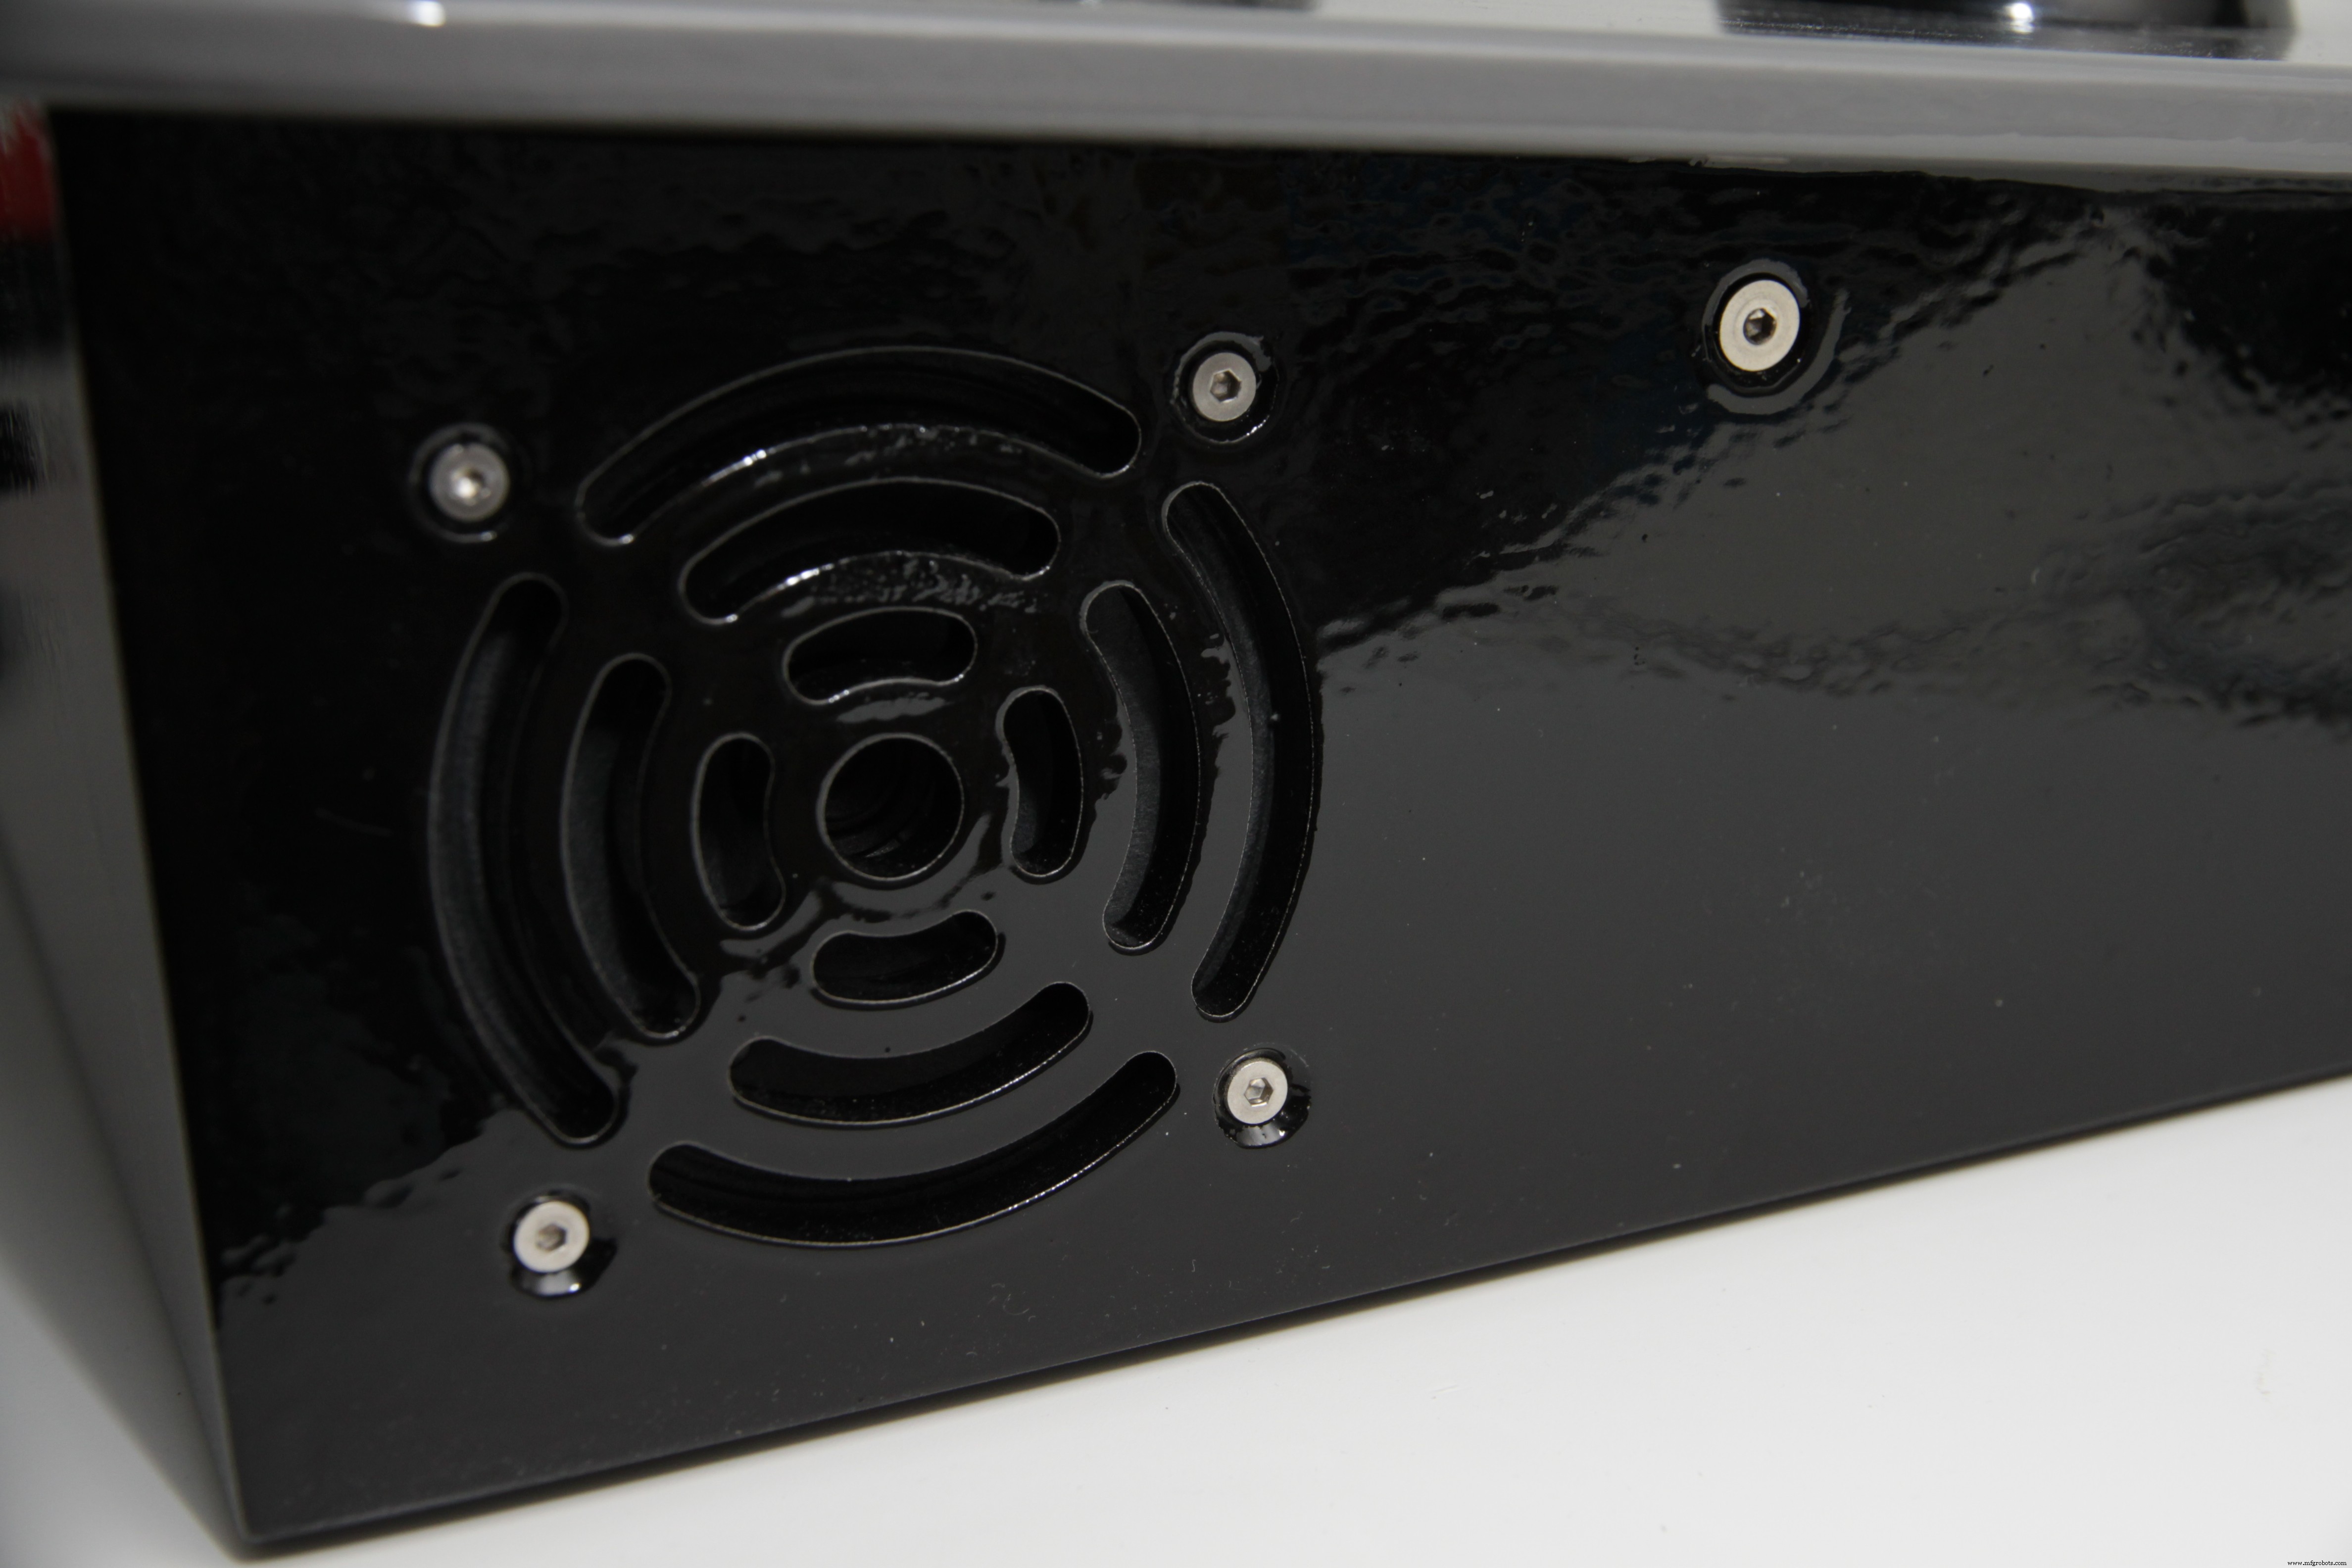
- Efectos de sonido. Durante varios estados del juego, los bucles de sonido se reproducen a través de los altavoces integrados.
- Recinto cortado con láser
- Muchas piezas impresas en 3D
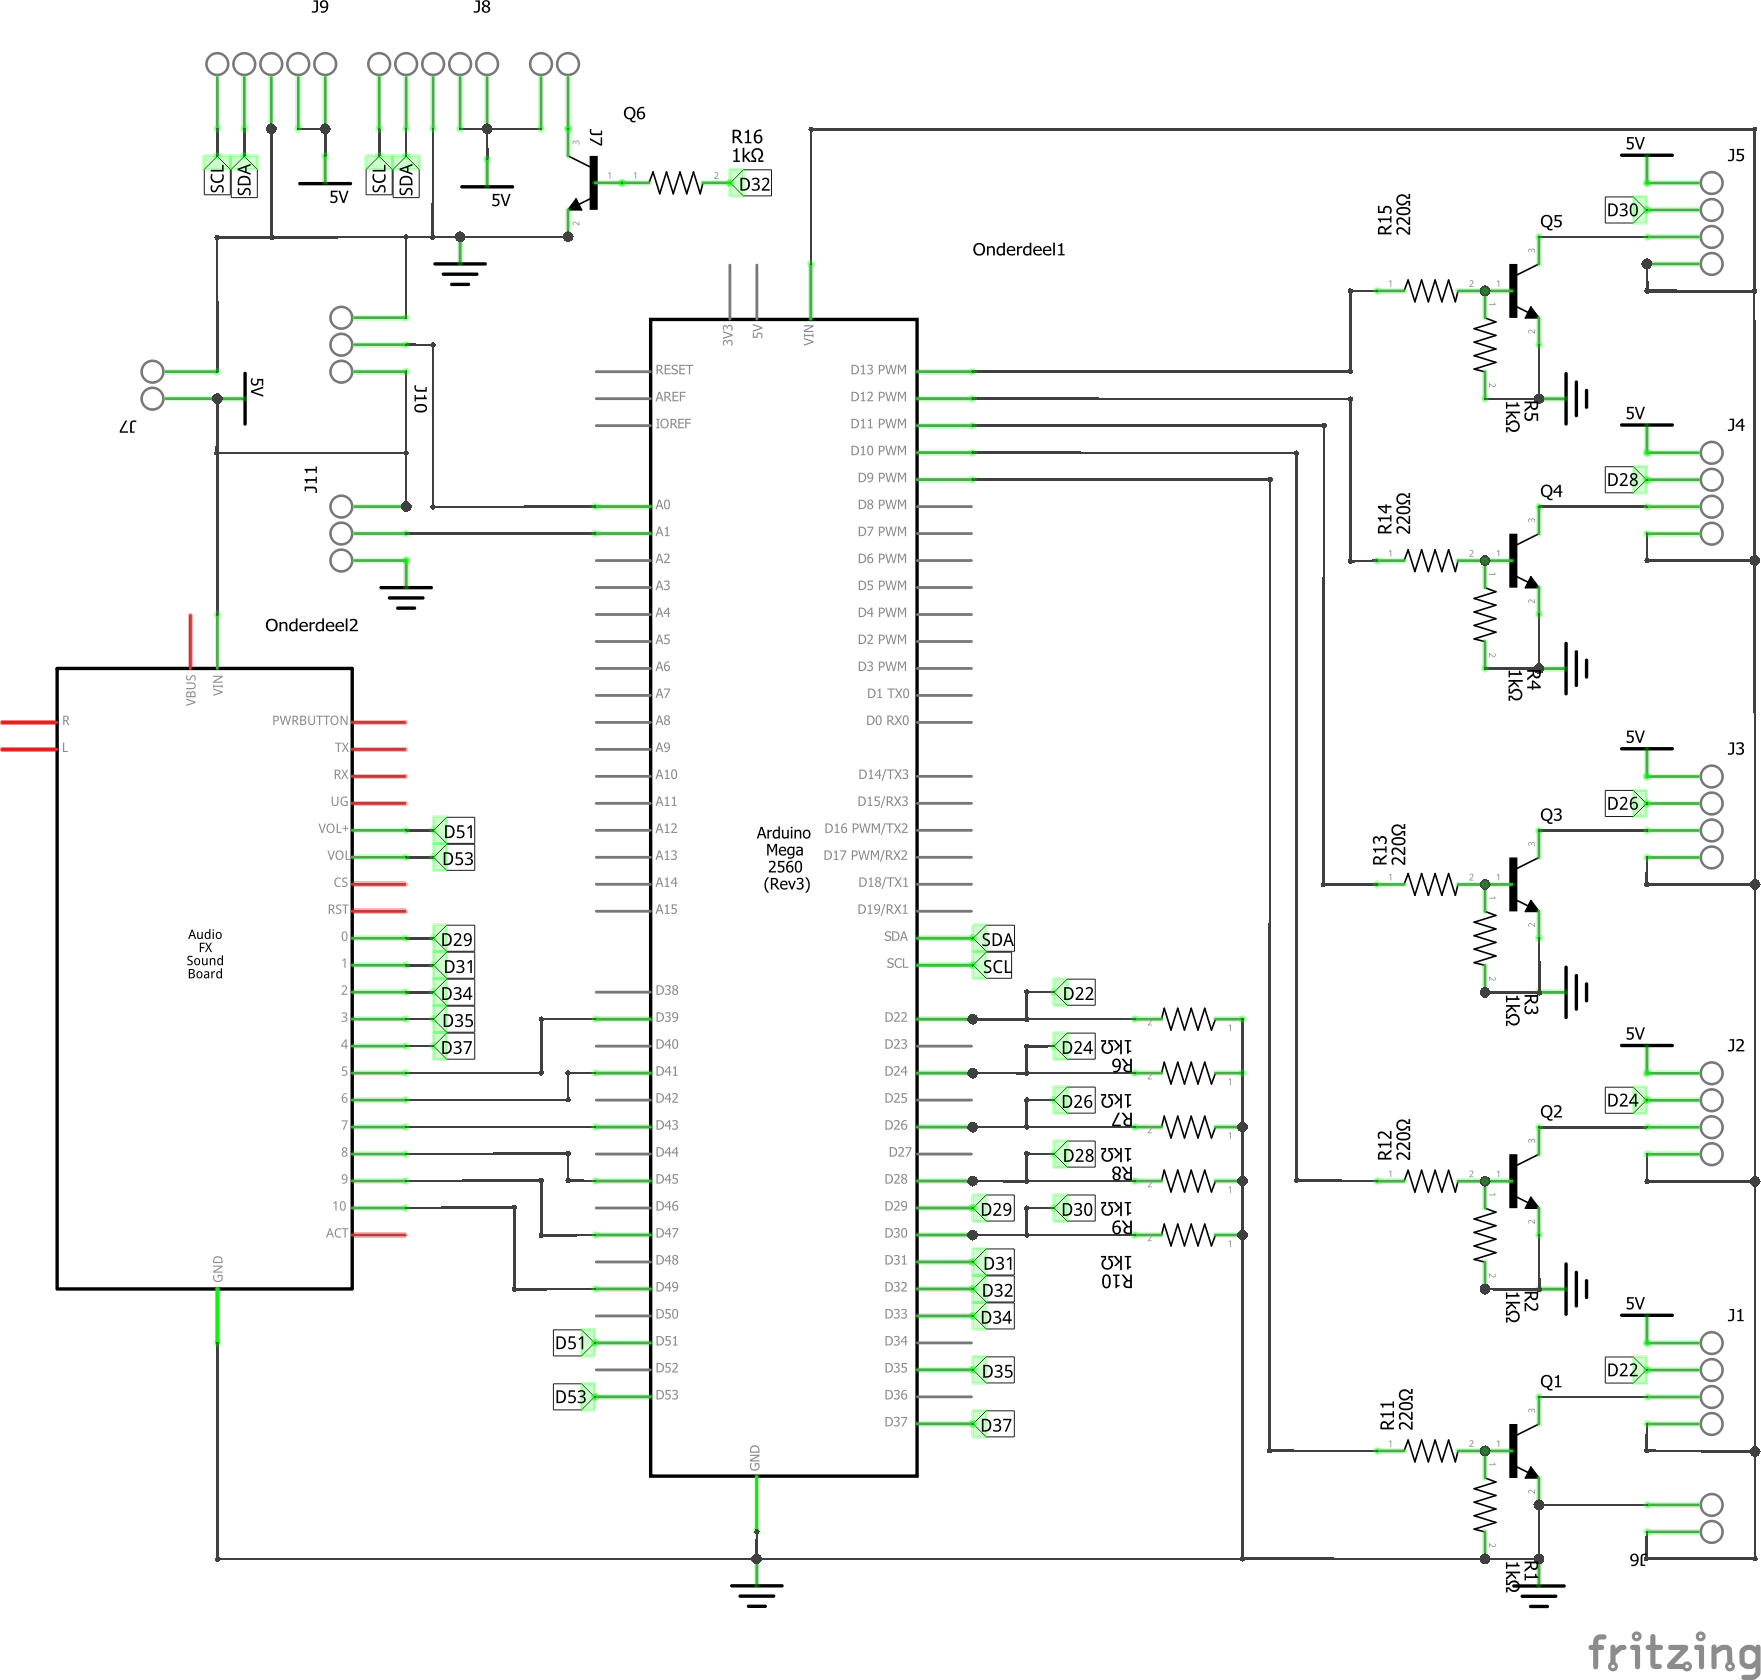
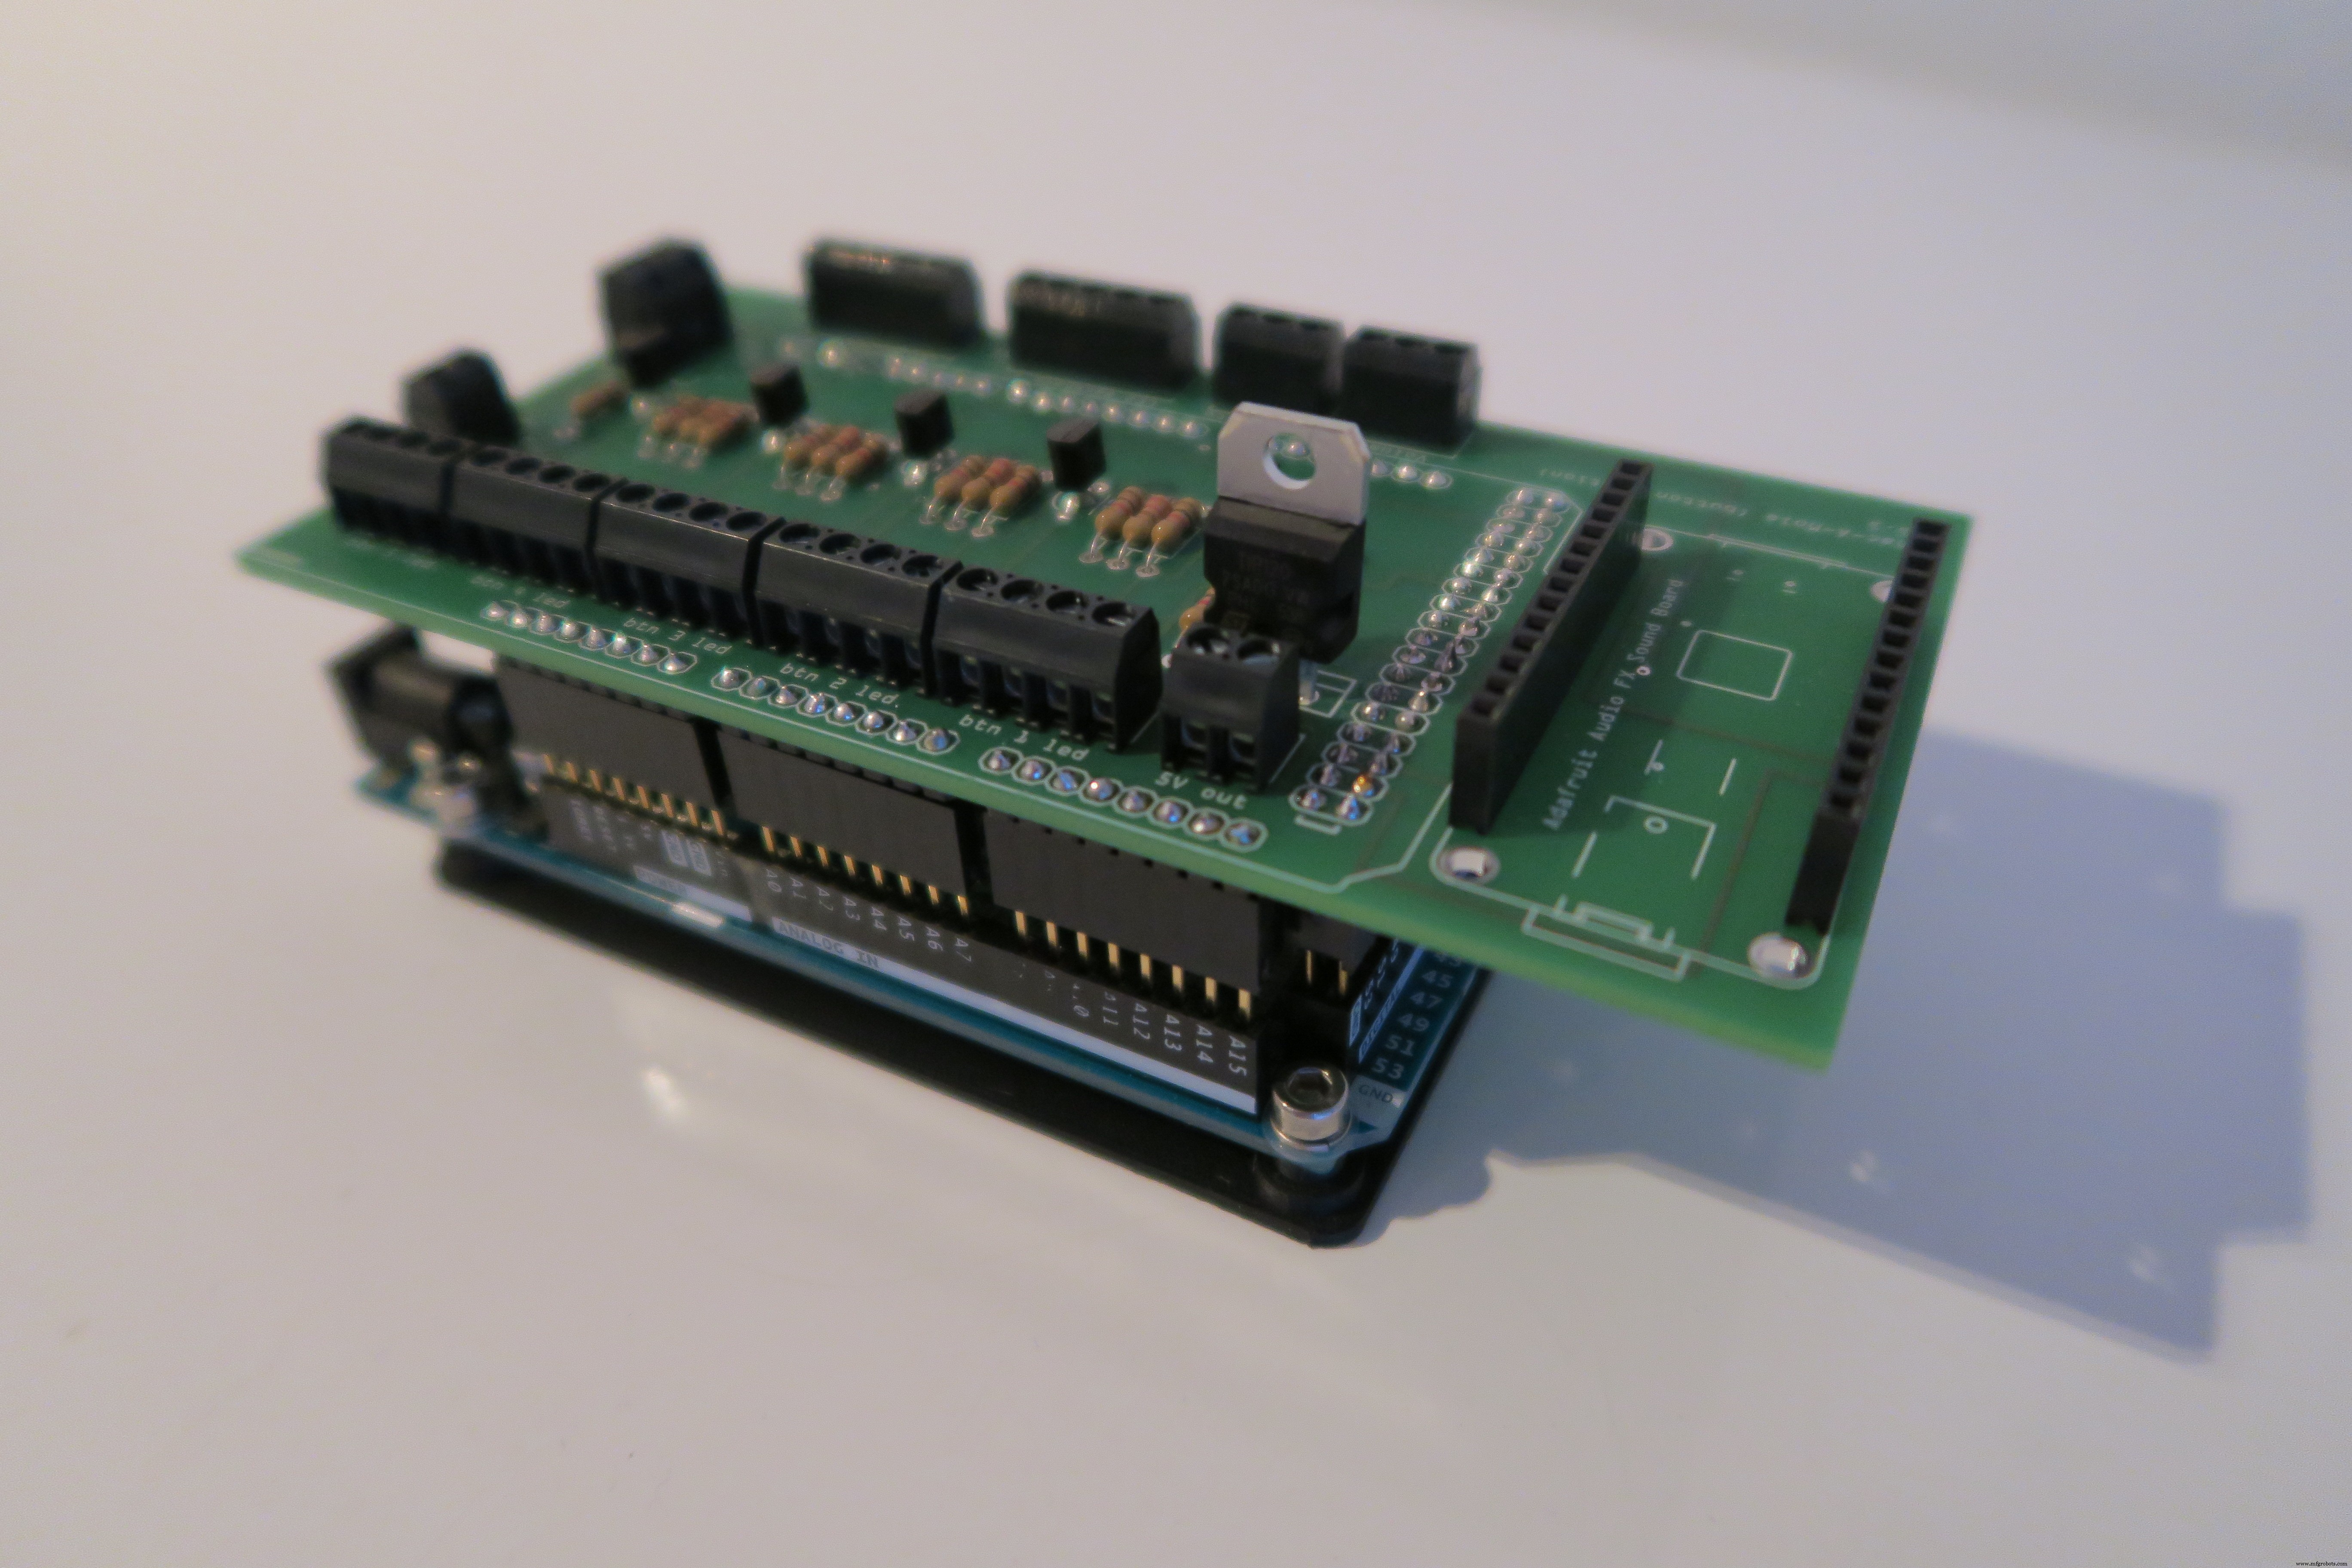
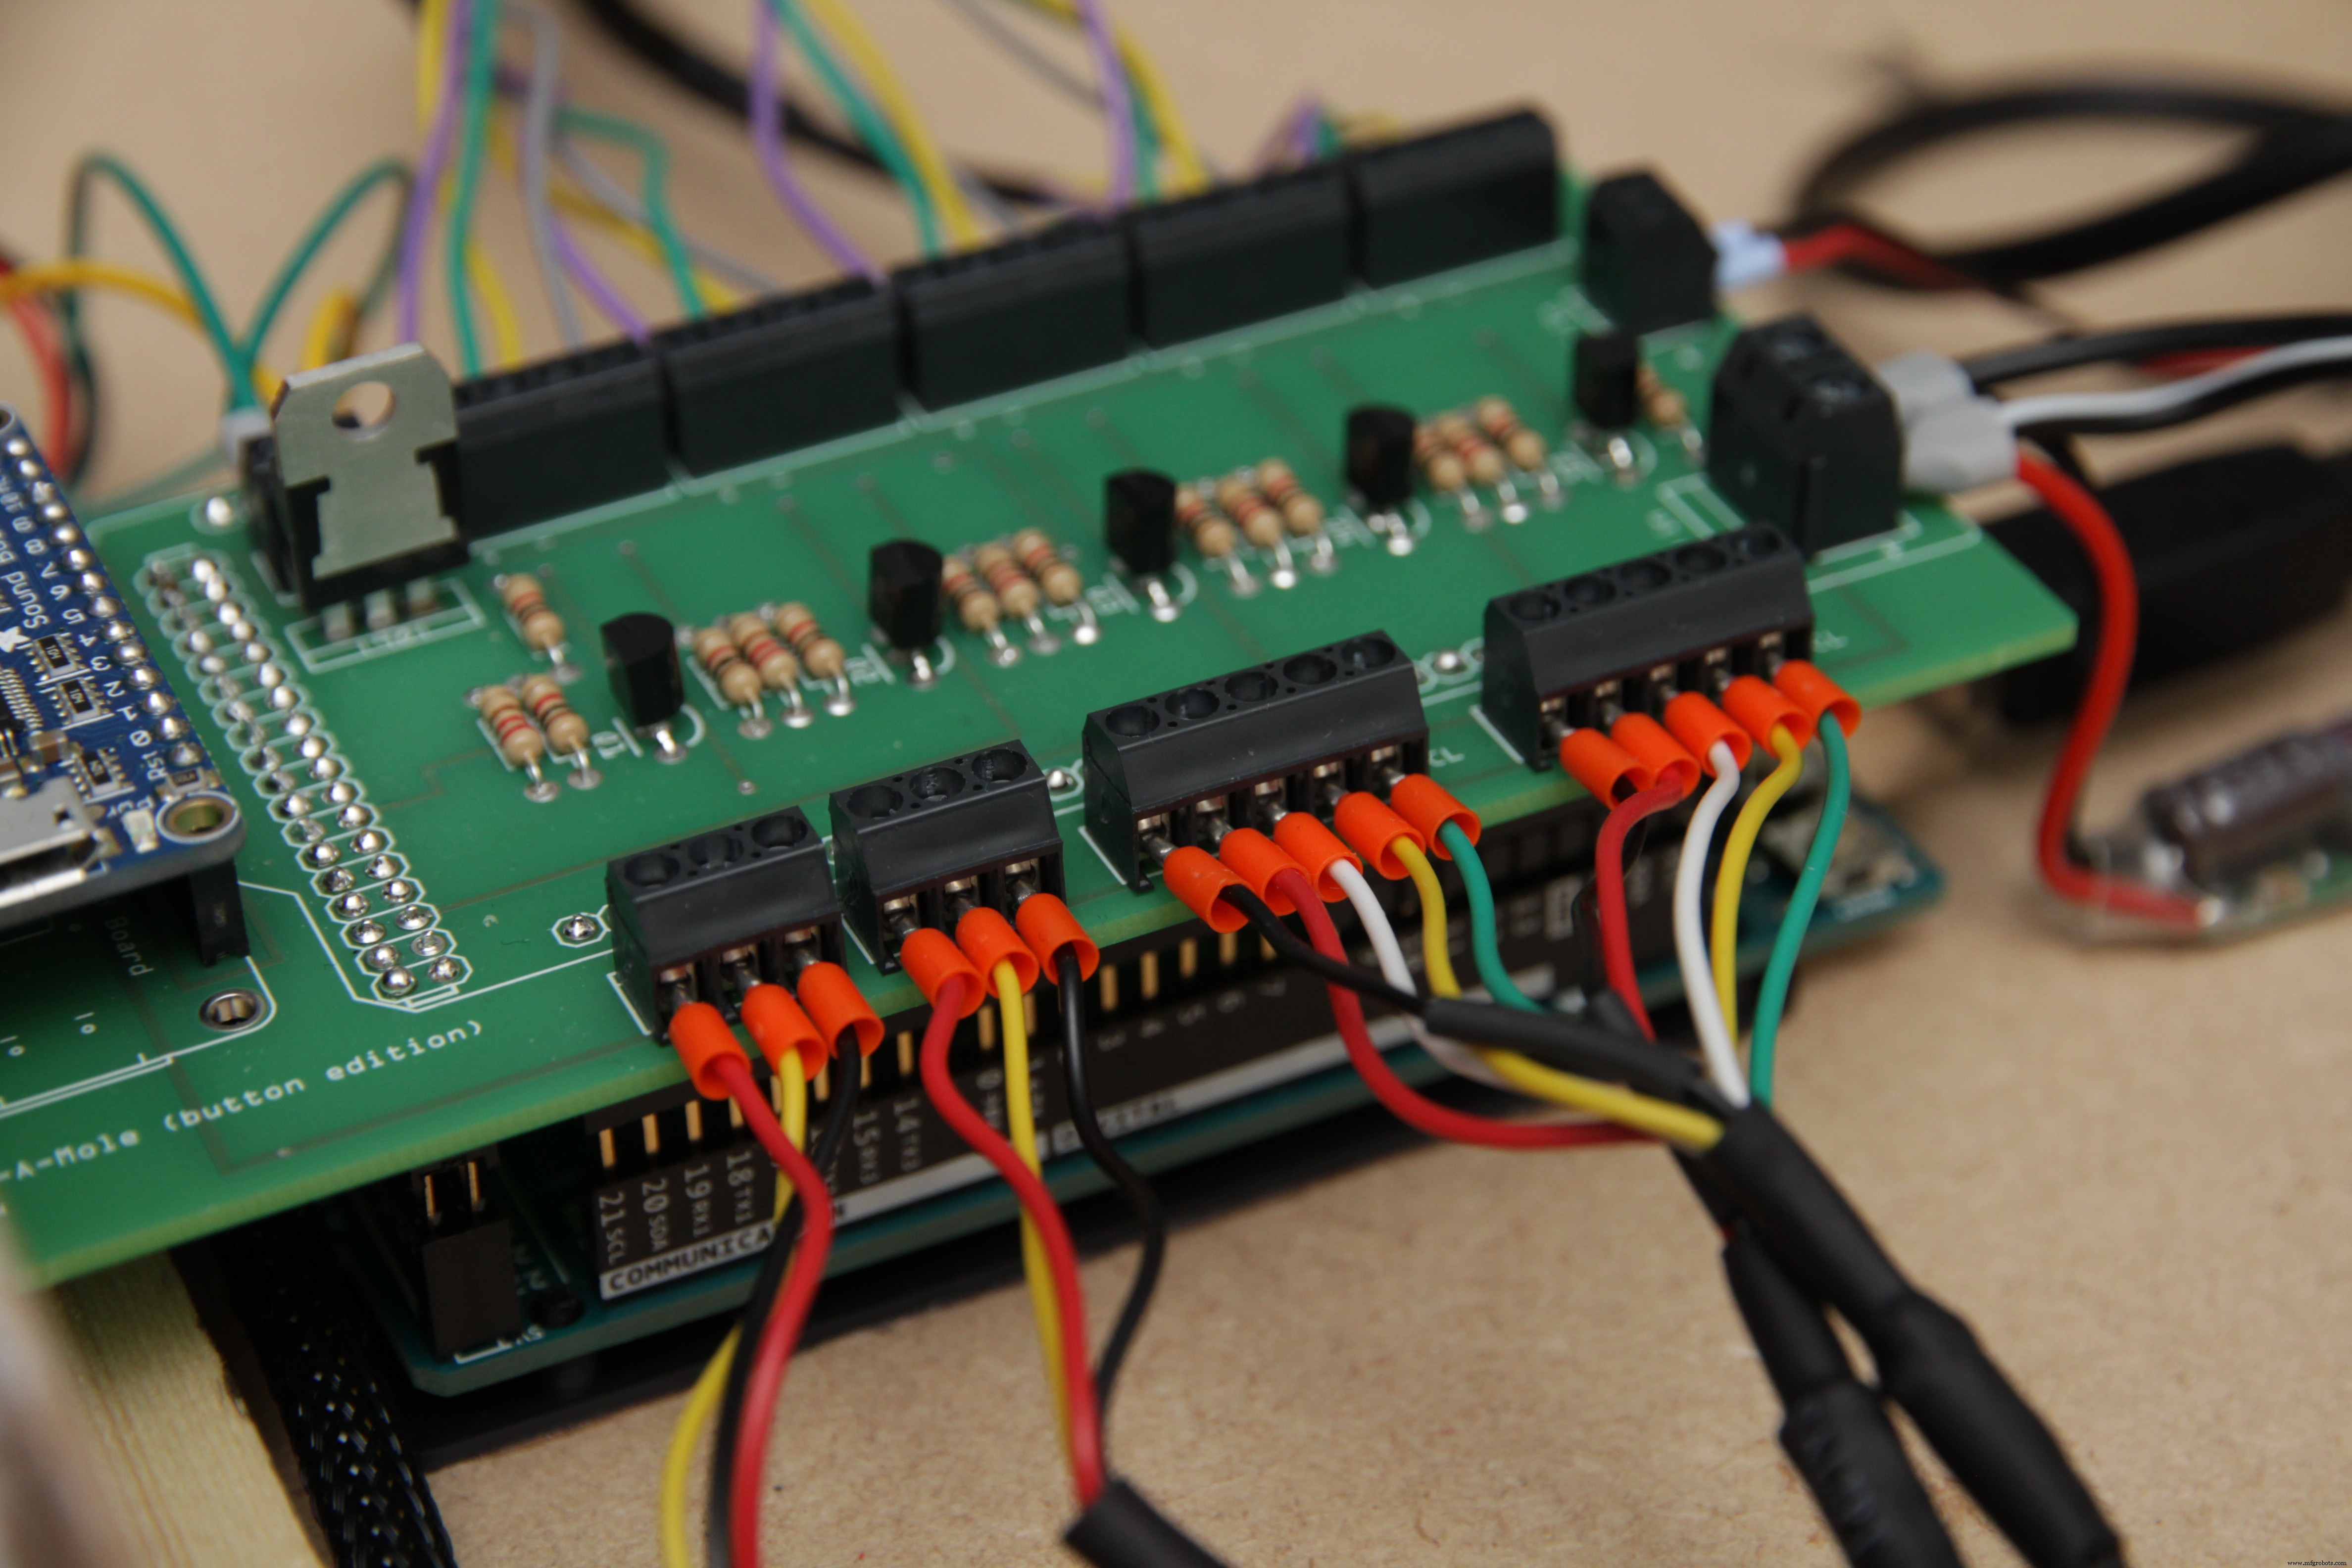
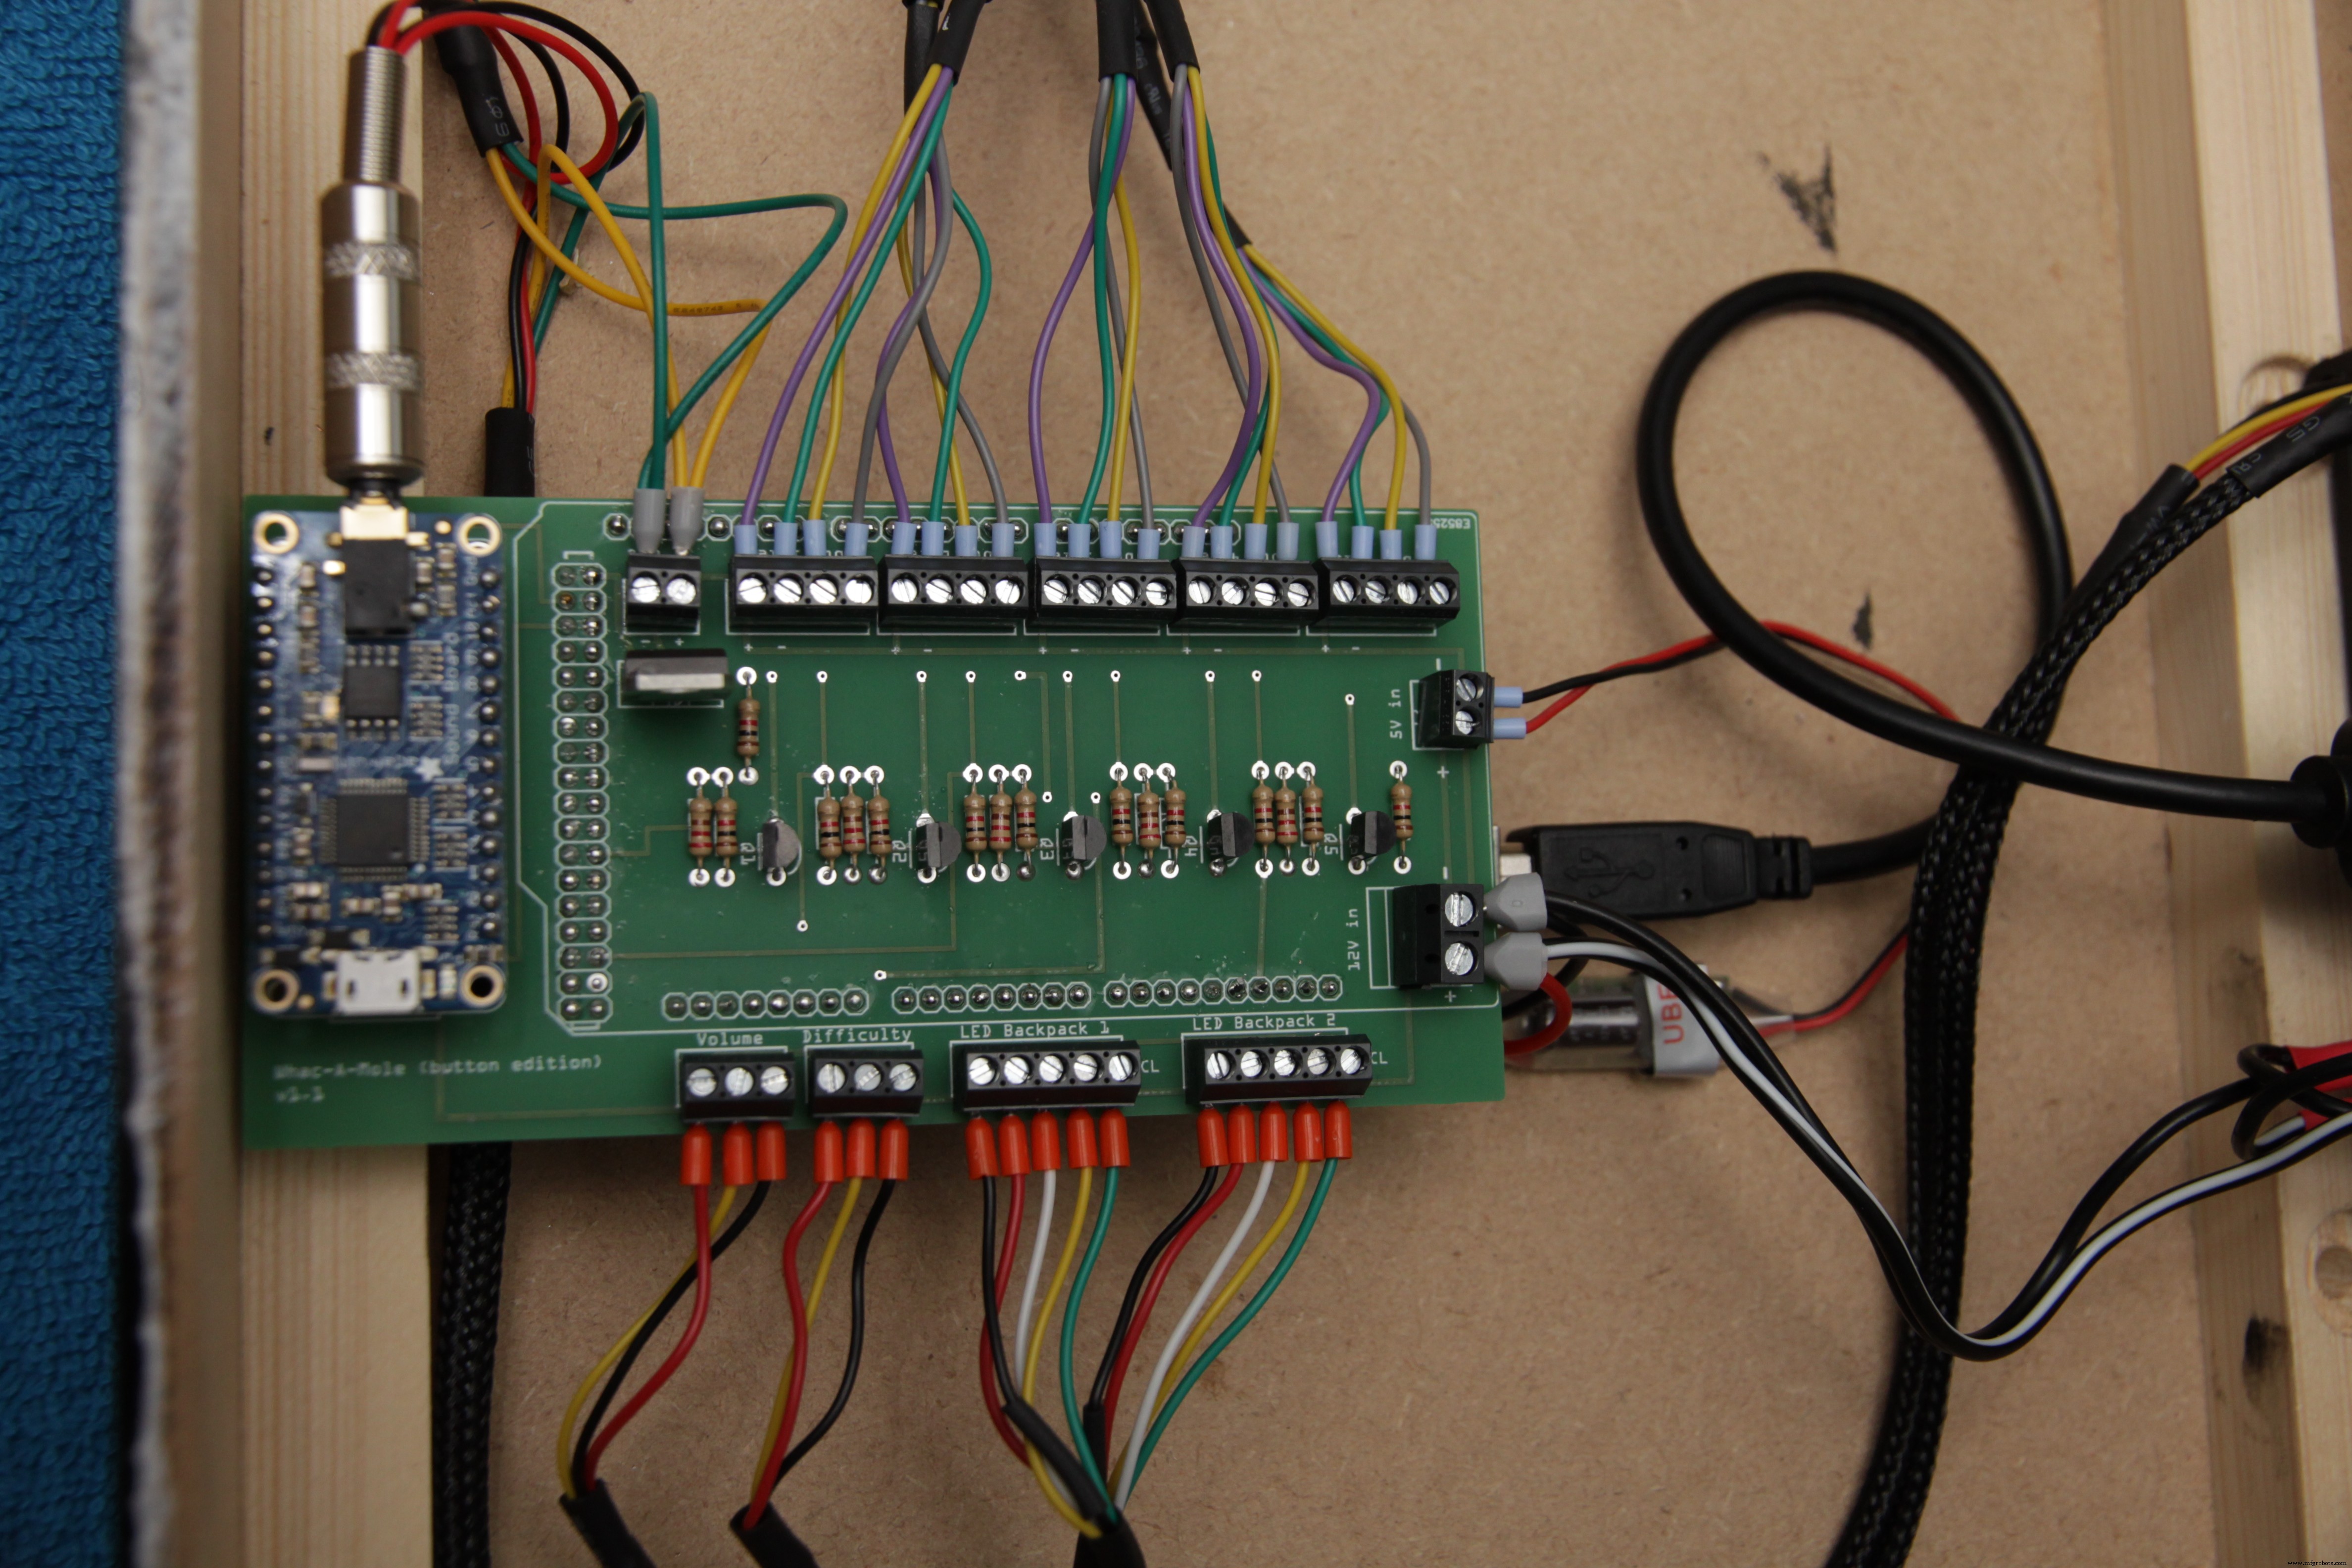
- Arduino Mega Shield personalizado
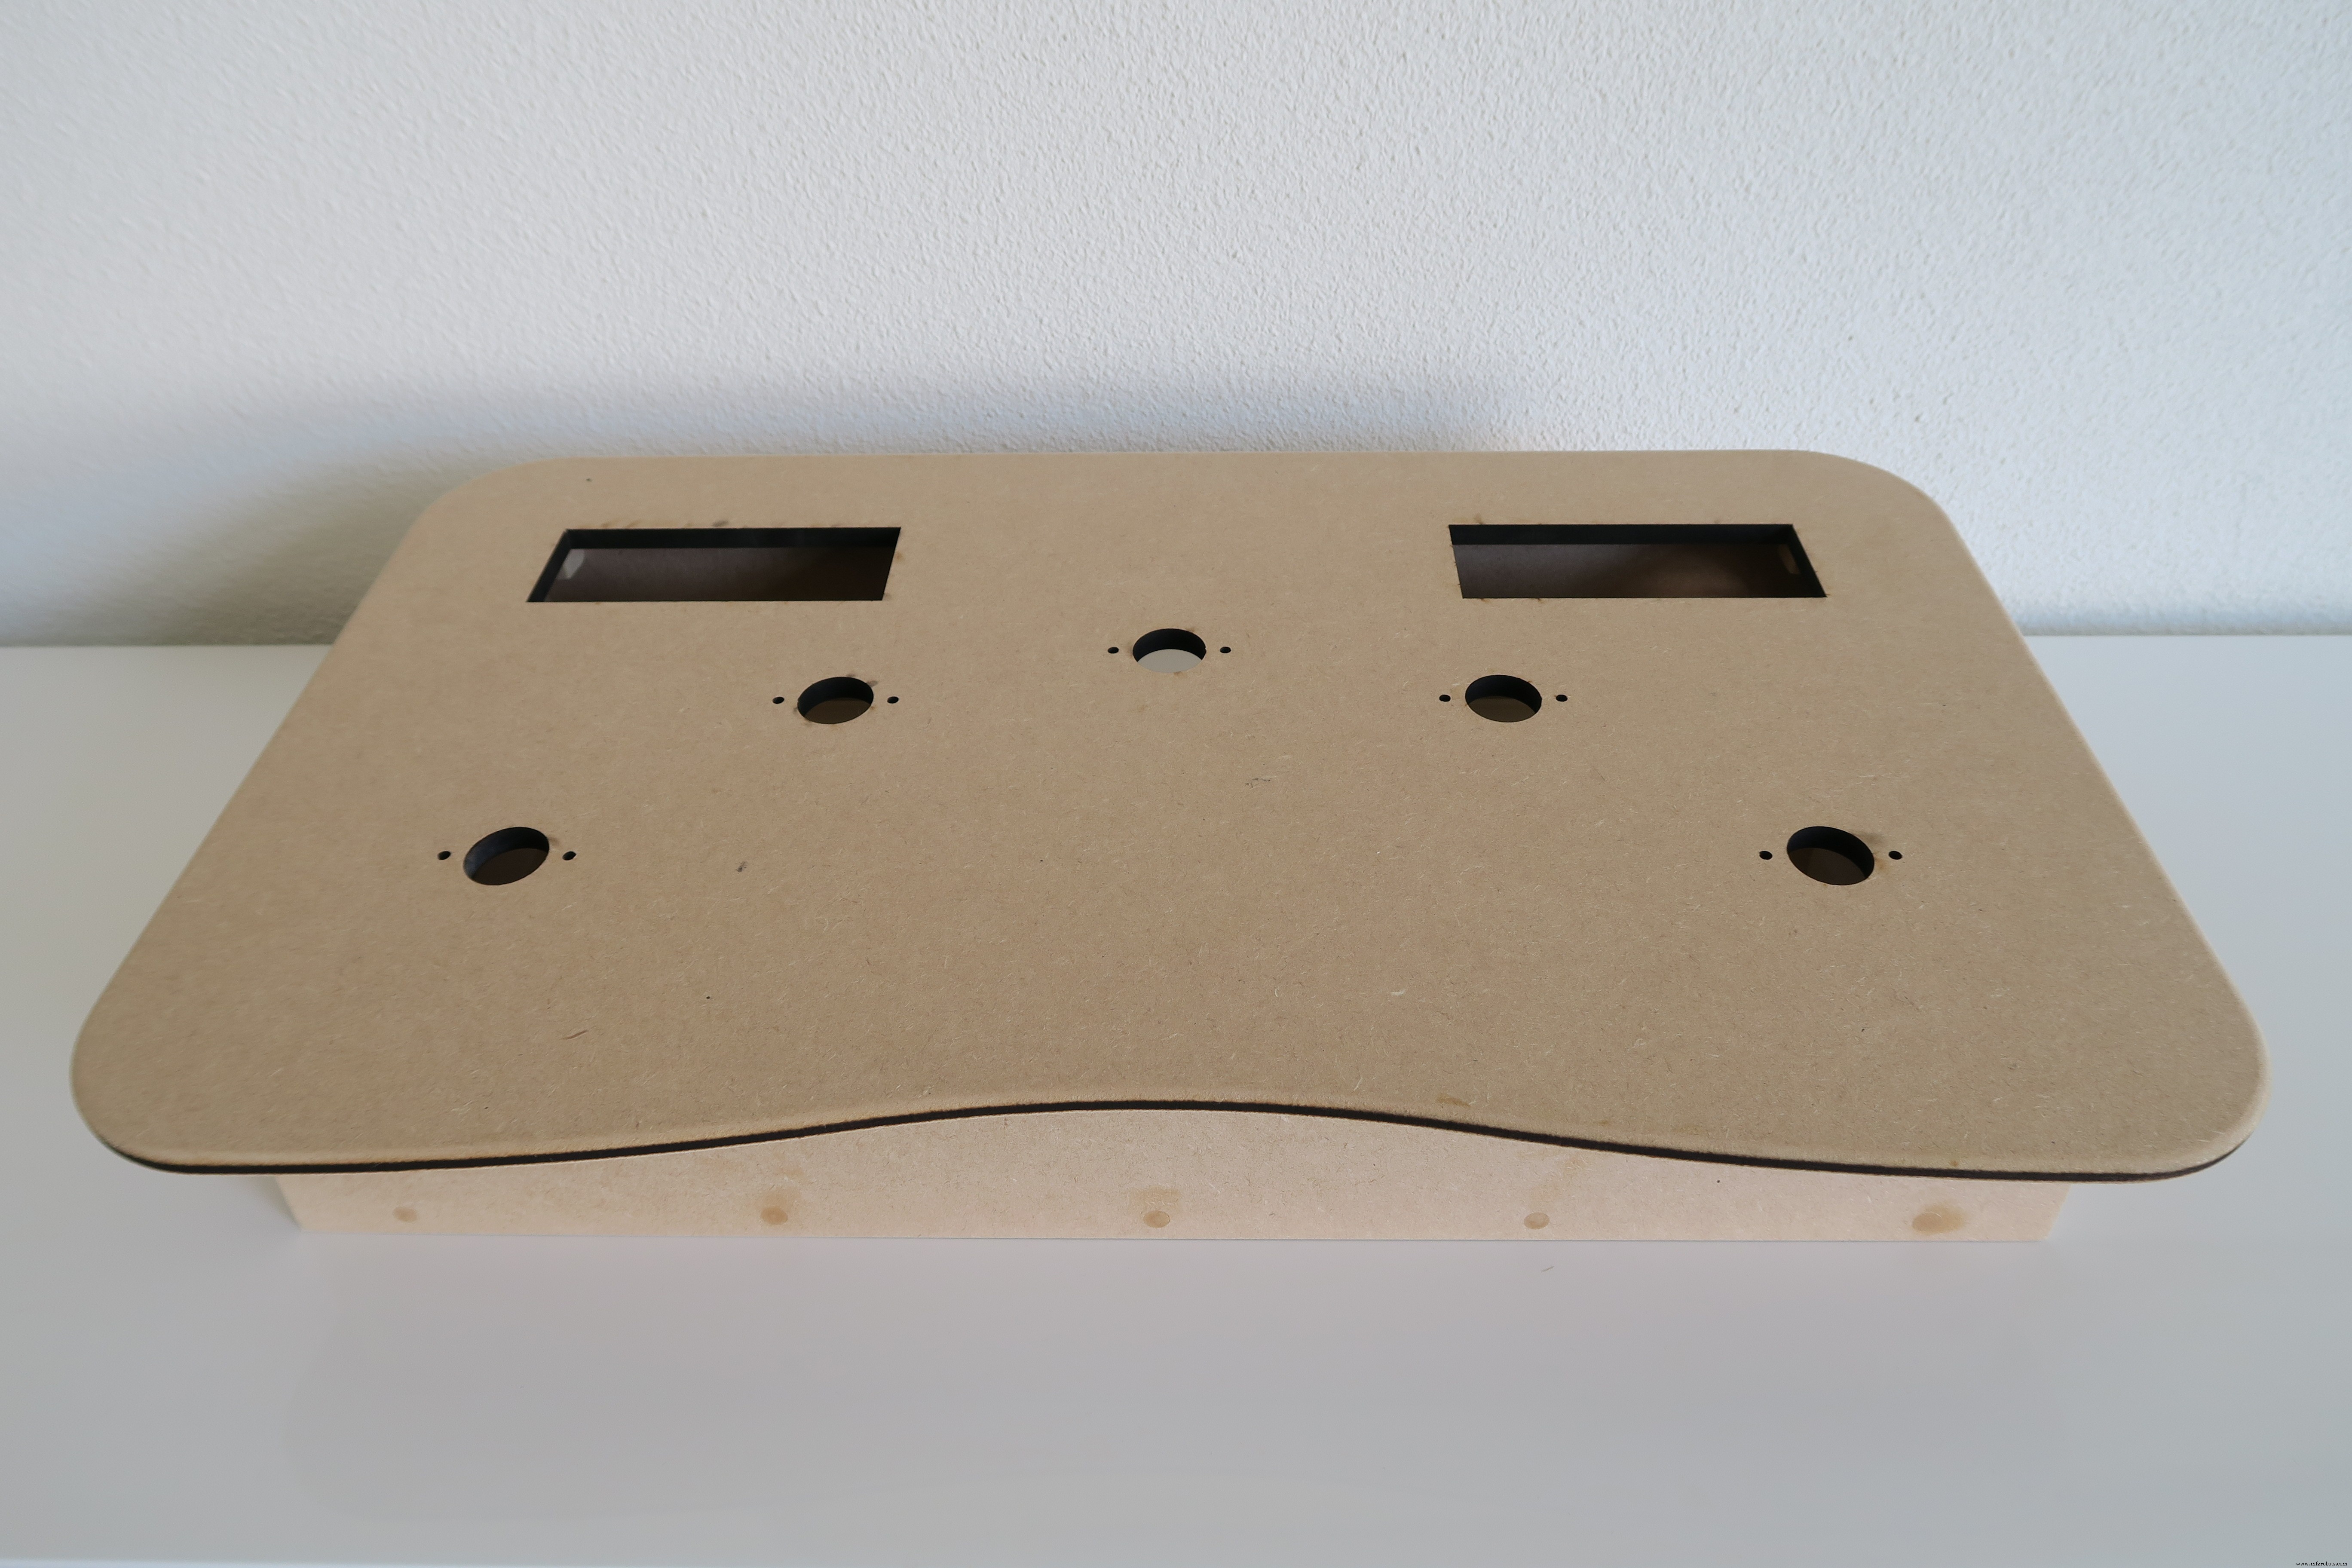
Recinto
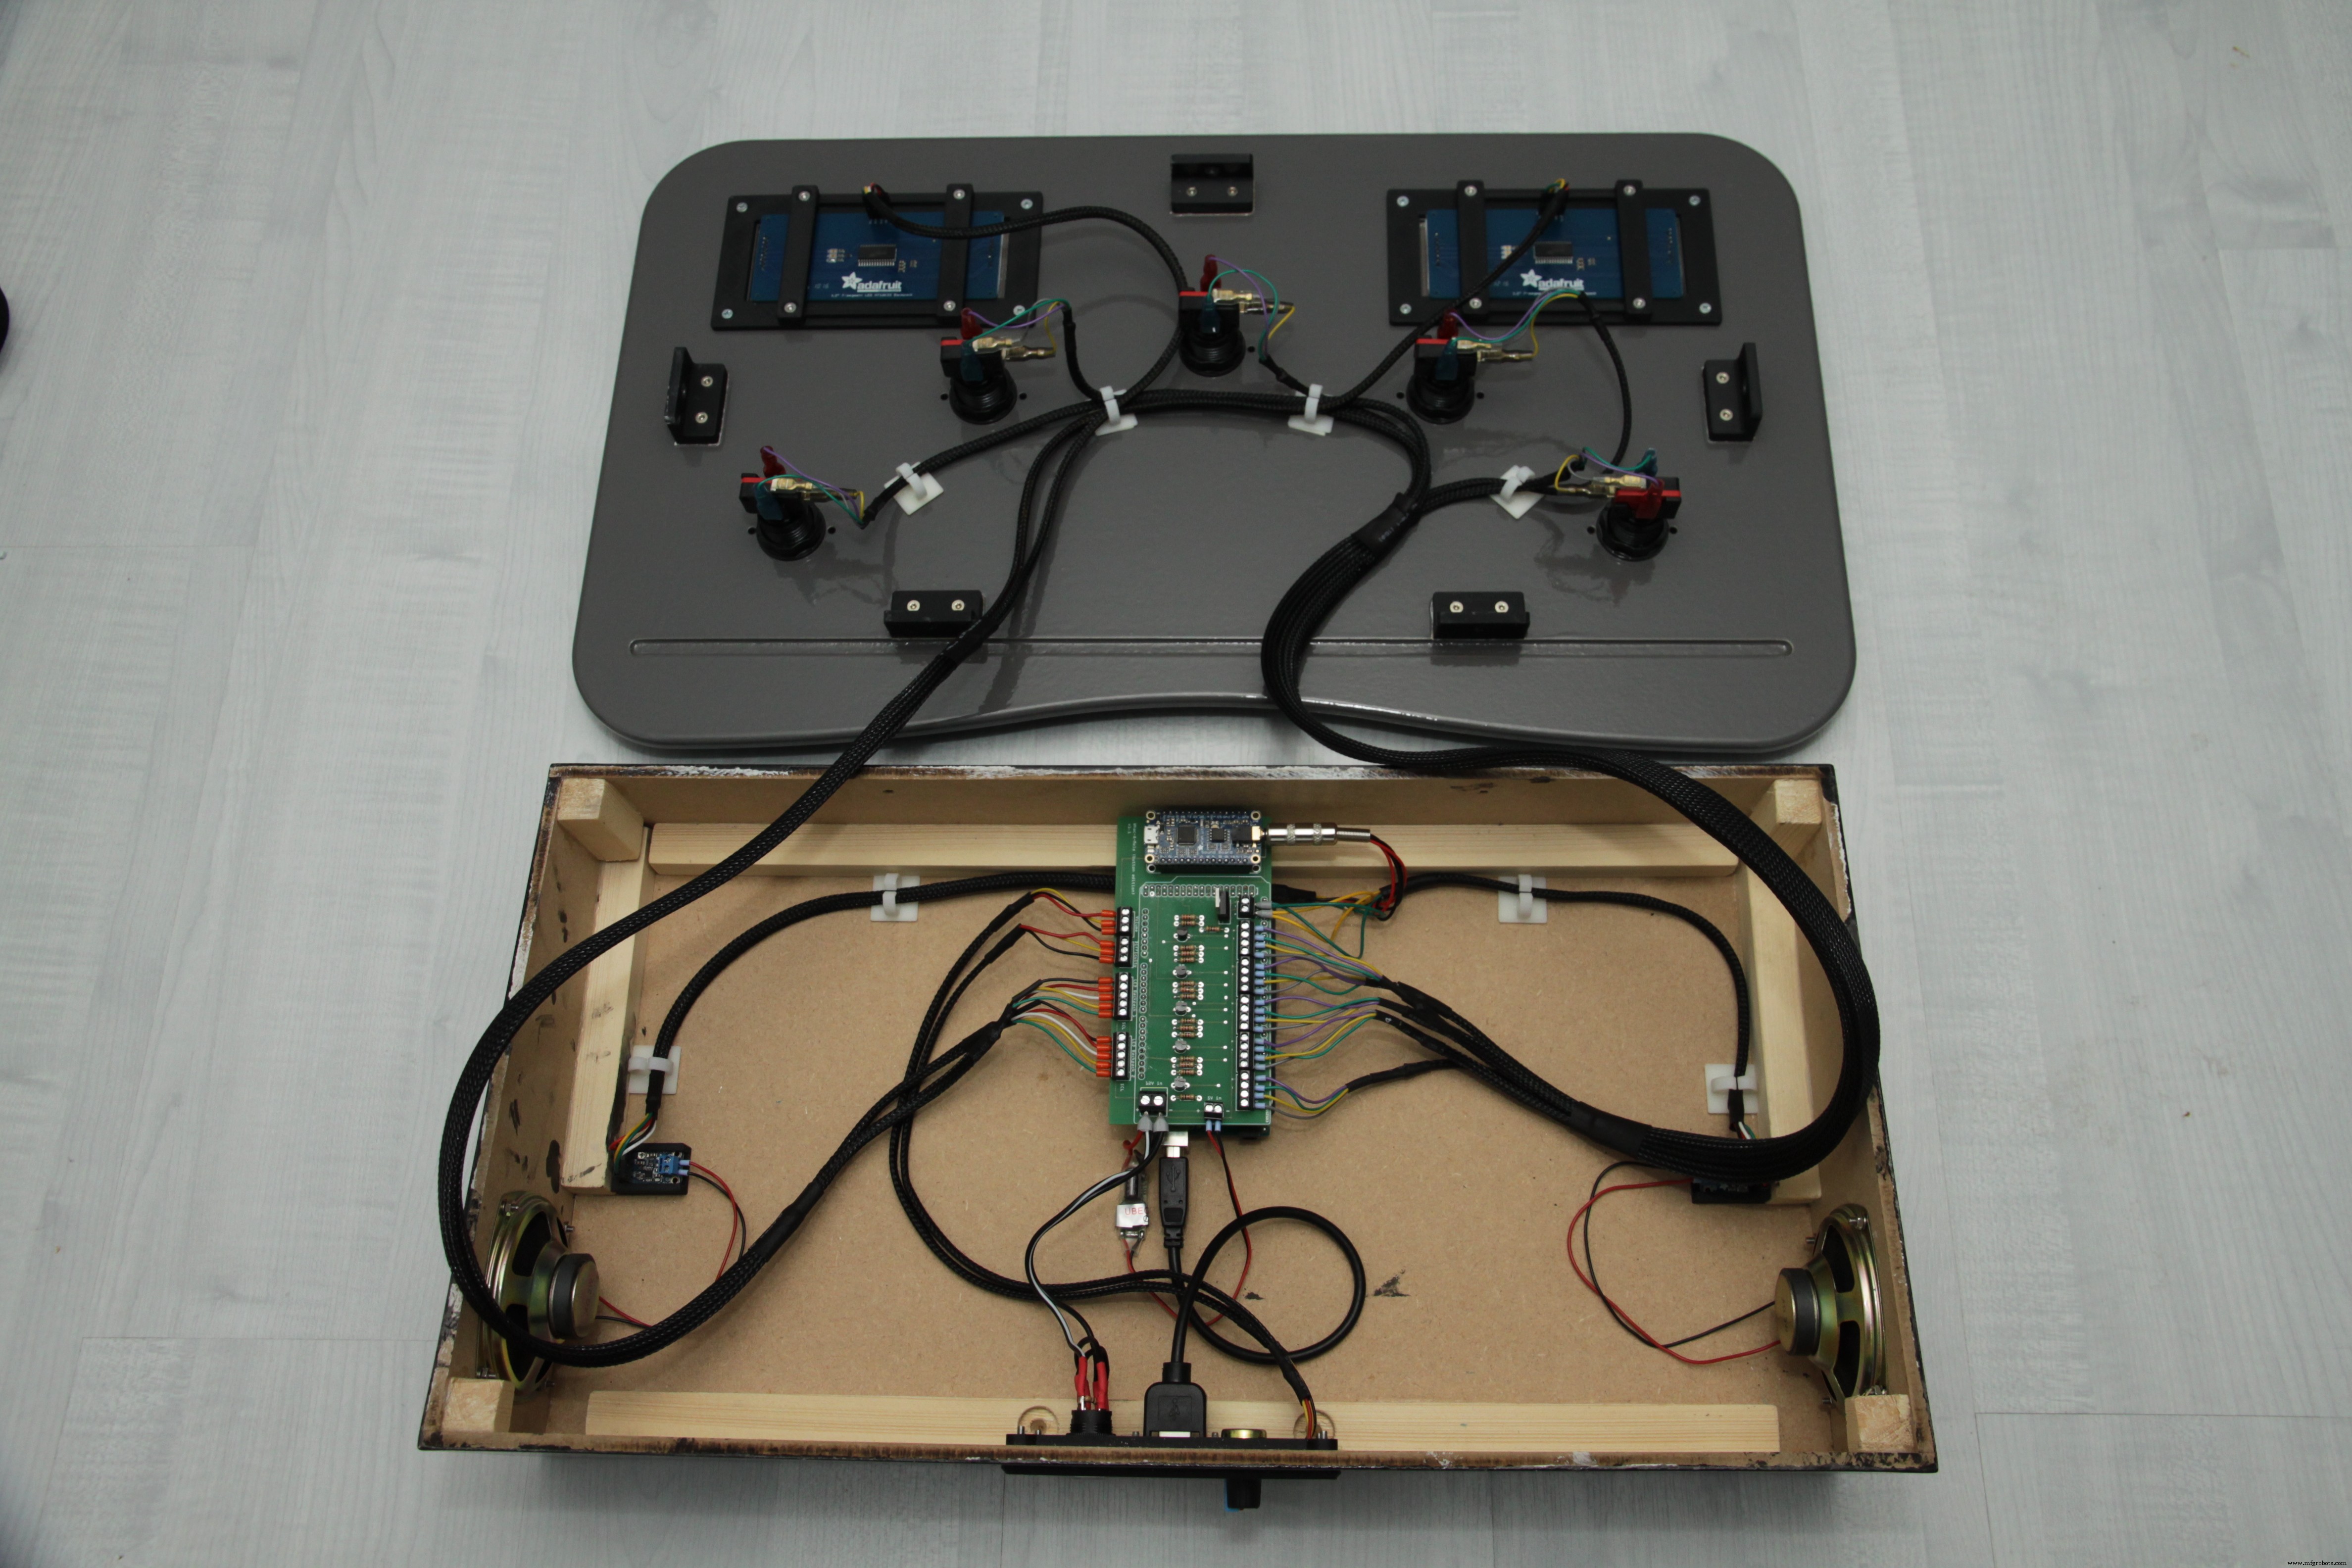
Primero, comience con el montaje del gabinete.
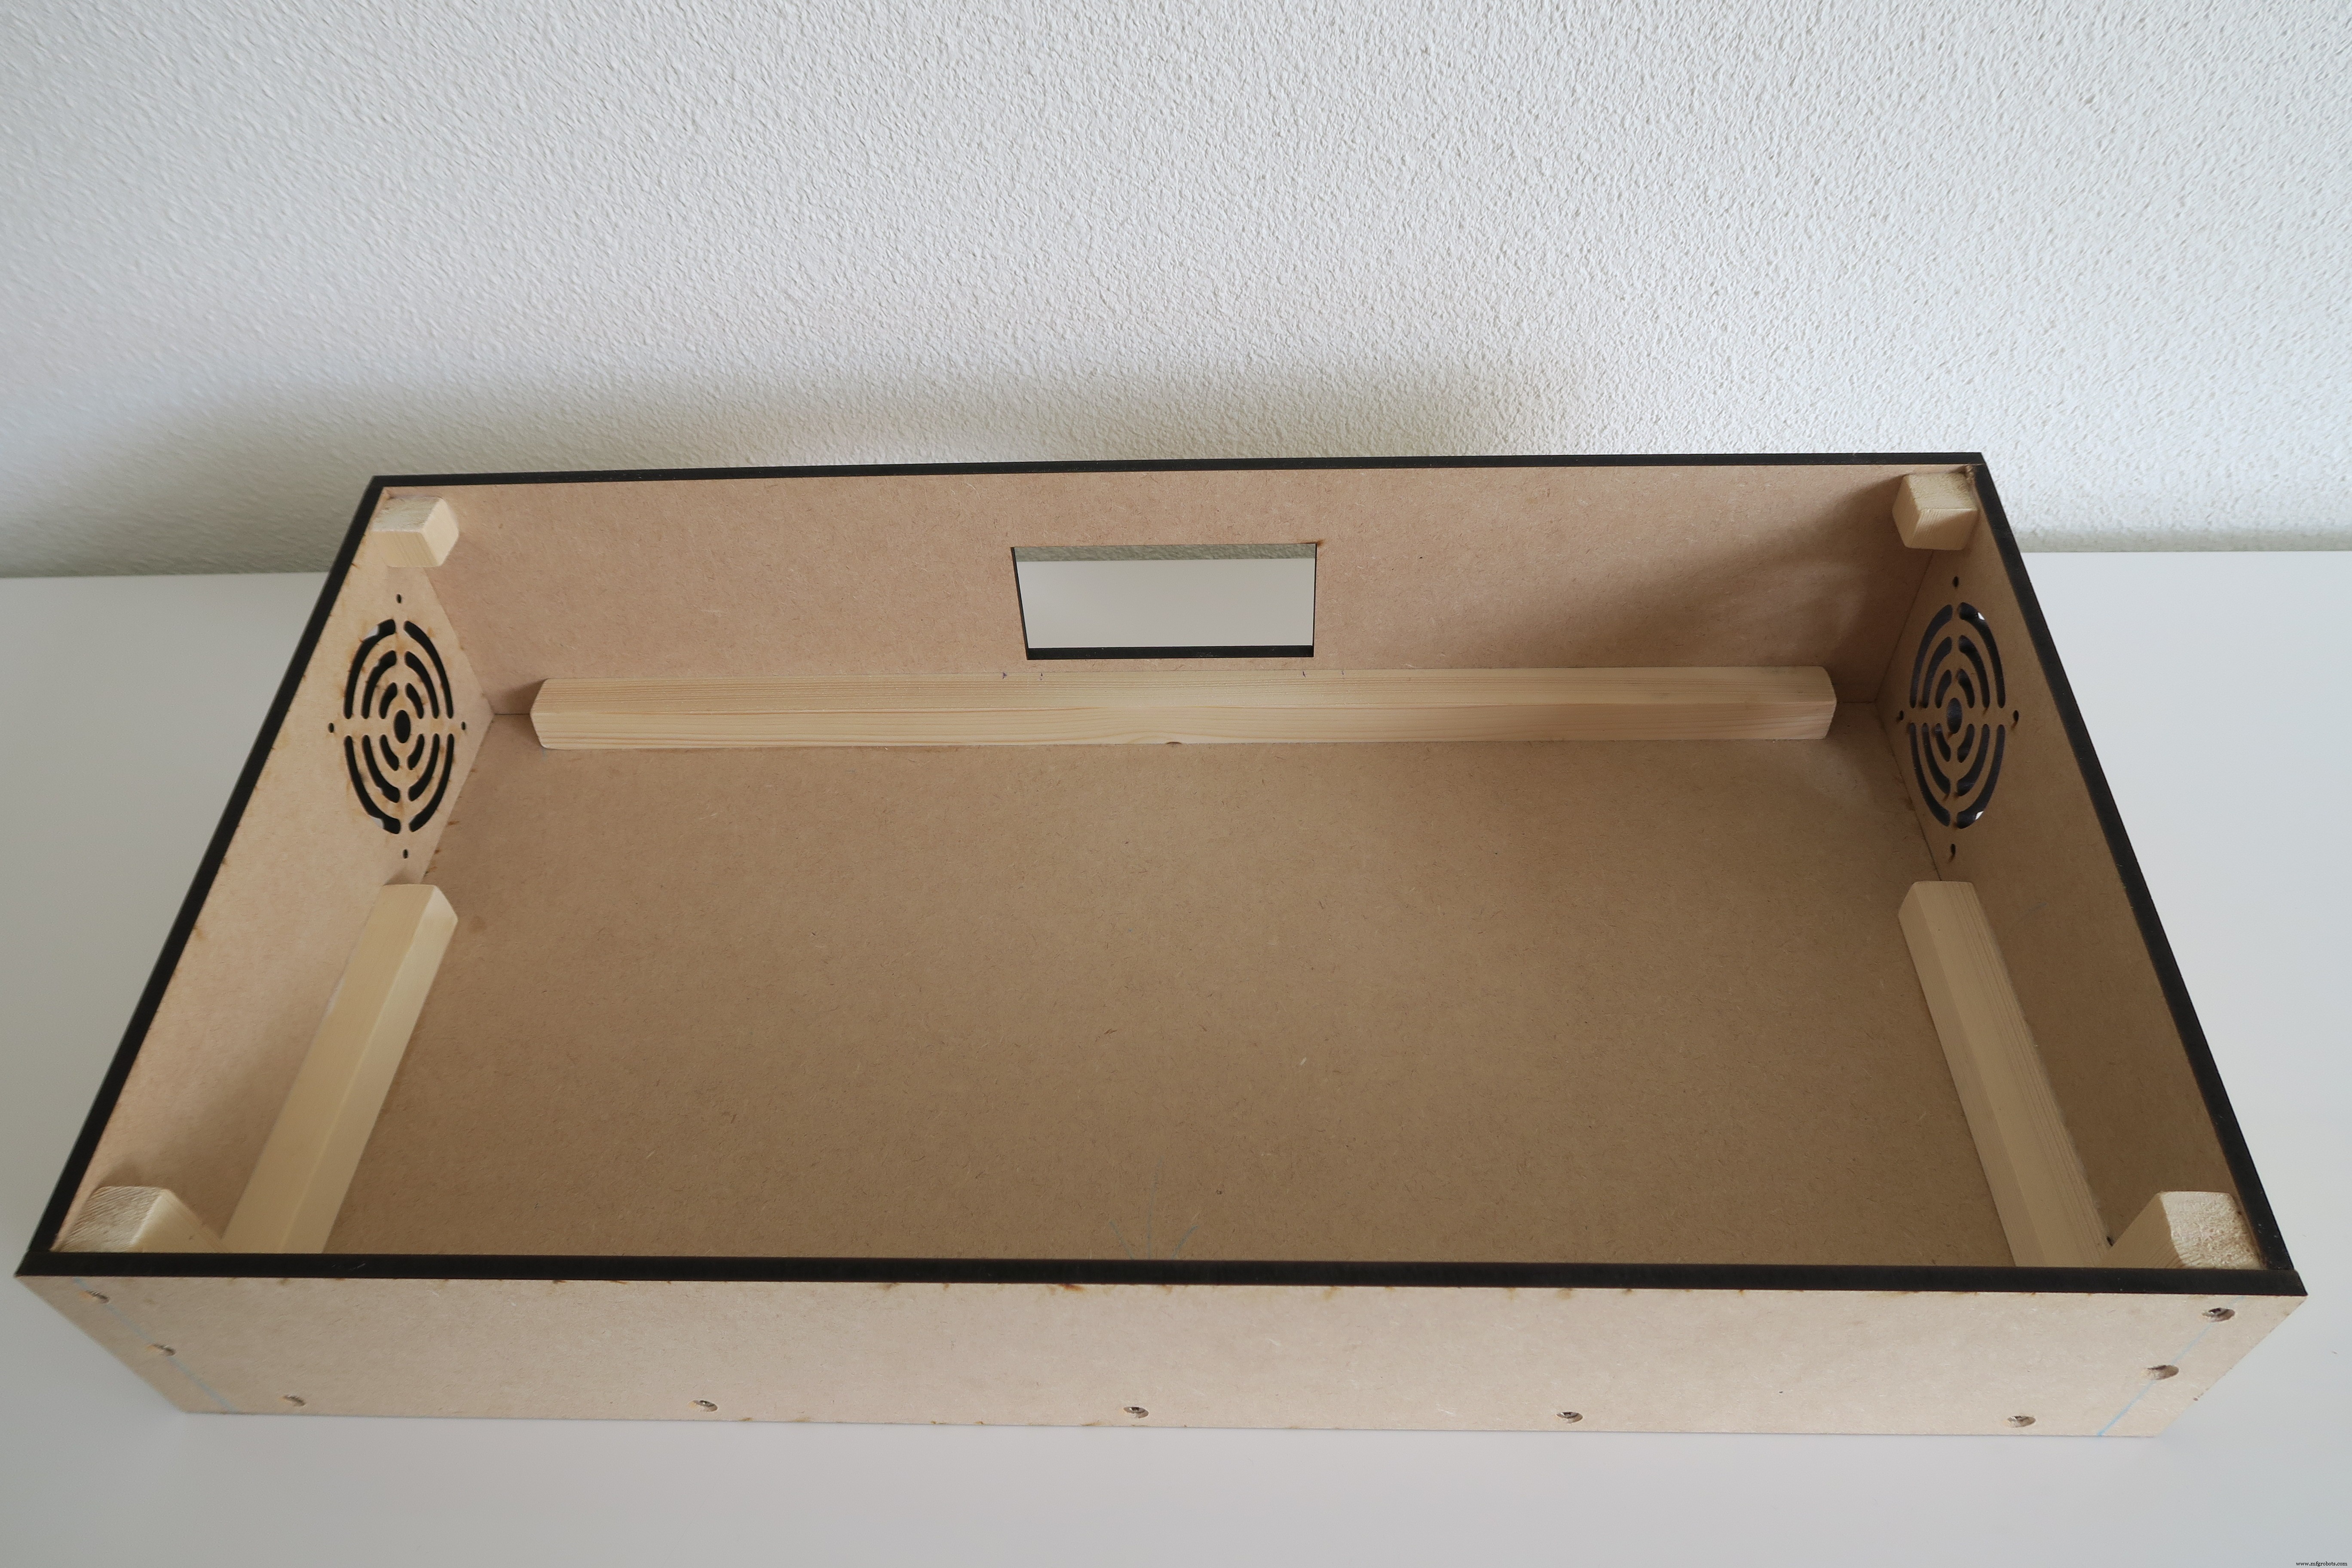
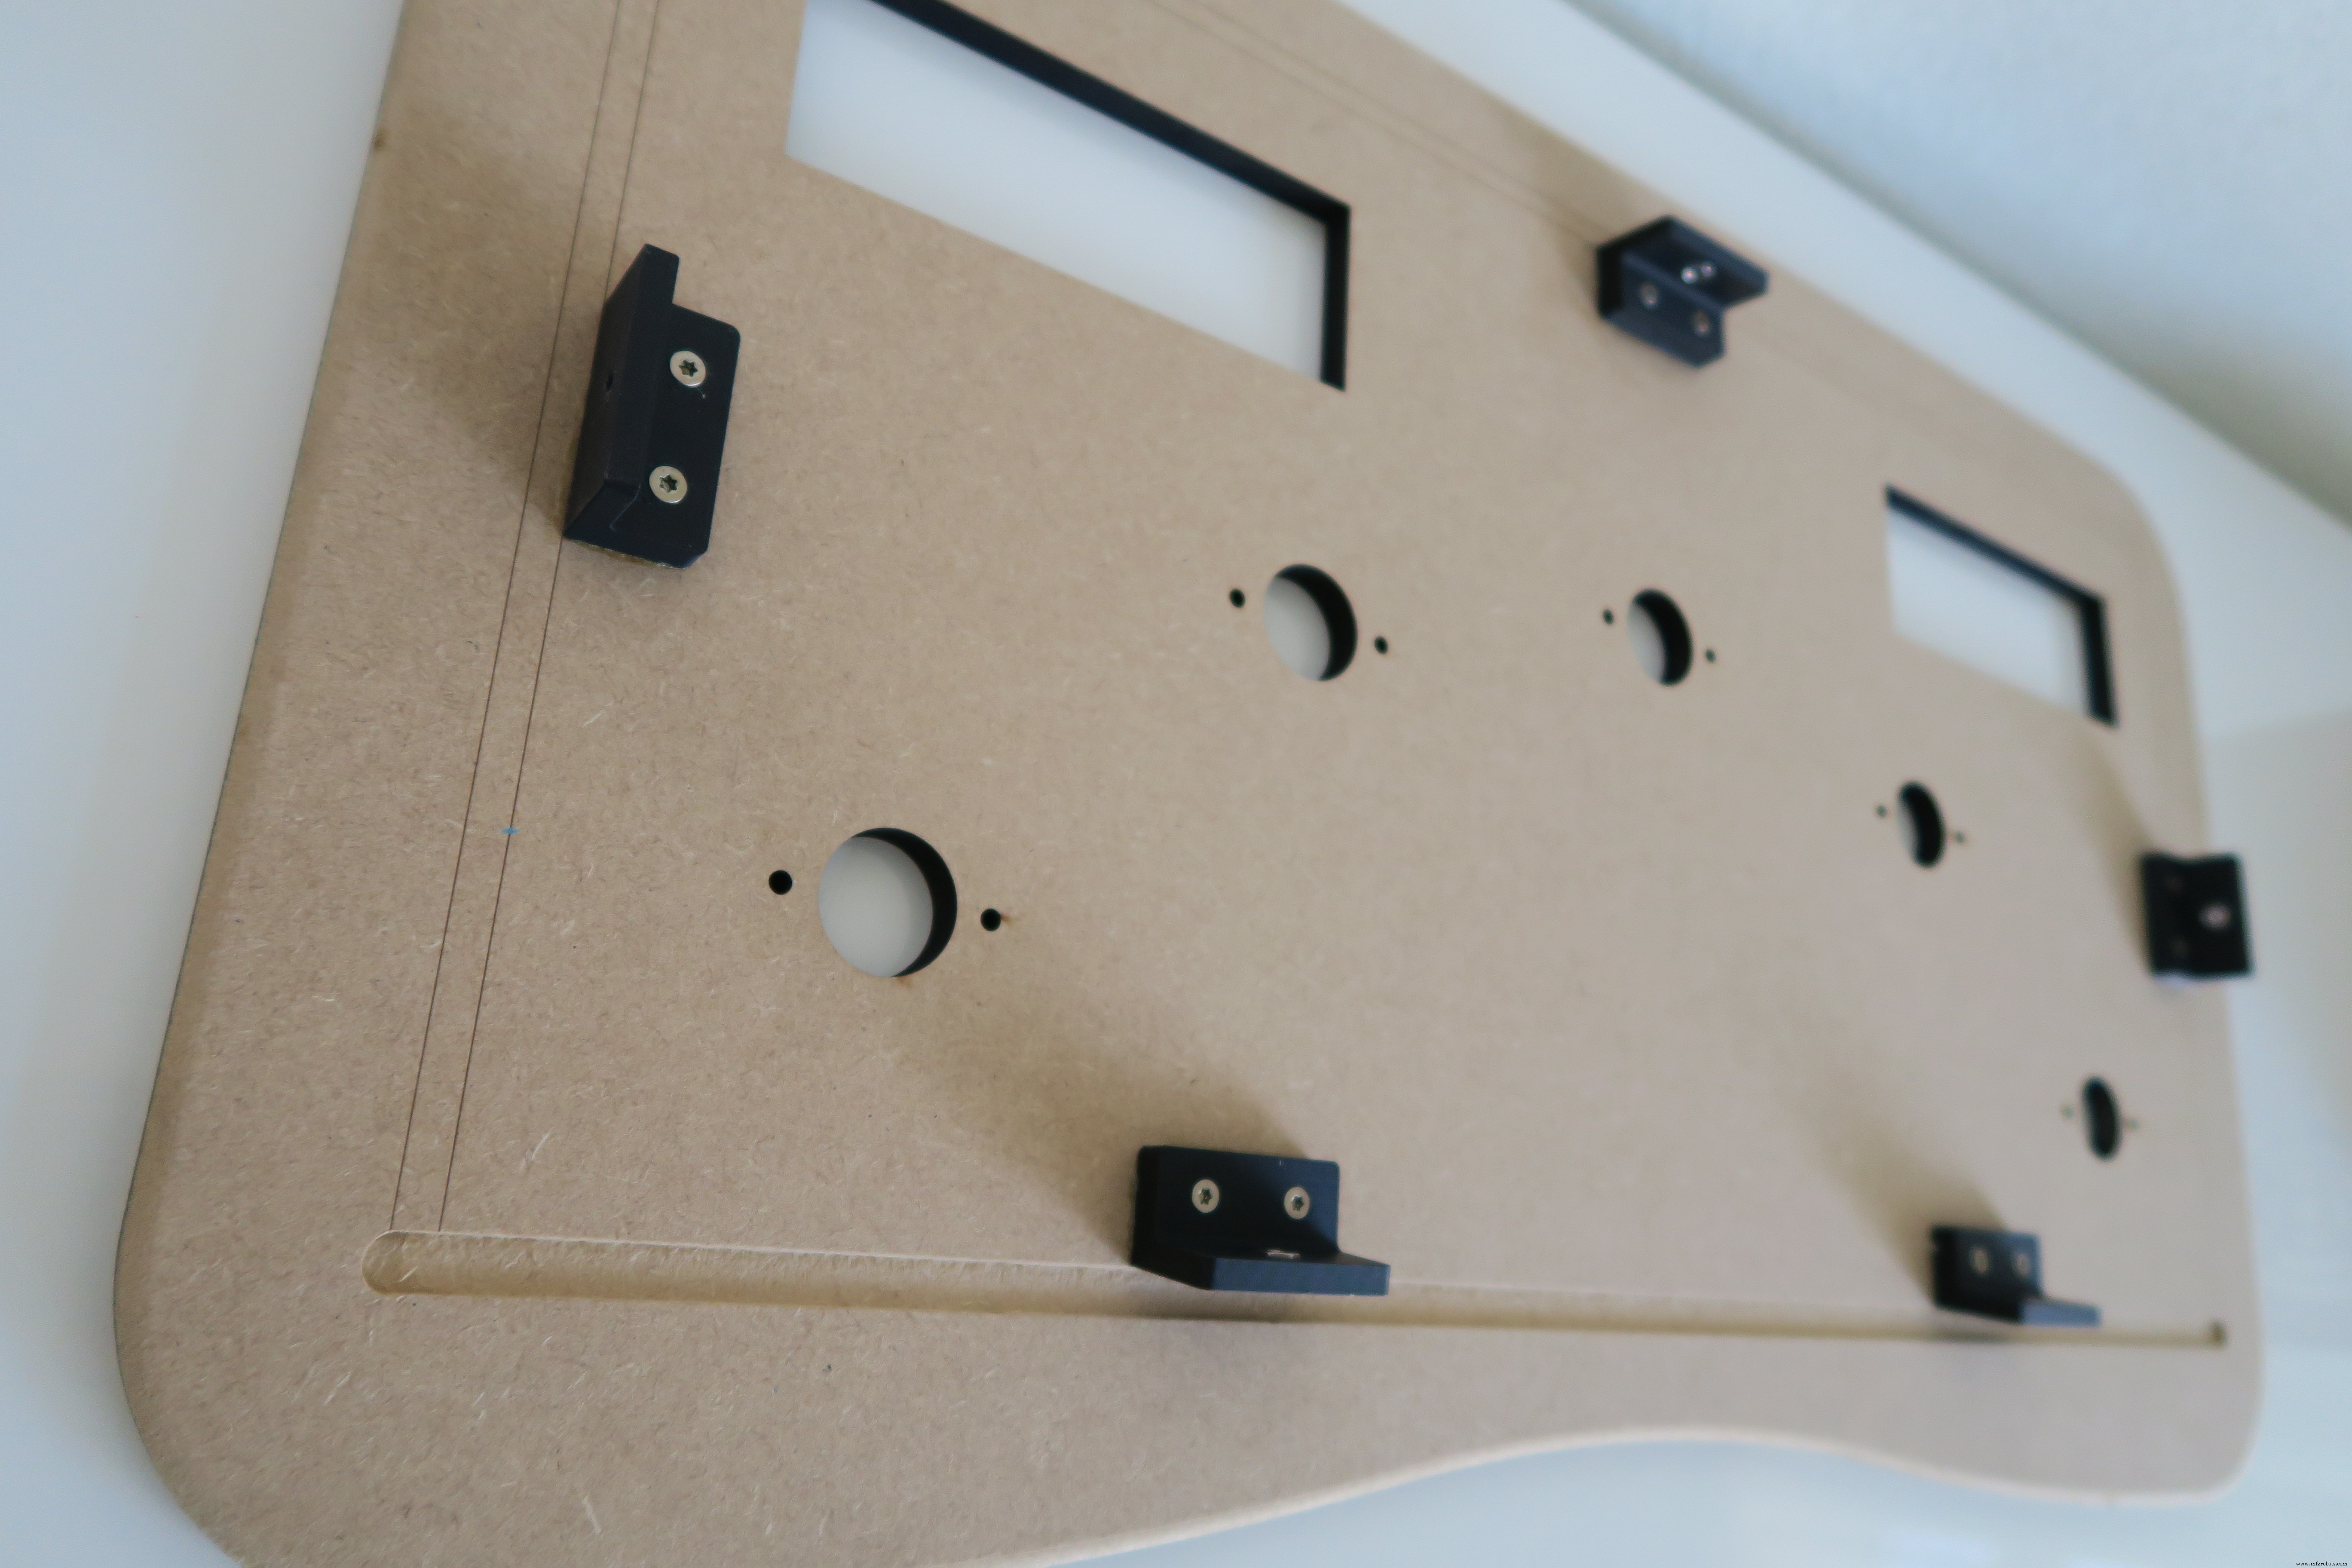
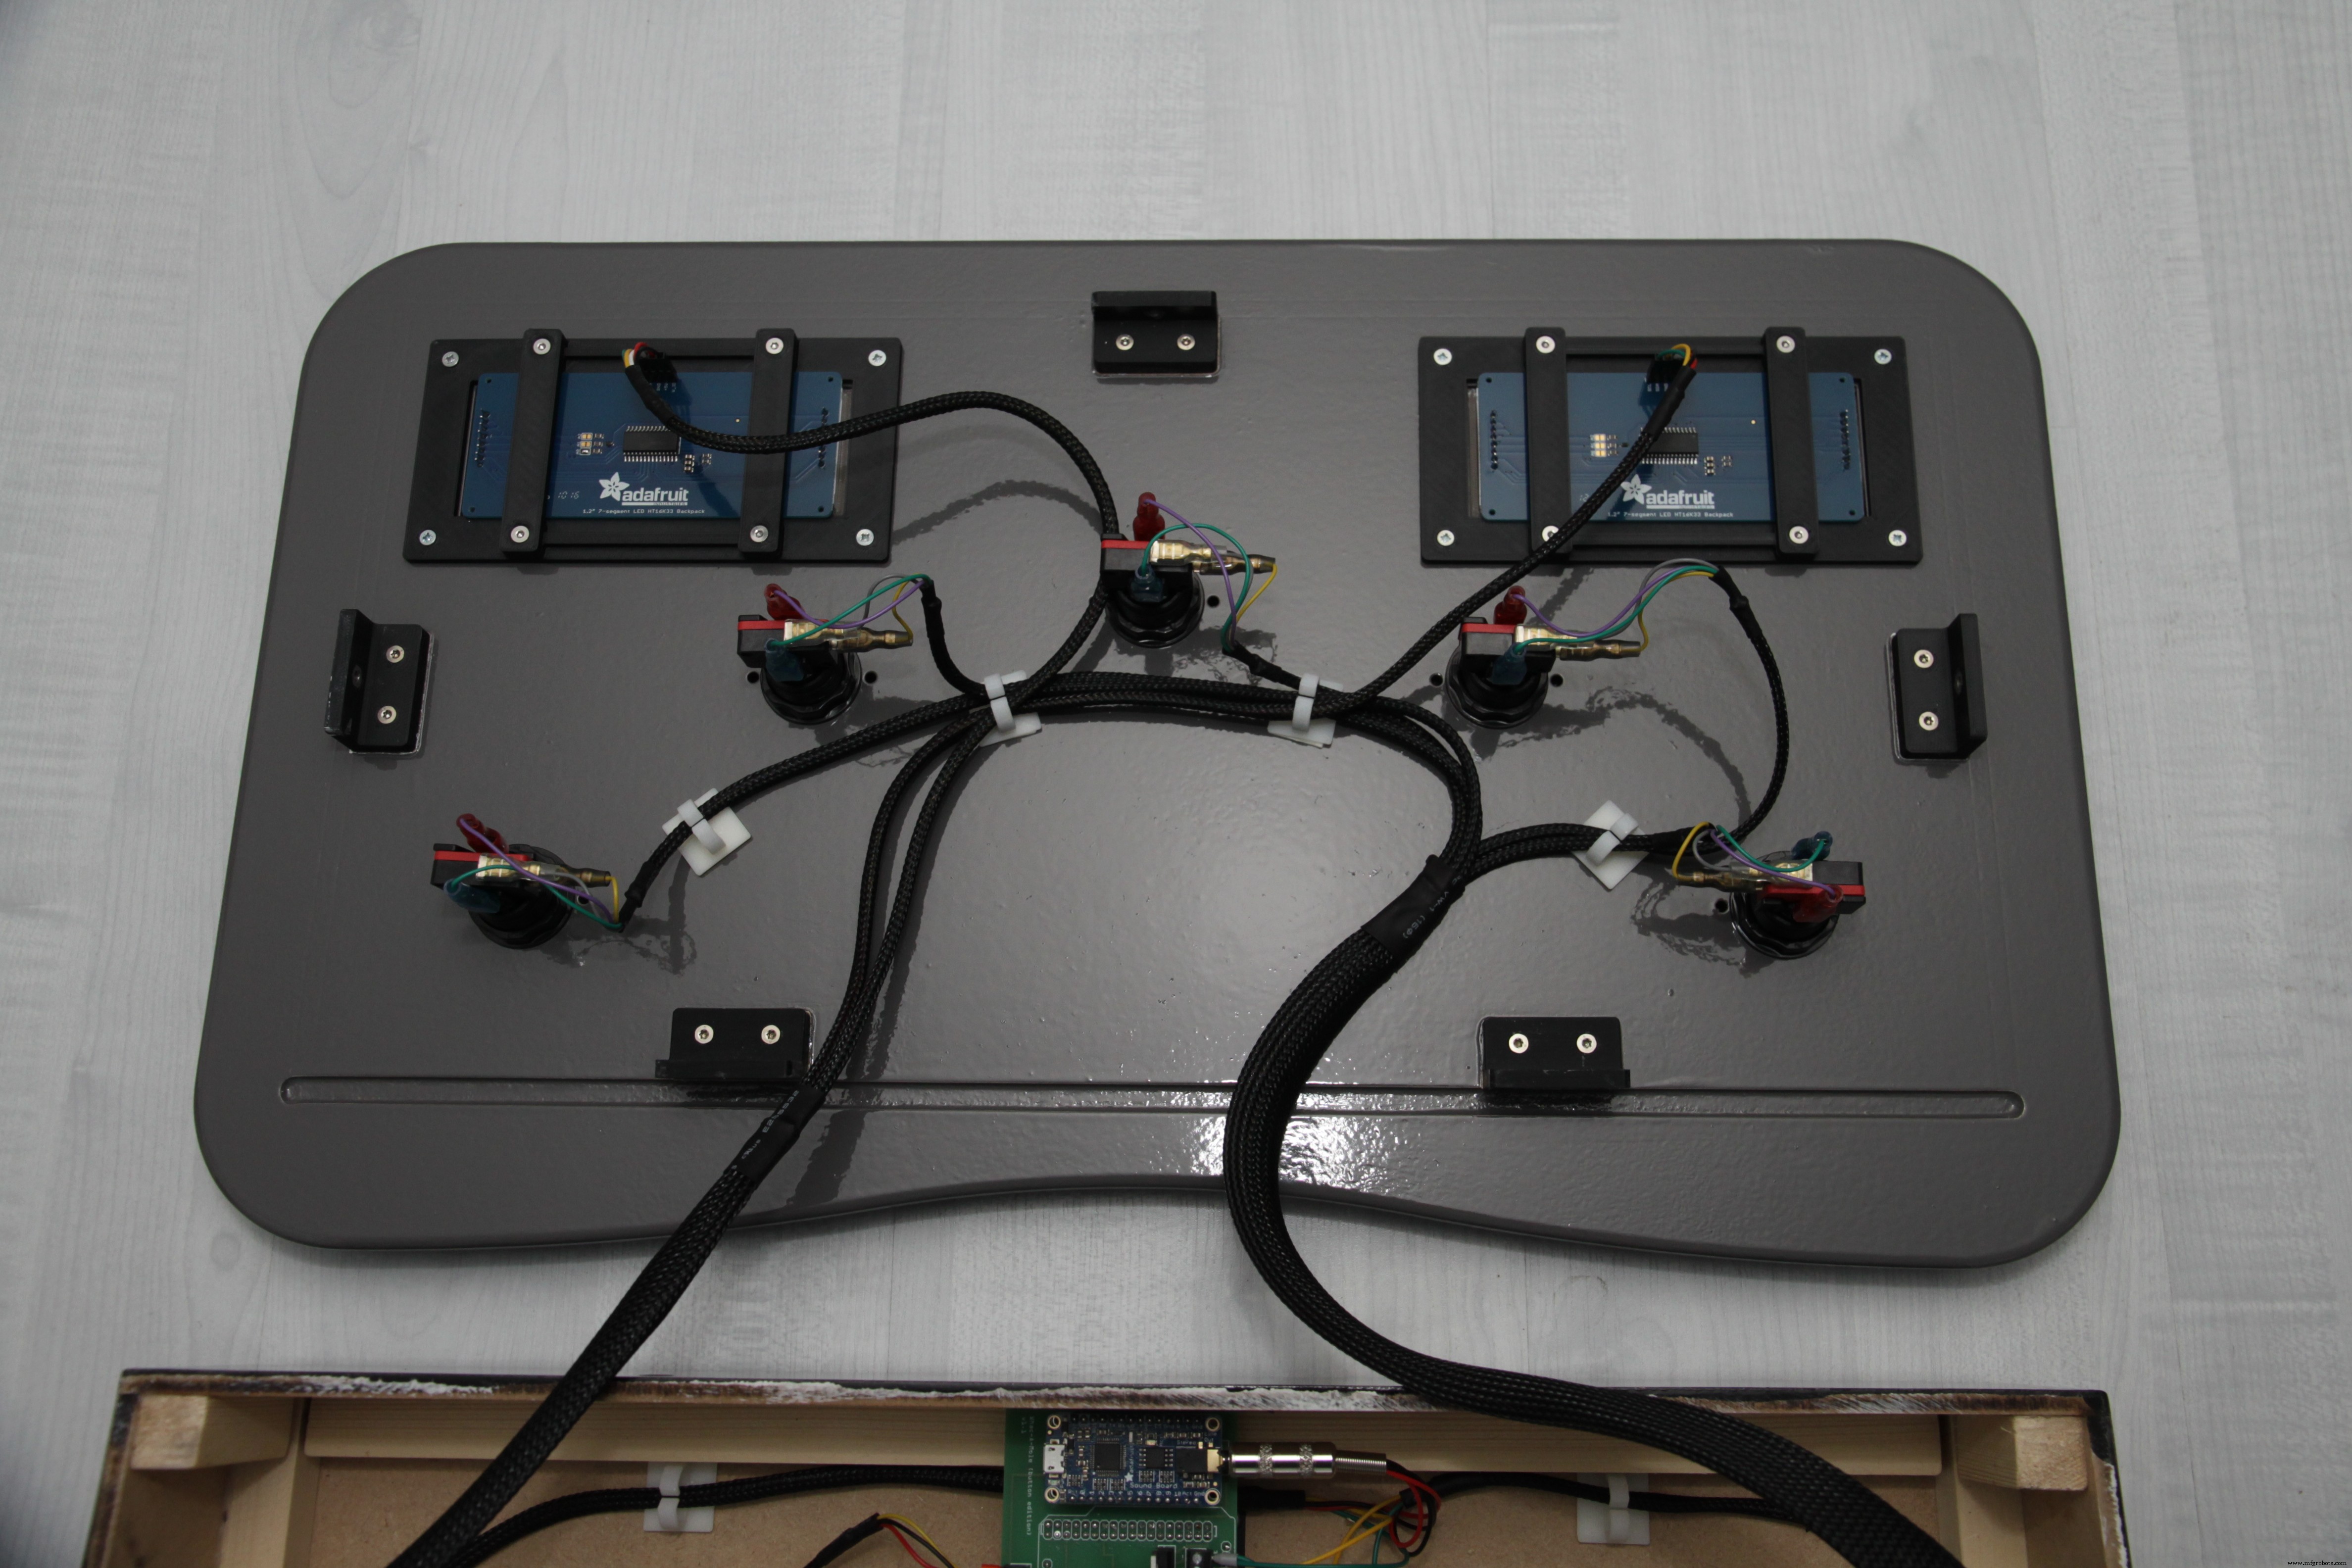
Monte los soportes de montaje impresos en 3D en la cubierta superior.
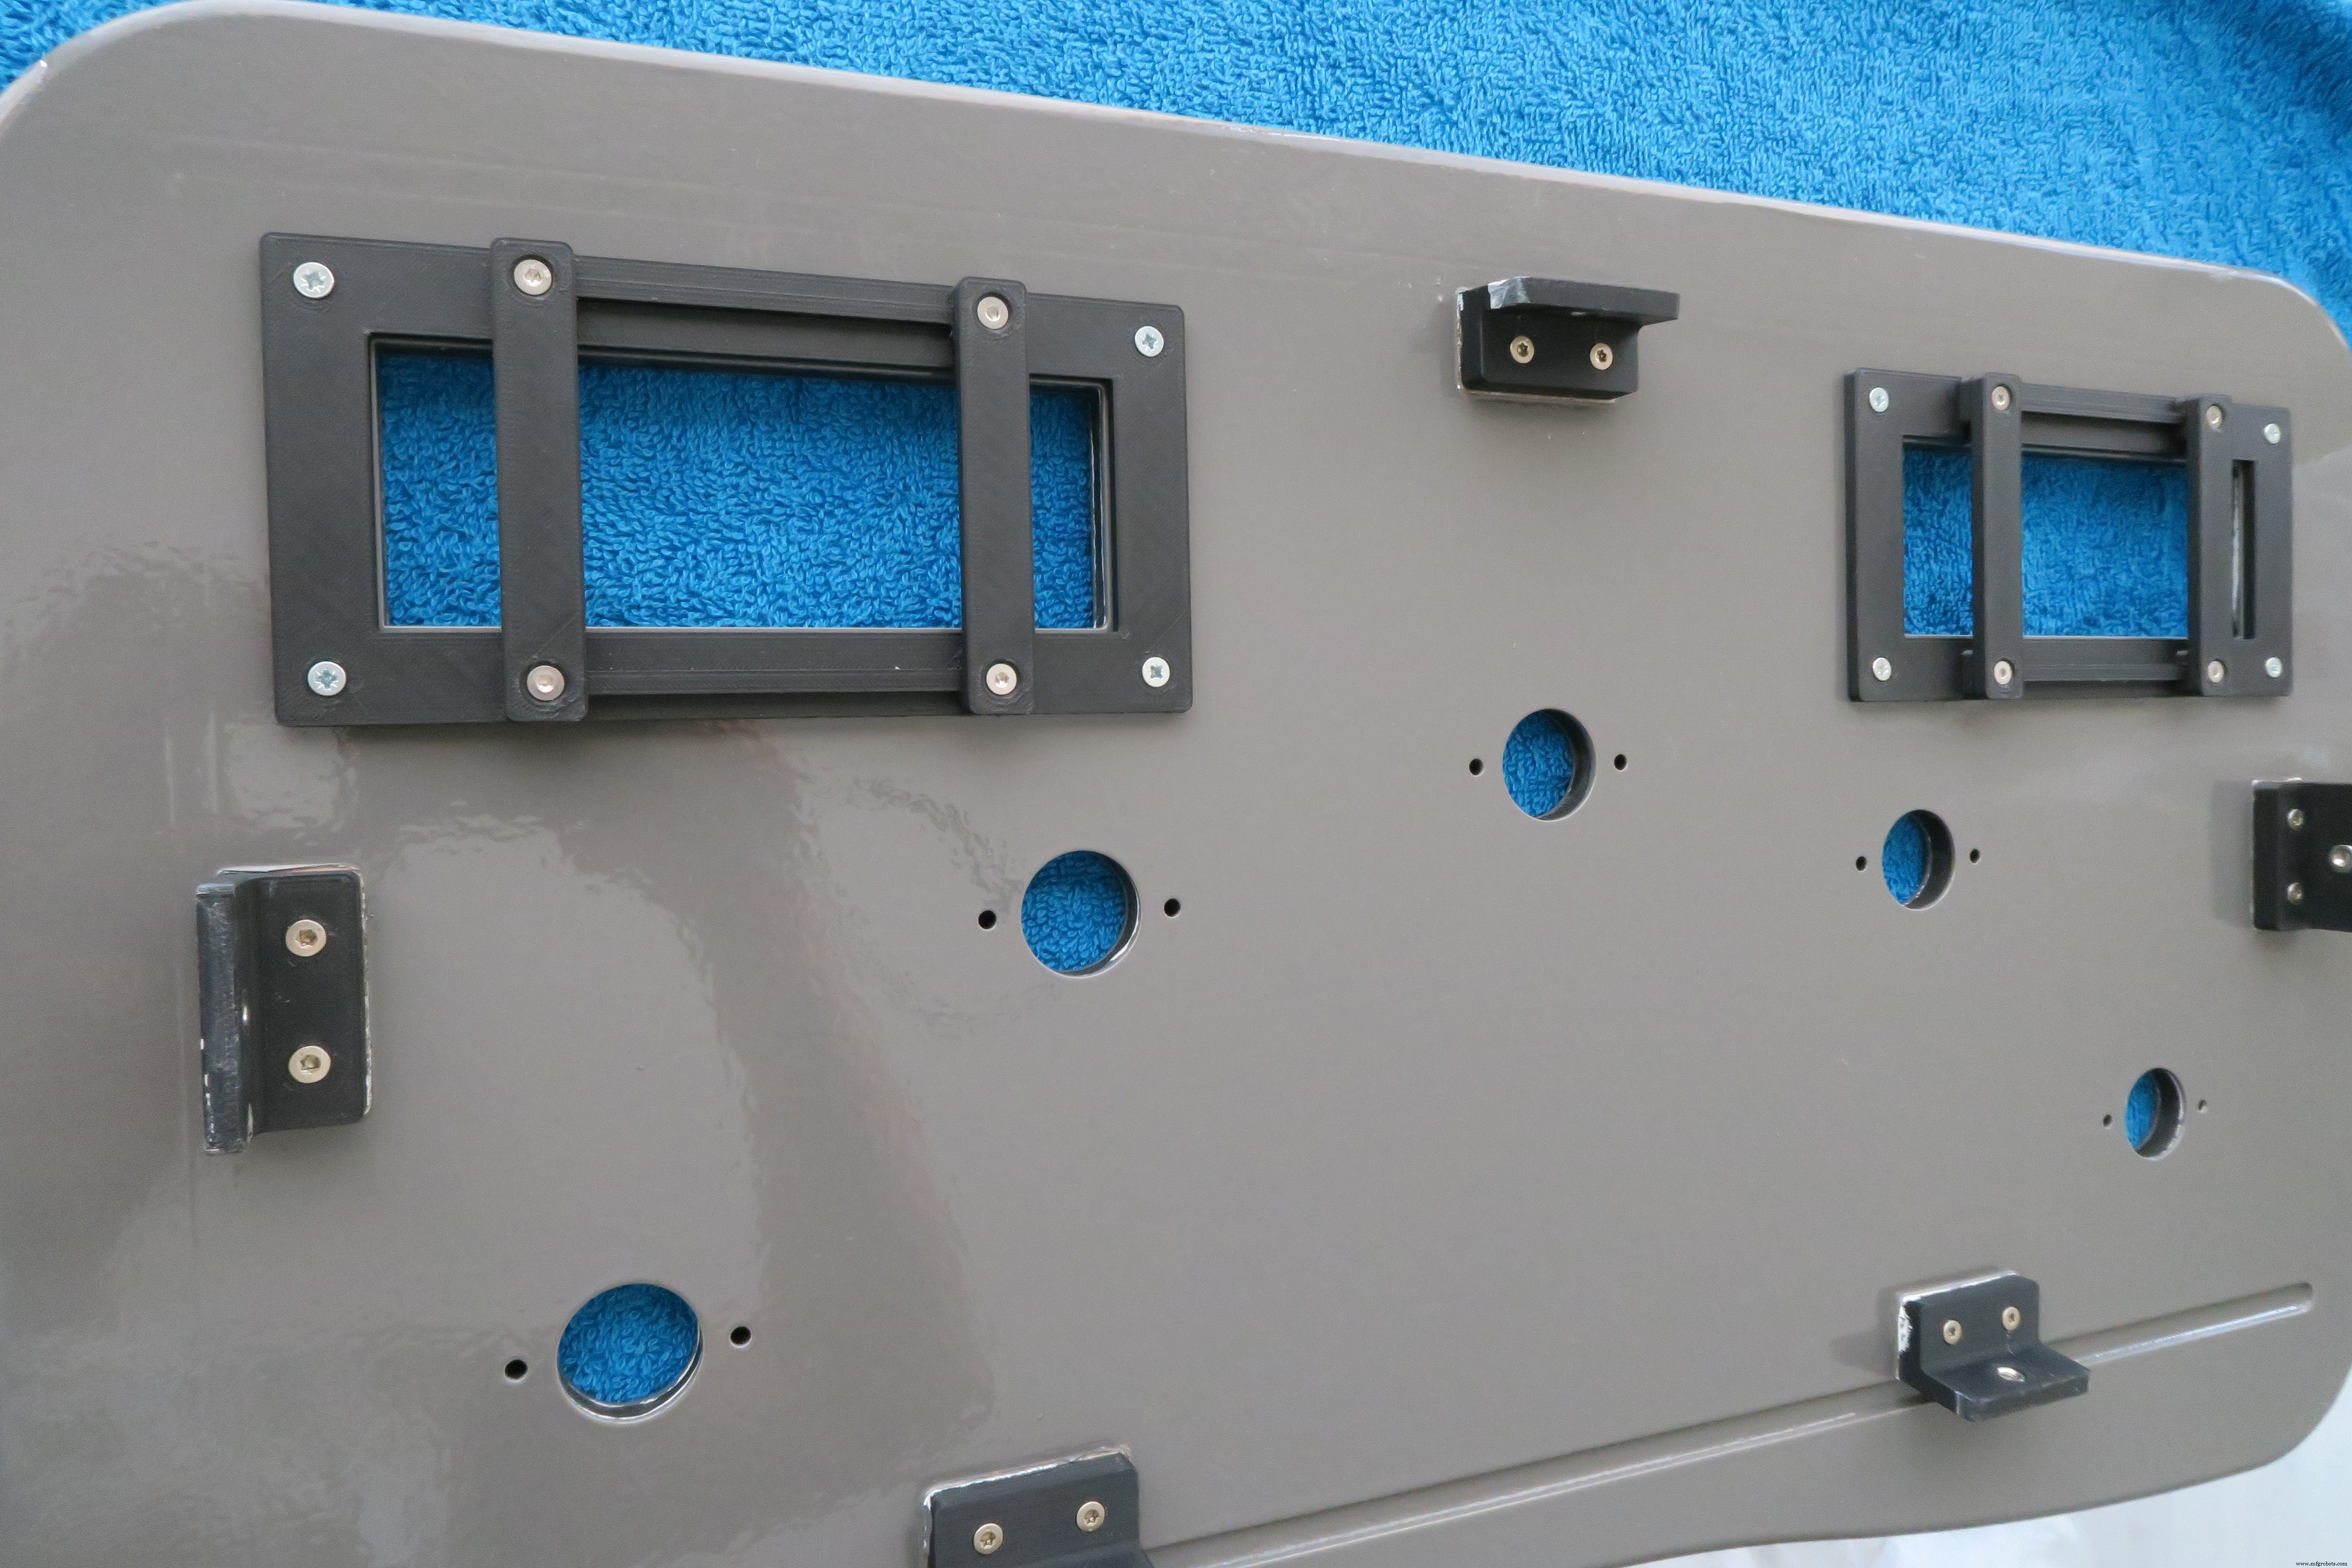
Si lo desea, pinte el recinto.
A continuación, monte los soportes de la pantalla LED. No olvide colocar los pernos debajo de los soportes, de lo contrario, las barras verticales no se pueden arreglar.
Ensambla el escudo Arduino. Usé un conjunto adicional de encabezados apilables, por lo que hay más espacio entre el escudo y el Arduino.
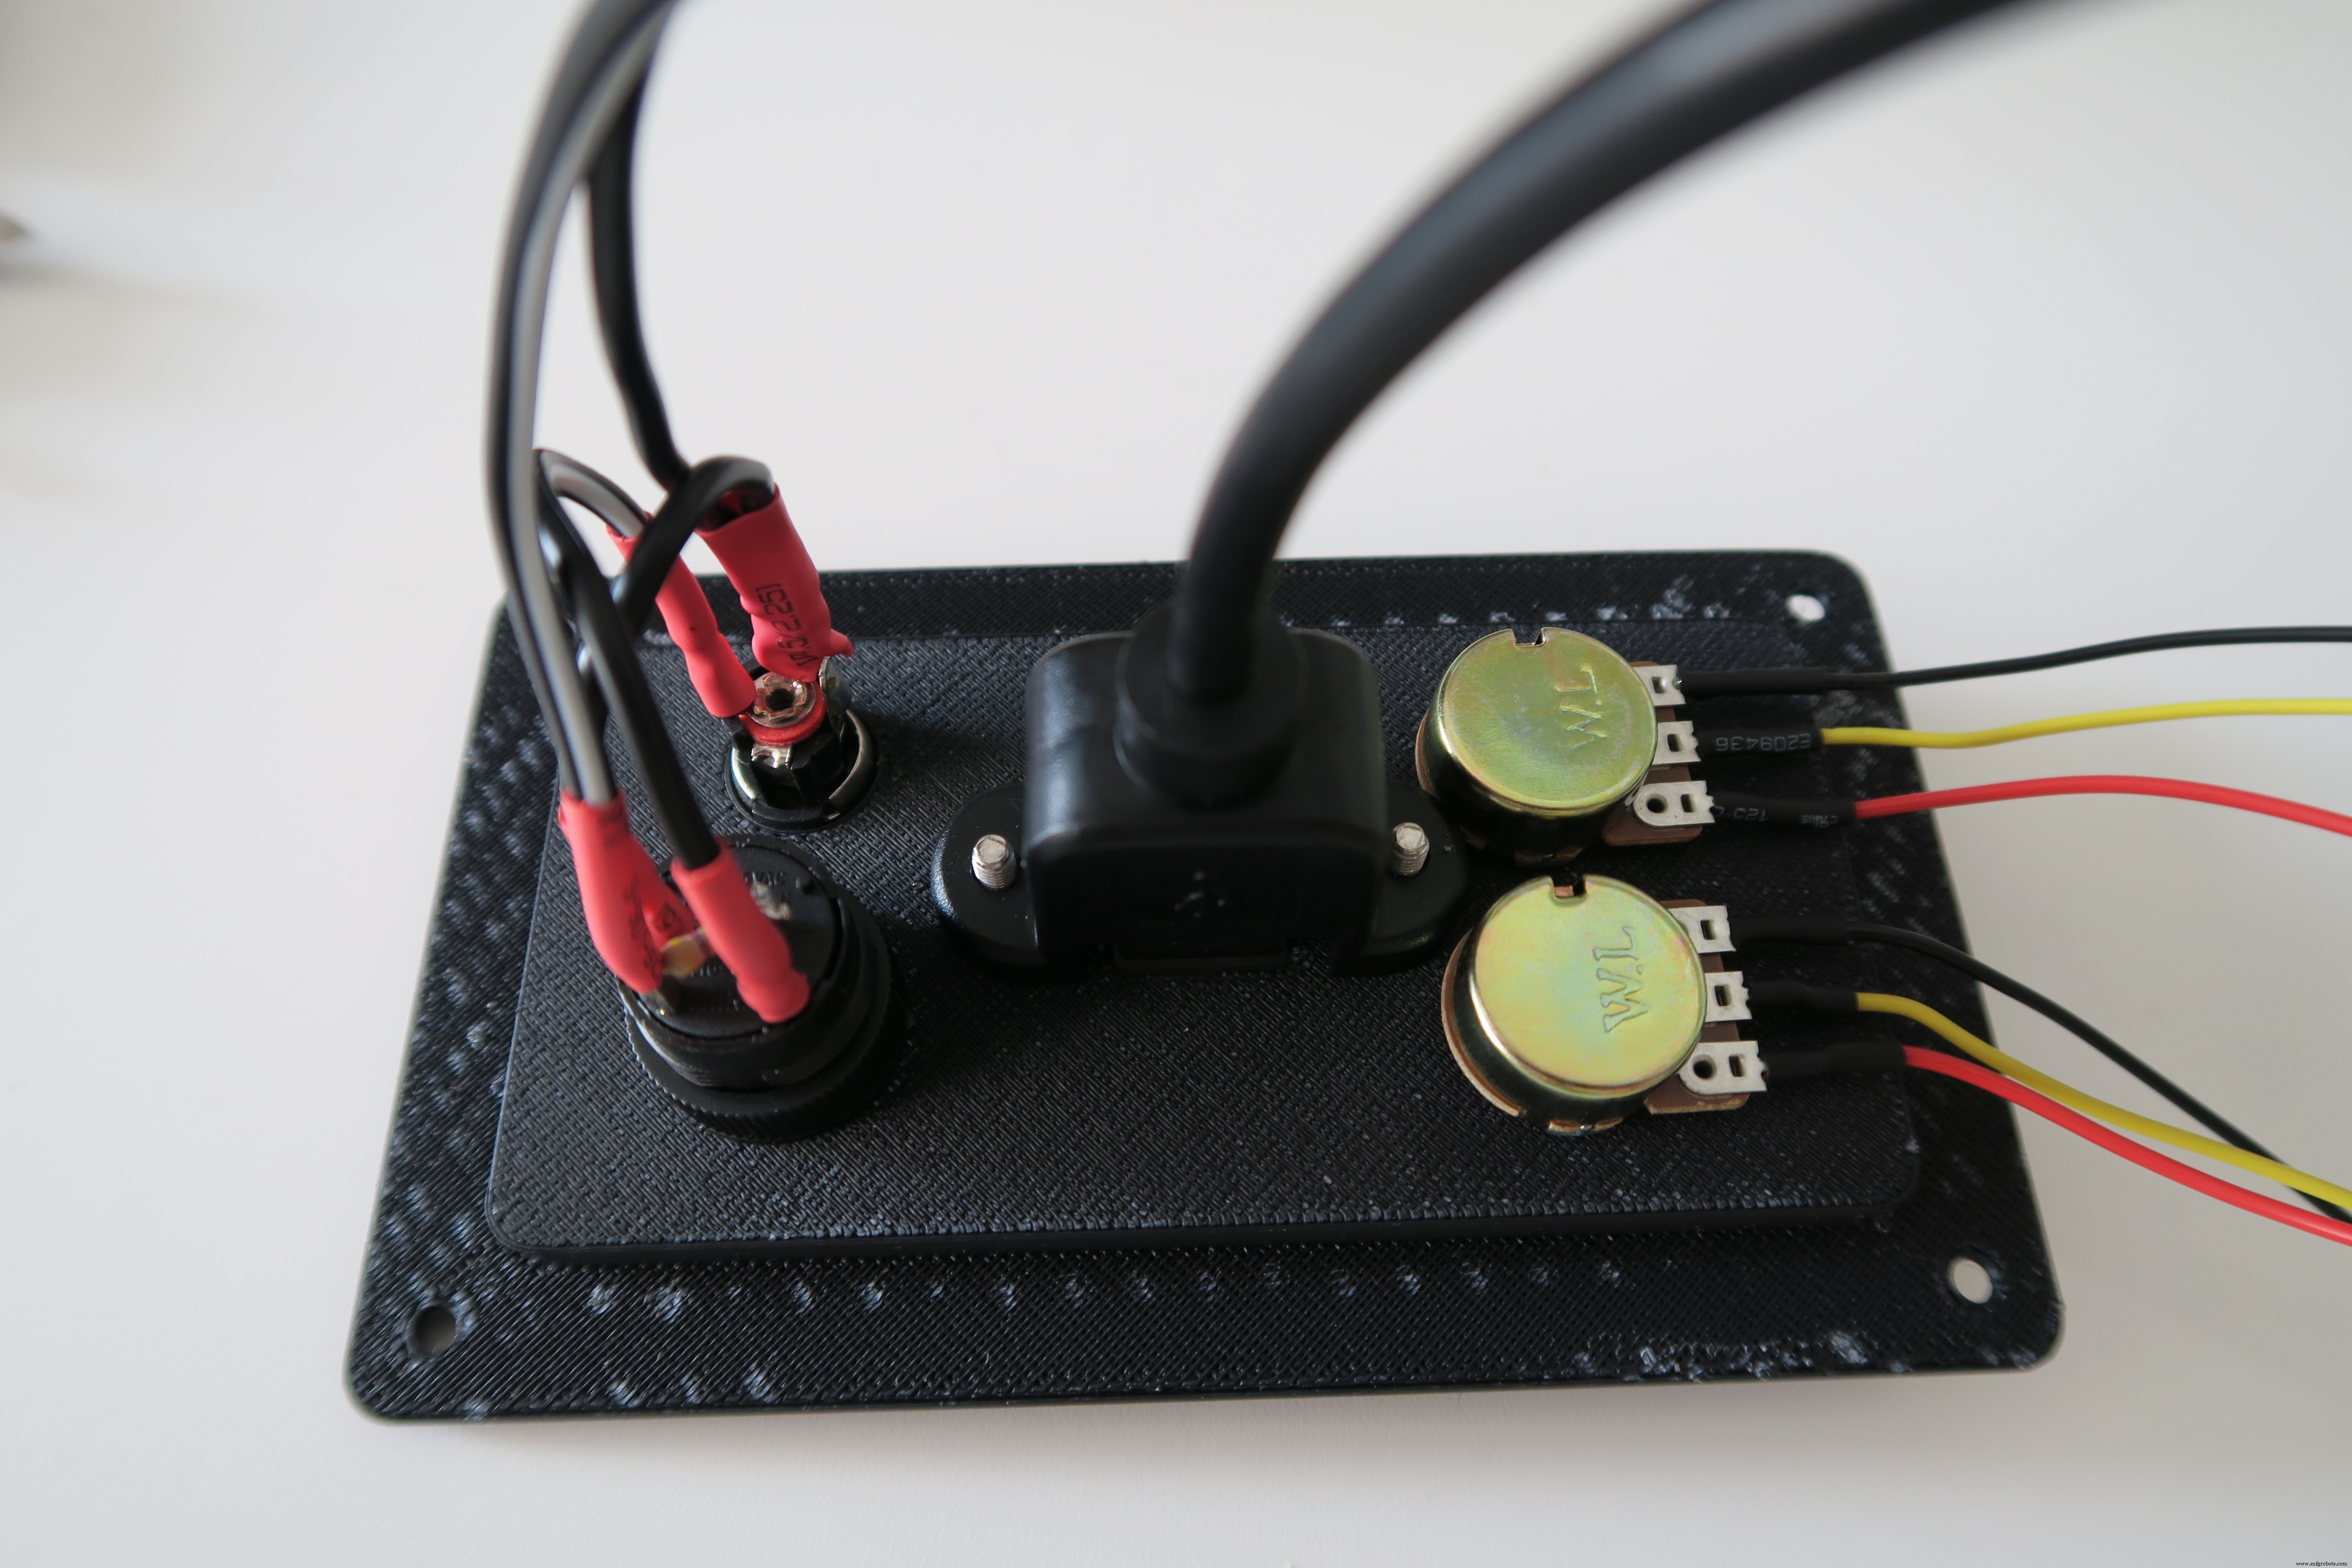
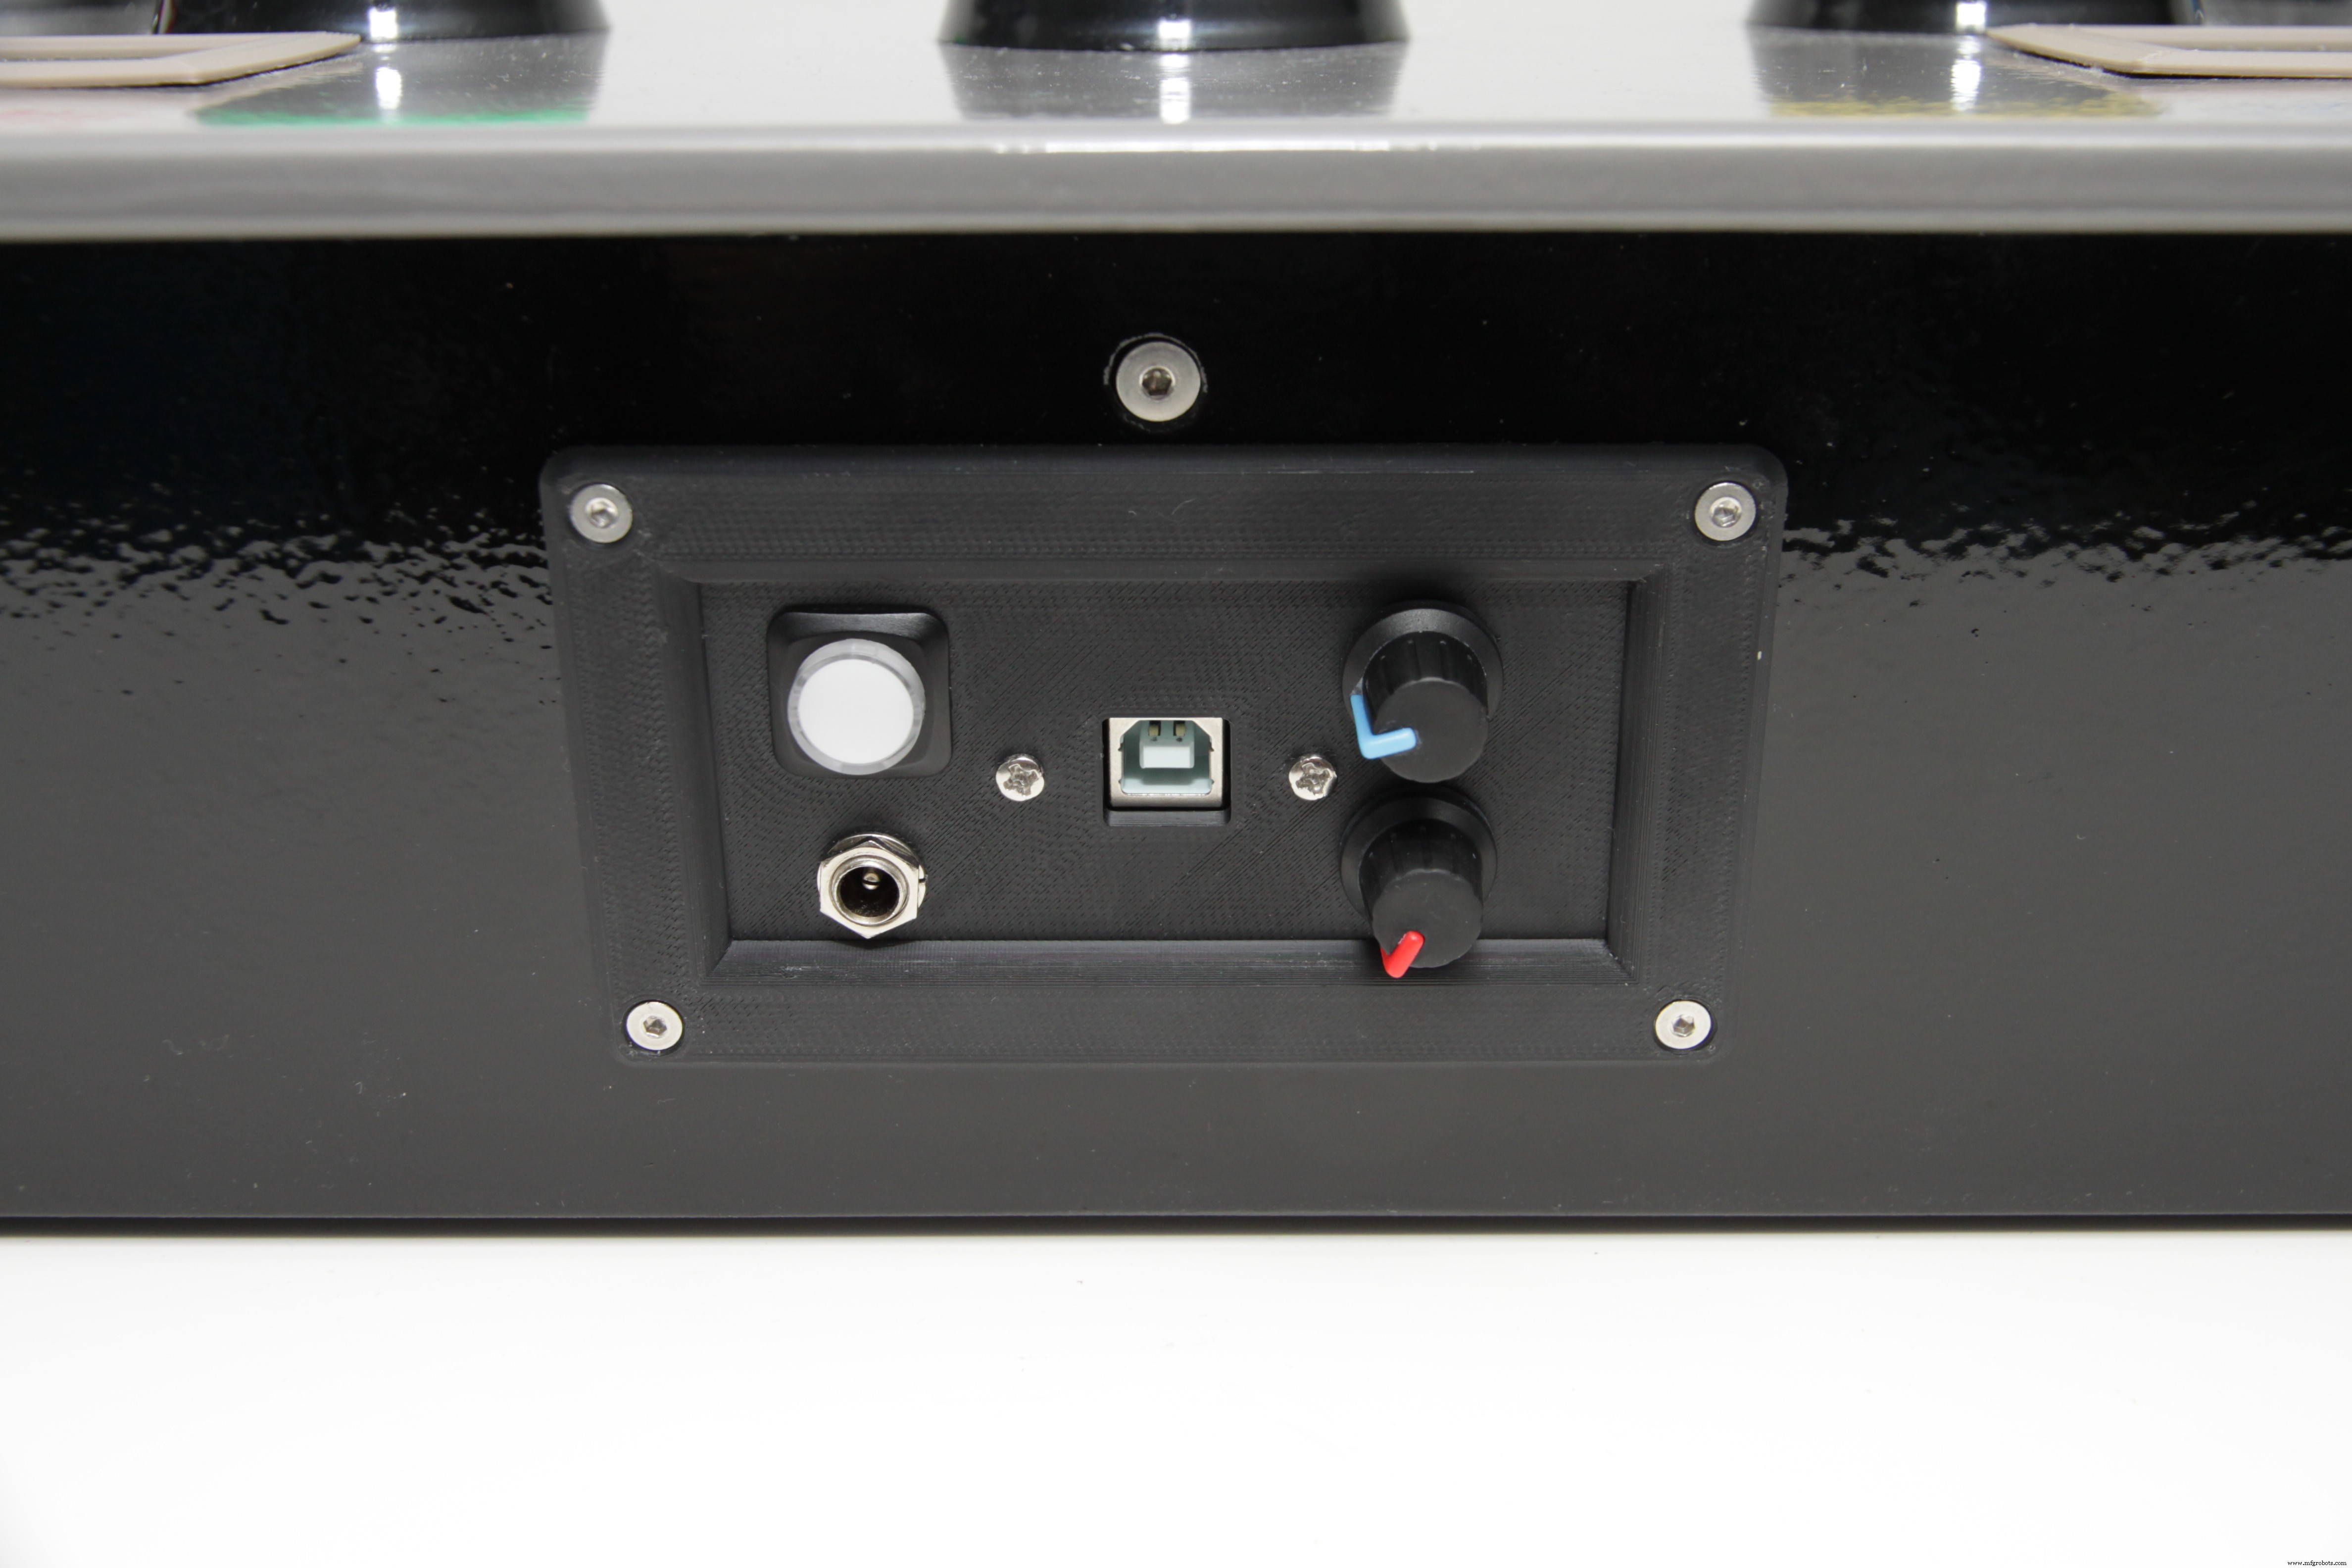
Ensamble el panel de control trasero.
Ensamble la cubierta superior (botones y paneles LED).
El panel de control trasero incluye dos controles de potenciómetro; uno para el control de volumen, otro para la selección de nivel.
Conclusiones
¡Terminó!
en el panel de dígitos led izquierdo se puede ver el nivel seleccionado. Puede seleccionar el nivel 1 (fácil) al 10 (loco). En el panel de dígitos LED derecho puede ver la puntuación más alta para el nivel correspondiente. Durante un juego activo, el panel de dígitos izquierdo mostrará la puntuación actual. Ahora presione el botón verde para iniciar el juego. Después de una cuenta regresiva, comenzará el juego.
Código
Whac_A_Mole_v1.0.0 Arduino
Código Arduino, escrito dentro de Visual Studio /*Whac_A_Mole_v1.0.0By WT040 * / # incluye "Wire.h" #include "Adafruit_LEDBackpack.h" #include "Adafruit_GFX.h" Adafruit_7segment matrix1 =Adafruit_7segment_7segmento matriz2 Adafruit_7segment (); # define debounceTime 10 // declara controles potmeter # define potmeterVolume 0 # define potmeterGameLevel 1 // declara amp power pin # define ampPower 32 // declara botones # define btn1Pin 22 # define btn2Pin 24 # define btn3Pin 26 # define btn4Pin 28 # define btn5Pin 30byte btnArray [] ={btn1Pin, btn2Pin, btn3Pin, btn4Pin, btn5Pin}; # define btn1 0 // para usar la matriz btn # define btn2 1 // para usar la matriz btn # define btn3 2 // para usando la matriz btn # definir btn4 3 // para usar la matriz btn # definir btn5 4 // para usar la matriz btn // declarar botones leds # definir btnLed1Pin 9 # definir btnLed2Pin 10 # definir btnLed3Pin 11 # definir btnLed4Pin 12 # definir btnLed5Pin 13 bytes btnLedArray [] ={btnLed1Pin, btnLed2Pin, btnLed3Pin, btnLed4Pin, btnLed5Pin}; # define btnLed1 0 // f o usando la matriz btn # define btnLed2 1 // para usar la matriz btn # define btnLed3 2 // para usar la matriz btn # define btnLed4 3 // para usar la matriz btn # define btnLed5 4 // para usar la matriz btn / / declare audio fx digitals # define fx0TriggerPin 29 # define fx1TriggerPin 31 # define fx2TriggerPin 33 # define fx3TriggerPin 35 # define fx4TriggerPin 37 # define fx5TriggerPin 39 # define fx6TriggerTriggerPin # define fx6TriggerTriggerPin 41PxPig9 define fx8rig7 43 definir fxVolUpPin 51 # define fxVolDnPin 53byte fxTriggerArray [] ={fx0TriggerPin, fx1TriggerPin, fx2TriggerPin, fx3TriggerPin, fx4TriggerPin, fx5TriggerPin, fx6TriggerPin, fx7TriggerPin, fx8TriggerPin, fx9TriggerPin, fx10TriggerPin}; byte fxVolumeArray [] ={fxVolUpPin, fxVolDnPin}; # definen fx0Trigger 0 // para usar el arreglo btn # define fx1Trigger 1 // para usar el arreglo btn # define fx2Trigger 2 // para usar el arreglo btn # define fx3Trigger 3 // para usar el arreglo btn # define fx4Trigger 4 // para usar el b tn array # define fx5Trigger 5 // para usar el arreglo btn # define fx6Trigger 6 // para usar el arreglo btn # define fx7Trigger 7 // para usar el arreglo btn # define fx8Trigger 8 // para usar el arreglo btn # define fx9Trigger 9 // para usar la matriz btn # define fx10Trigger 10 // para usar la matriz btn # define fxVolUp 0 // para usar la matriz btn # define fxVolDn 1 // para usar la matriz btn con firma int currentPlayingSound =-1; byte btnPressed [5 ], ledState [5]; // parpadea ledunsigned long anteriorMillisLedBlink =0; // para el led parpadeante # define intervalLedBlink 750 //// secuencia de inicio del juego sin firmar largo anteriorMillisGameStarting =0; #define intervalCountDown 1000byte gameStartCountDown; //// pasos del juego sin firmar largo anteriorMillisGameStep =0; int gameStepLength =0; // longitud de un stepint individual gameStepBtn =0; // el botón que se debe presionar // int valPotmeterVolume =0; int volume =0; int actualVolume =35; // volumen del tablero de adafruit fxint valPotmeterGameLevel =0; int gameLevel; int currentScore; int highScore; int highScoreAddr =1; byte activeBtn; bool debug; // habilitar depuración o notbyte wackAMoleState; // estado del gamebool SystemInitialized =false; #define stateUnknown 0 # define waitForStart 1 # define start 2 # define running 3 # define gameOver 4 # define detenido 5void setup () {Serial.begin (9600); // pinMode de pin de alimentación del amplificador de inicio (ampPower, OUTPUT); digitalWrite (ampPower, LOW); // init btn pines para (int Pin =0; Pin <5; Pin ++) {pinMode (btnArray [Pin], INPUT); } // init btn led pines para (int Pin =0; Pin <5; Pin ++) {pinMode (btnLedArray [Pin], OUTPUT); } // init btn fx pines para (int Pin =0; Pin <11; Pin ++) {pinMode (fxTriggerArray [Pin], OUTPUT); digitalWrite (fxTriggerArray [Pin], HIGH); } // init btn fx pines de volumen para (int Pin =0; Pin <2; Pin ++) {pinMode (fxVolumeArray [Pin], OUTPUT); digitalWrite (fxVolumeArray [Pin], HIGH); } matriz1.begin (0x70); matrix2.begin (0x71); while (! eeprom_is_ready ()); // Espere a que EEPROM esté lista cli (); highScore =eeprom_read_word ((uint16_t *) (gameLevel * 2)); sei (); matrix1.print (0); matrix1.writeDisplay (); matriz2.impresión (0); matrix2.writeDisplay (); initializeSystem ();} bucle vacío () {checkButtonInputs (); // cuando comprobamos los interruptores obtendremos el estado actual readVolumePotmeter (); if (wackAMoleState ==waitForStart) {playSound (fx0Trigger); if (btnPressed [btn4]) {wackAMoleState =comenzando; } readGameLevelPotmeter (); ledBlinkStart (); } if (wackAMoleState ==comenzando) {startGame (); } if (wackAMoleState ==en ejecución) {playSound (fx1Trigger); checkNextGameStep (); }} void checkNextGameStep () {largo sin firmar currentMillisGameStep =millis (); int amountOfButtonPresses =0; for (int btn =0; btn <5; btn ++) {if (btnPressed [btn]) {amountOfButtonPresses ++; }} if (previousMillisGameStep ==0) {previousMillisGameStep =currentMillisGameStep; digitalWrite (btnLedArray [btnLed4], LOW); randomSeed (analogRead (2)); gameStepBtn =aleatorio (0, 5); gameStepLength =aleatorio (3000 / gameLevel, 5000 / gameLevel); digitalWrite (btnLedArray [gameStepBtn], HIGH); // enciende la luz del nuevo botón} if ((currentMillisGameStep - previousMillisGameStep>
=gameStepLength) || (amountOfButtonPresses> 1) || (amountOfButtonPresses ==1) &&! btnPressed [gameStepBtn]) {// Fin del juego ... playSound ( fx2Trigger); wackAMoleState =gameOver; previousMillisGameStep =0; para (int contador =0; contador <5; contador ++) {analogWrite (btnLedArray [contador], 255); } for (int brillo =255; brillo> 0; brillo--) {analogWrite (btnLedArray [btnLed1], brillo); analogWrite (btnLedArray [btnLed2], brillo); analogWrite (btnLedArray [btnLed3], brillo); analogWrite (btnLedArray [btnLed4], brillo); analogWrite (btnLedArray [btnLed5], brillo); retraso (10); } escritura analógica (btnLedArray [btnLed1], 0); analogWrite (btnLedArray [btnLed2], 0); analogWrite (btnLedArray [btnLed3], 0); analogWrite (btnLedArray [btnLed4], 0); analogWrite (btnLedArray [btnLed5], 0); Serial.println ("Fin del juego"); if (puntaje actual> puntaje alto) {while (! eeprom_is_ready ()); // Espere a que EEPROM esté lista cli (); eeprom_write_word ((uint16_t *) (gameLevel * 2), currentScore); // Inicialicemos nuestro valor en EEPROM sei (); } int contador =0; hacer {retrasar (1); checkButtonInputs (); contador ++; } while ((contador <1000) &&! btnPressed [btn1] &&! btnPressed [btn2 &&! btnPressed [btn3] &&! btnPressed [btn4] &&! btnPressed [btn5]]); // esperar a que se suelte el botón matrix1 .impresión (0); matrix1.writeDisplay (); wackAMoleState =waitForStart; } else if (btnPressed [gameStepBtn] &&(amountOfButtonPresses ==1)) {digitalWrite (btnLedArray [gameStepBtn], LOW); // apagar led botón anterior int contador =0; hacer {retrasar (1); checkButtonInputs (); contador ++; } while ((contador <1000) &&btnPressed [gameStepBtn]); // esperar el lanzamiento del botón previousMillisGameStep =currentMillisGameStep; int tempStepBtn =0; hacer {tempStepBtn =random (0, 5); gameStepLength =aleatorio (3000 / gameLevel, 5000 / gameLevel); } while (gameStepBtn ==tempStepBtn); gameStepBtn =tempStepBtn; digitalWrite (btnLedArray [gameStepBtn], HIGH); // iluminar nuevo botón light currentScore ++; matrix1.print (puntaje actual); matrix1.writeDisplay (); if (puntaje actual> puntaje alto) {matriz2.print (puntaje actual); matrix2.writeDisplay (); }}} void ledBlinkStart () // parpadea un led sin demora {unsigned long currentMillisLedBlink =millis (); if (currentMillisLedBlink - previousMillisLedBlink> =intervalLedBlink) {previousMillisLedBlink =currentMillisLedBlink; if (ledState [0] ==BAJO) {ledState [0] =HIGH; } else {ledState [0] =LOW; } escritura digital (btnLedArray [btnLed4], ledState [0]); // led verde / botón}} void startGame () // secuencia de inicio del juego en sí {unsigned long currentMillisGameStarting =millis (); escritura digital (btnLedArray [btnLed4], 0); // apaga el LED / botón verde currentScore =0; if (gameStartCountDown ==0) {playSound (fx3Trigger); previousMillisGameStarting =millis (); gameStartCountDown =4; retraso (300); matrix1.print (gameStartCountDown, DEC); matrix1.writeDisplay (); } if (currentMillisGameStarting - previousMillisGameStarting> =intervalCountDown) {previousMillisGameStarting =currentMillisGameStarting; if (gameStartCountDown> 0) {gameStartCountDown--; matrix1.print (gameStartCountDown, DEC); matrix1.writeDisplay (); if (gameStartCountDown ==0) {wackAMoleState =running; }}}} void initializeSystem () {// agregue el código de inicio aquí ... digitalWrite (btnLedArray [btnLed1], HIGH); retraso (75); digitalWrite (btnLedArray [btnLed2], ALTO); retraso (75); digitalWrite (btnLedArray [btnLed3], ALTO); retraso (75); escritura digital (btnLedArray [btnLed4], ALTA); retraso (75); escritura digital (btnLedArray [btnLed5], ALTA); retraso (1000); digitalWrite (btnLedArray [btnLed5], LOW); retraso (75); digitalWrite (btnLedArray [btnLed4], LOW); retraso (75); digitalWrite (btnLedArray [btnLed3], LOW); retraso (75); digitalWrite (btnLedArray [btnLed2], LOW); retraso (75); digitalWrite (btnLedArray [btnLed1], LOW); retraso (1000); debug =true; wackAMoleState =waitForStart; initVolume (); if (actualVolume> 0) {enableAmpPower (verdadero); }} void checkButtonInputs () // comprobar cambios en los botones {byte estático estado anterior [5]; estado actual de byte estático [5]; estática larga última vez; índice de bytes; // debounce if ((última vez + debounceTime)> millis ()) {return; } última hora =millis (); // para (índice =0; índice <5; índice ++) {estado actual [índice] =lectura digital (btnArray [índice]); // leer el botón if (currentstate [index]! =btnPressed [index]) {if ((btnPressed [index] ==HIGH) &&(currentstate [index] ==LOW)) {if (debug) {Serial.print ("botón suelto:"); Serial.println (índice + 1); } btnPressed [índice] =0; } if ((btnPressed [index] ==LOW) &&(currentstate [index] ==HIGH)) {if (debug) {Serial.print ("botón presionado:"); Serial.println (índice + 1); } btnPressed [índice] =1; }}}} void initVolume () {valPotmeterVolume =(analogRead (potmeterVolume) / 30); if (actualVolume> valPotmeterVolume) {hacer {digitalWrite (fxVolumeArray [fxVolDn], LOW); actualVolume--; retraso (20); digitalWrite (fxVolumeArray [fxVolDn], HIGH); retraso (20); } while (actualVolume> valPotmeterVolume); } else if (actualVolume valPotmeterVolume) {digitalWrite (fxVolumeArray [fxVolDn], LOW); actualVolume--; retraso (40); digitalWrite (fxVolumeArray [fxVolDn], HIGH); if (actualVolume ==0) {enableAmpPower (falso); }} else if (actualVolume -1) {matriz2.print (highScore); } más {matriz2.impresión (0); } matrix2.writeDisplay ();} void playSound (int sound) {if (currentPlayingSound! =sound) {for (int contador =0; contador <11; contador ++) {digitalWrite (fxTriggerArray [contador], ALTO); } digitalWrite (fxTriggerArray [sonido], BAJO); currentPlayingSound =sonido; }} void enableAmpPower (bool state) {digitalWrite (ampPower, state);} Piezas y carcasas personalizadas
Piezas de MDF cortadas con láser de 6 mm OC9CvHjuTzsYL9POZCJt.dxfLasercut MDF parts 9mm 1irkeqvO4ABzhKqhmyG7.dxf Piezas de plexiglás cortadas con láser de 3 mm j4Tnmni6dQ0KXJtiHcy1.dxfCustom Arduino Mega Shield 5yiRX1RdQuPX0gNXjYkm.zip Montaje de amplificador impreso en 3D, impresión Arduino mega mount impreso en 2x3D Montaje en panel de conexión trasera impresa en 3D Panel de conexión trasera impresa en 3D Clip de cable impreso en 3D, imprime tantos como quieras marco superior, imprimir 2x3D impreso en la cubierta superior montar en la parte trasera 3D impreso en la tapa superior montar en la parte delantera, imprimir 2x3D impreso en la cubierta superior montar en el lado, imprimir 2x Esquemas