



Reloj de 7 segmentos con Arduino Nano, DS3231 RTC y brillo automático LDR
Componentes y suministros
 |
Arduino Nano R3 (funciona con Arduino Uno o Elegoo Uno) | × | 1 |
| Adafruit 7-Segment Backpack - Dígitos de 1.2" (opcional si compras el kit) | × | 1 | |
| Adafruit 1.2" 4-Dígitos 7-Segmentos Display con I2C Backpack - Verde | × | 1 | |
| Adafruit DS3231 (o DS1307 si prefieres) | × | 1 | |
 |
Resistencia 100k ohm | × | 1 |
 |
Fotorresistencia (LDR) | × | 1 |
 |
Protoboard (genérica) | × | 1 |
 |
Cables jumper (genéricos) 10-14 piezas | × | 1 |
| Pila de botón CR1220 | × | 1 |
Aplicaciones y servicios en línea
 |
Arduino IDE |
Sobre este proyecto
Introducción
En una época donde siempre llevamos un reloj en la muñeca (reloj inteligente o smartphone), un Arduino Uno/Nano parece algo simple. Sin embargo, existen dispositivos sincronizados con servidores NTP que están constantemente en línea vía Internet.
Historia
Un amigo rechazó, por razones personales, un dispositivo con conexión WiFi en su dormitorio, así que equipé el Arduino con un reloj independiente.
Elegir el producto adecuado
Me sorprendió la variedad de productos que ofrece Adafruit: según voltaje deseado y precisión. Elegí dos: el más económico DS1307 y el más preciso DS3231.
Ambos funcionan en este reloj. Para usar el DS1307, presta atención a la asignación de pines correcta y comenta la función displayTemp() en el loop(), ya que el DS1307 no tiene sensor de temperatura.
Adaptar el sketch
Busqué un sketch base y lo reestructuré, manteniendo los comentarios en checo y añadiendo notas en inglés.
Quería la pantalla lo más grande posible, así que opté por un display de 7 segmentos: solo quería ver la hora.
Una grata sorpresa: el DS3231 proporciona lectura de temperatura, algo que el DS1307 no tiene (además de su menor precisión).
Inicializar los relojes
Si tienes una pila CR1220, sigue el tutorial de Adafruit para configurar los relojes. En resumen: la hora no se descarga de Internet, sino que se toma del PC local al subir el sketch.
Funciones
Añadí la matriz LED para mostrar hora y temperatura. El período de cambio entre hora y temperatura es configurable por variables.
El control de los puntos intermitentes y dígitos en la matriz LED está bien documentado en el código.
El sketch incluye:
- Ajuste de horario verano/invierno (cambio automático).
- Brillo automático de la matriz LED según luz ambiental (más oscuro de noche, más brillante de día).
En el video notarás el cambio entre hora y temperatura. ¿Viste el punto a la izquierda? Cambia de posición (arriba/abajo) según los segundos.
Comentario: Si sabes cómo mostrar "ERR" en la matriz LED en caso de fallo del reloj, házmelo saber. Actualmente muestra "bEEF":

// ¡Oh no, sin datos!
Serial.println("DS3231 Sensor Error - cant read temperature");
matrix.print(0xBEEF, HEX); // informa al usuario con BEEF
matrix.writeDisplay();
delay(5000);
Expansión
- Alarma o despertador no integrado aún.
- Posible extensión vía módulo Bluetooth y Blynk.
Actualización 01.02.2019
La transferencia de protoboard a placa perforada permanente se completó. Algunas fotos:
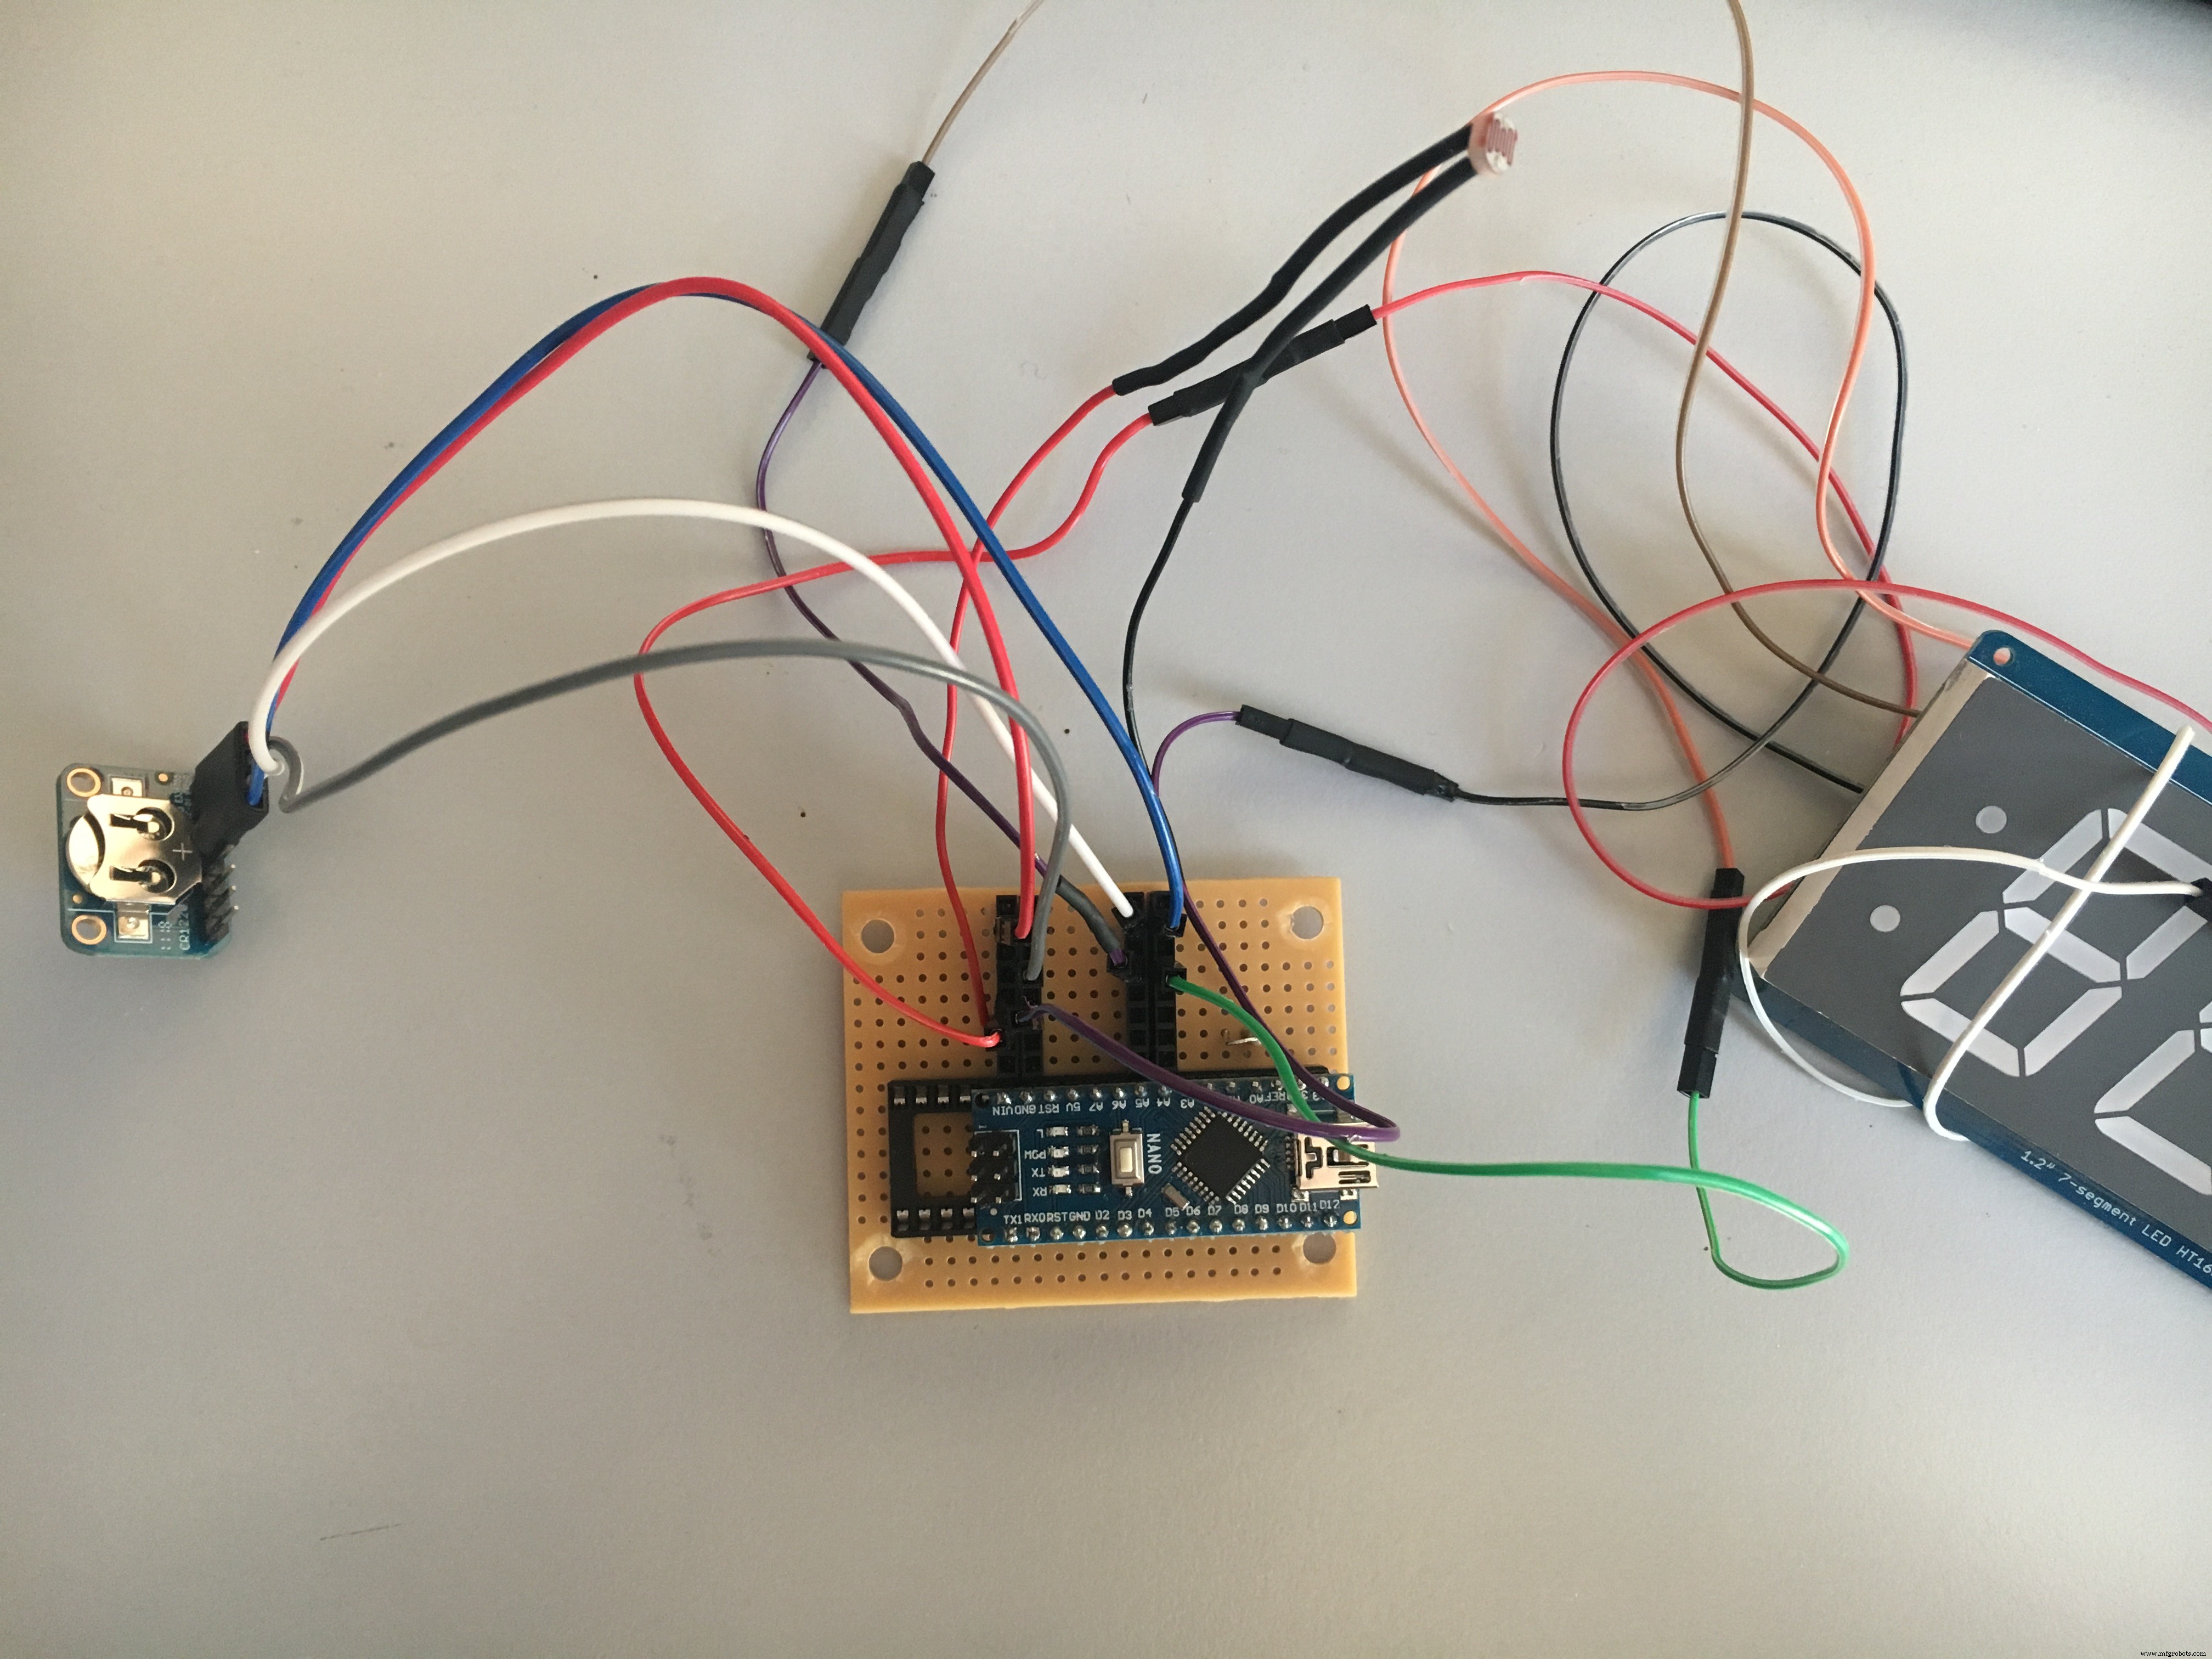


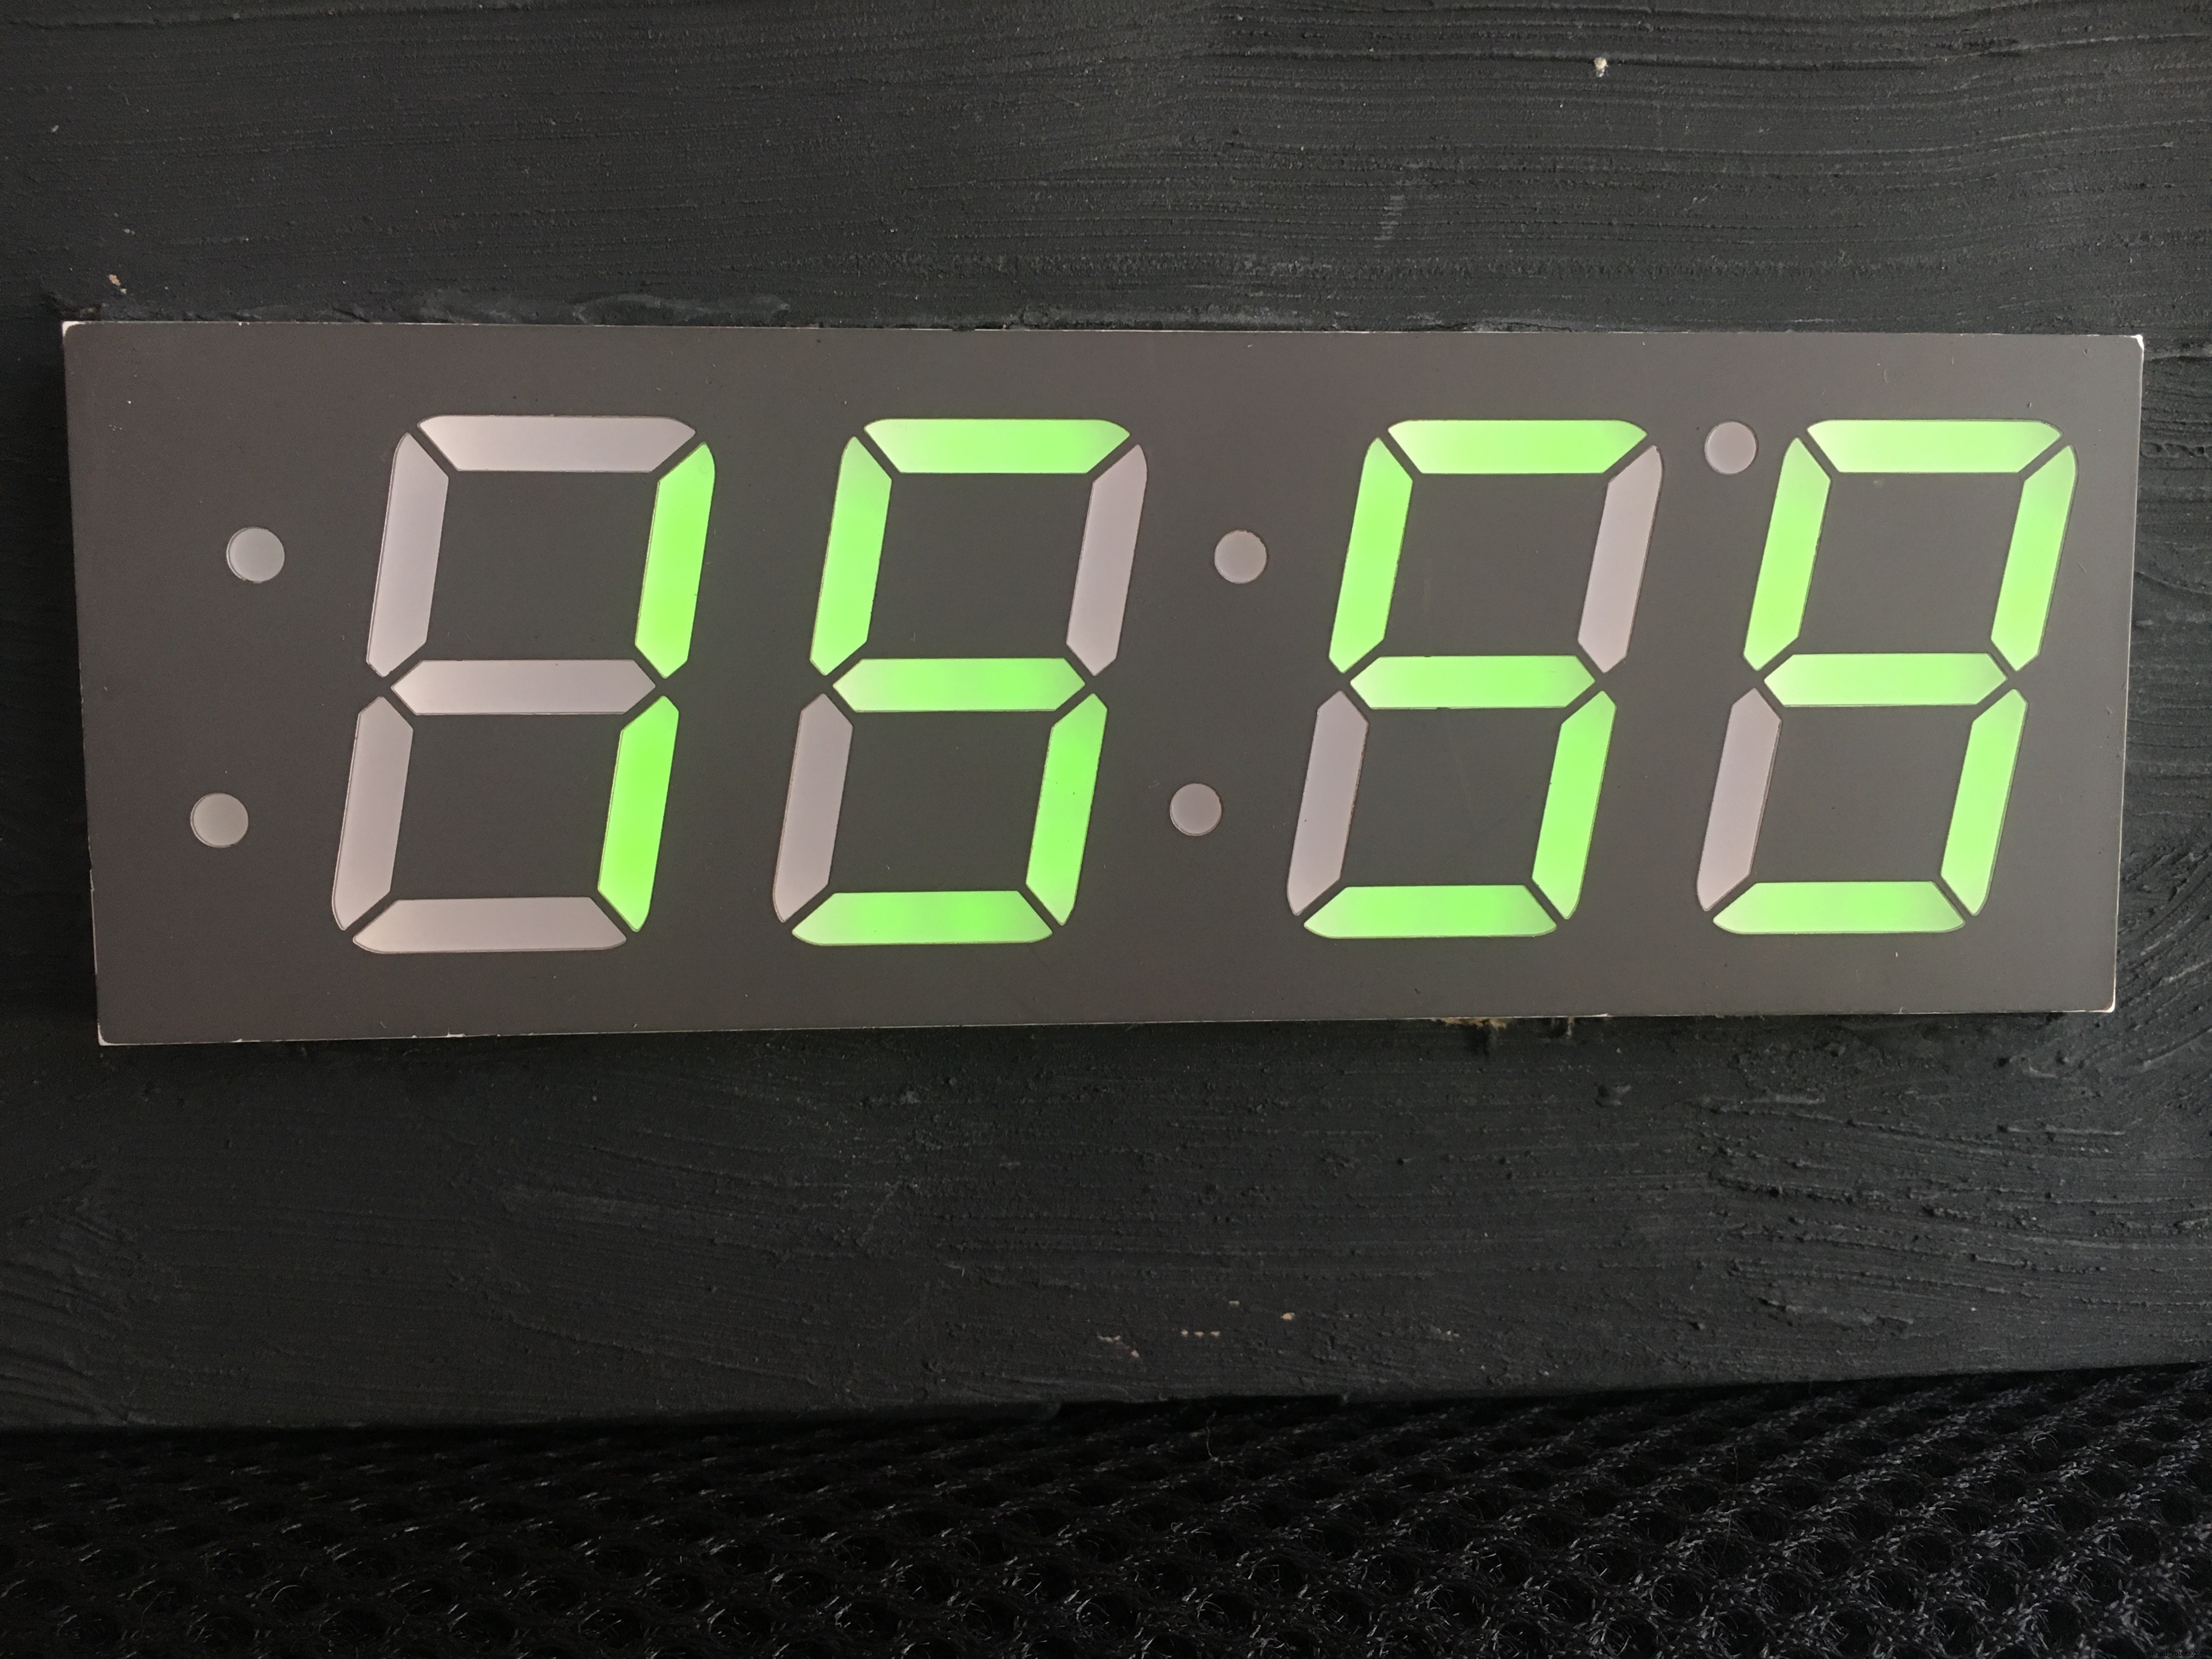
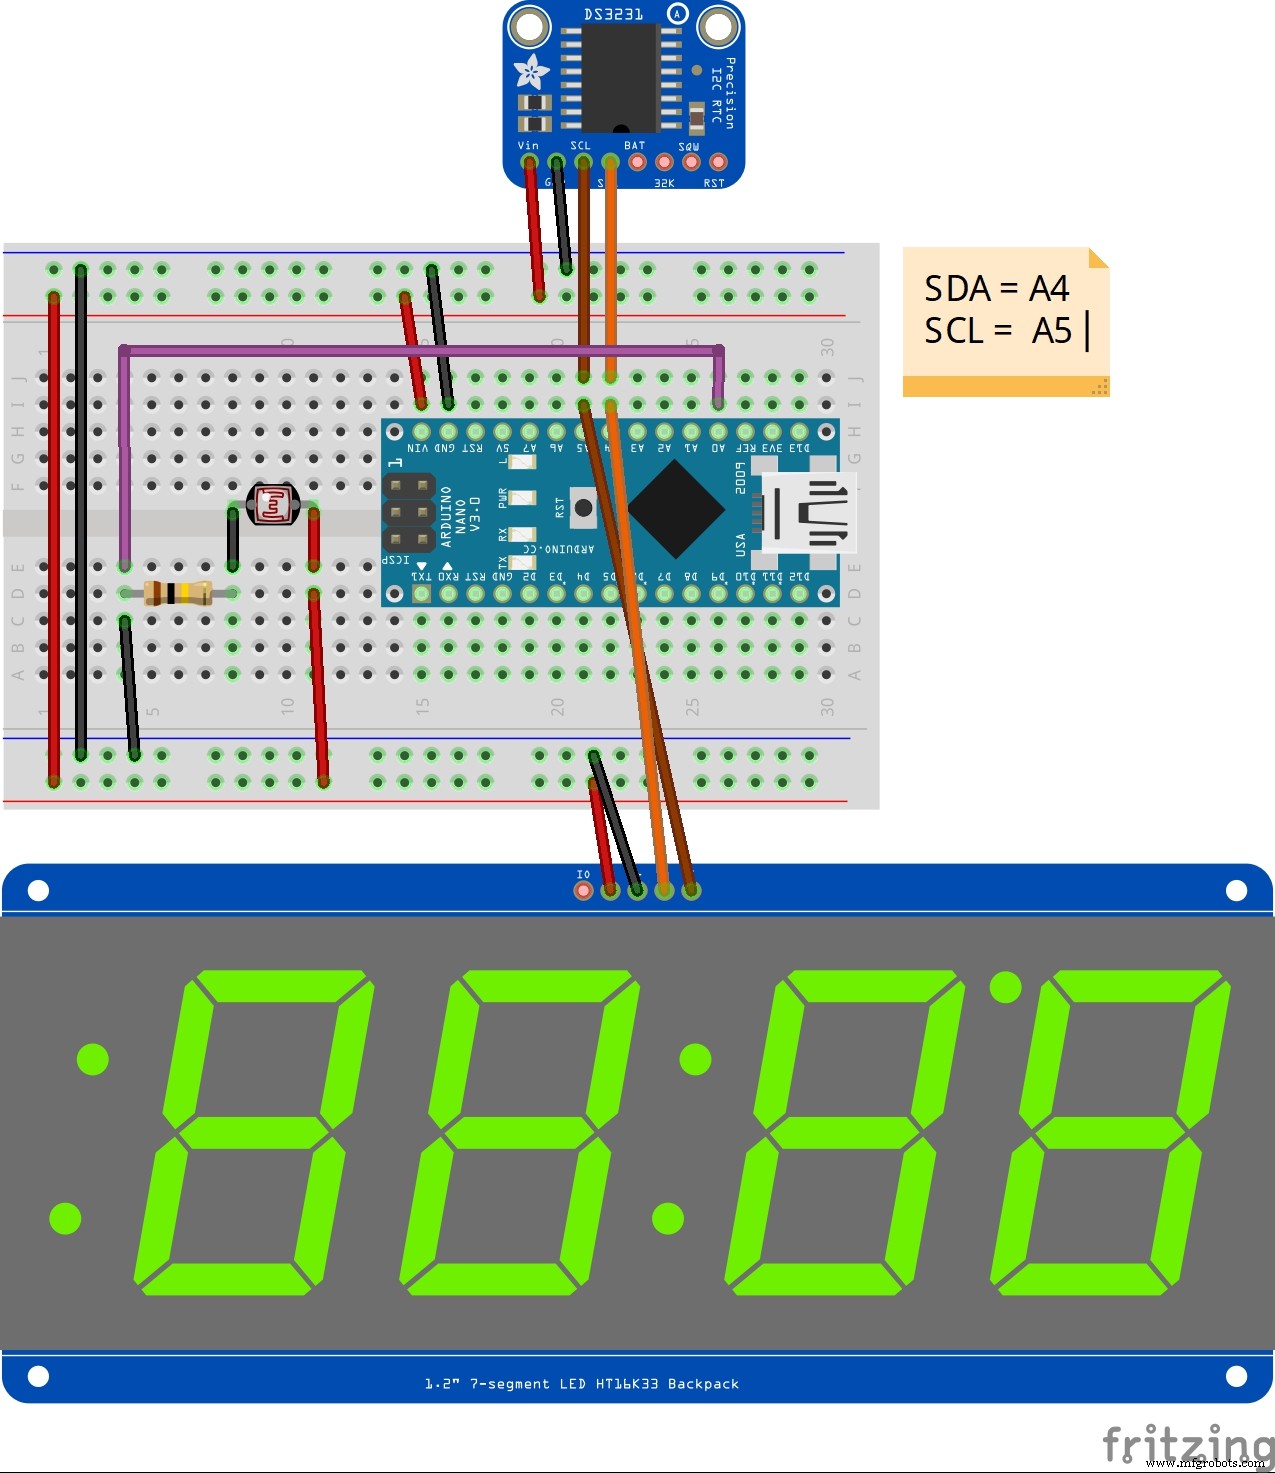
Código actualizado v1.1 e imagen de Fritzing personalizada en los adjuntos.
Código
MyClock v1.0 (C/C++)
// MyClock v1.0
// Ingo Lohs
// Hardware: probado con Arduino Uno y Arduino Nano (ATmega328P [Old Bootloader]) con Arduino IDE v1.8.8

/* Teoría para la matriz ht16k33
Lo más fácil es llamar a print - igual que Serial:
print(variable,HEX) - imprime hexadecimal 0000-FFFF
print(variable,DEC) o print(variable) - imprime decimal 0000-9999
Para más control: writeDigitNum(location, number) - escribe número (0-9) en ubicación.
Ubicación #0 = extrema izquierda, #2 = dos puntos (colon), #4 = extrema derecha.
Para controlar dos puntos y decimales: writeDigitRaw(location, bitmap).
Bits en location 2:
0x02 - colon central (ambos puntos)
0x04 - colon izquierdo - punto inferior
0x08 - colon izquierdo - punto superior
0x10 - punto decimal
Para punto decimal: writeDigitNum(location, number, true)
Para dibujar colon: drawColon(true/false)
Control total de segmentos: writeDigitRaw(location, bitmask)
¡No olvides writeDisplay() para guardar en la matriz vía I2C!
Fuente: https://www.mouser.com/ds/2/737/adafruit-led-backpack-932846.pdf
*/

#include <Wire.h>
#include <Adafruit_GFX.h>
#include "Adafruit_LEDBackpack.h"

#define DS3231_I2C_ADDRESS 0x68

int ldr_sensor = A0; // LDR con 100k a GND, otra pata a 5V
int ldr_value = 0;
int brightness_matrix;
int threshold_brightness = 400;
int blinkrate_value = 0;
int delay_matrix_time = 20; // seg mostrando hora
int delay_matrix_temp = 2000; // ms mostrando temp
int blinky_dot = 2;

Adafruit_7segment matrix = Adafruit_7segment();

byte decToBcd(byte val) {
  return ((val/10*16) + (val%10));
}

byte bcdToDec(byte val) {
  return ((val/16*10) + (val%16));
}

void setup() {
  Serial.begin(9600);
  Wire.begin();
  matrix.begin(0x70);
}

void loop() {
  lightBrightness();
  matrixBlinkrate();
  displayTime();
  displayTemp();
}

void lightBrightness() {
  ldr_value = analogRead(ldr_sensor);
  Serial.print("LDR: ");
  Serial.println(ldr_value);
  if (ldr_value <= threshold_brightness) {
    brightness_matrix = 0; // brillante de día
  } else {
    brightness_matrix = 15; // oscuro de noche
  }
}

void matrixBlinkrate() {
  matrix.blinkRate(blinkrate_value);
}

void displayTime() {
  matrix.setBrightness(brightness_matrix);
  matrix.clear();

  for (uint16_t i = 0; i < delay_matrix_time; i++) {
    byte second, minute, hour, dayOfWeek, dayOfMonth, month, year;
    getDateDs3231(&second, &minute, &hour, &dayOfWeek, &dayOfMonth, &month, &year);

    byte se = second, mi = minute, ho = hour, we = dayOfWeek;
    byte dm = dayOfMonth, mo = month, ye = year;

    // Cambio a horario de verano - último domingo de marzo a las 2h
    if ((dayOfWeek == 7) && (dayOfMonth >= 25) && (month == 3) && (hour == 2)) {
      setDS3231time(se, mi, 3, we, dm, mo, ye); // poner a las 3h
    }
    // Cambio a horario de invierno
    if ((dayOfWeek == 7) && (dayOfMonth >= 25) && (month == 10) && (hour == 1) && (year != 1)) {
      setDS3231time(se, mi, ho, we, dm, mo, 1); // año como indicador de verano
    }
    if ((dayOfWeek == 7) && (dayOfMonth >= 25) && (month == 10) && (hour == 3) && (year == 1)) {
      setDS3231time(se, mi, 2, we, dm, mo, 0); // poner a las 2h y flag a 0
    }

    /* location #2 controla también los 2 puntos izquierdos (blinky_dot):
    2 = no parpadea, 3 = no parpadea, 4 = parpadea punto sup. izq.,
    5 = parpadea punto sup. izq., 6 = parpadea punto sup. izq. + colon central,
    7 = parpadea punto sup. izq. + colon central, 8 = parpadea punto inf. izq.,
    9 = parpadea punto inf. izq., 10 = parpadea punto inf. izq. + colon central,
    11 = parpadea punto inf. izq. + colon central, 12 = parpadea ambos puntos izq. sin colon central
    */

    // Formato horas: _0:mm
    if (hour > 9) {
      matrix.writeDigitNum(0, (hour / 10), false);
      matrix.writeDigitNum(1, (hour % 10), false);
    } else {
      matrix.writeDigitNum(1, hour, false);
    }

    // Puntos según segundos
    if (se <= 30) {
      blinky_dot = 10; // punto inf. izq. + colon central
    } else if (se > 30) {
      blinky_dot = 6;  // punto sup. izq. + colon central
    }
    matrix.writeDigitRaw(2, blinky_dot);
    matrix.writeDigitNum(3, (minute / 10), false);
    matrix.writeDigitNum(4, (minute % 10), false);
    matrix.writeDisplay();

    delay(500);
    matrix.drawColon(false);
    matrix.writeDisplay();
    delay(500);
  }
}

void displayTemp() {
  matrix.setBrightness(brightness_matrix);
  matrix.clear();
  byte temp = get3231Temp();
  int abs_temp = abs(temp);

  matrix.writeDigitNum(1, (abs_temp % 10), false);
  if (temp < 0) matrix.writeDigitRaw(0, 64); // signo menos
  if (temp <= -10) matrix.writeDigitRaw(2, 12);
  if (temp >= 10) matrix.writeDigitNum(0, (abs_temp/10), false);
  if (temp <= -10) matrix.writeDigitNum(0, (abs_temp/10), false);
  // matrix.writeDigitRaw(2, 0x10); // punto decimal
  matrix.writeDigitRaw(3, 99); // "°"
  matrix.writeDigitRaw(4, 57); // "C"
  matrix.writeDisplay();

  Serial.print("Temperatura en C: ");
  Serial.println(get3231Temp()); // +/- 3°C

  delay(delay_matrix_temp);
}

void setDS3231time(byte second, byte minute, byte hour, byte dayOfWeek, byte dayOfMonth, byte month, byte year) {
  Wire.beginTransmission(DS3231_I2C_ADDRESS);
  Wire.write(0);
  Wire.write(decToBcd(second));
  Wire.write(decToBcd(minute));
  Wire.write(decToBcd(hour));
  Wire.write(decToBcd(dayOfWeek)); // 1=Domingo, 7=Sábado
  Wire.write(decToBcd(dayOfMonth));
  Wire.write(decToBcd(month));
  Wire.write(decToBcd(year)); // 0-99
  Wire.endTransmission();
}

void getDateDs3231(byte *second, byte *minute, byte *hour, byte *dayOfWeek, byte *dayOfMonth, byte *month, byte *year) {
  Wire.beginTransmission(DS3231_I2C_ADDRESS);
  Wire.write(0);
  Wire.endTransmission();
  Wire.requestFrom(DS3231_I2C_ADDRESS, 7);
  *second = bcdToDec(Wire.read() & 0x7f);
  *minute = bcdToDec(Wire.read());
  *hour = bcdToDec(Wire.read() & 0x3f);
  *dayOfWeek = bcdToDec(Wire.read());
  *dayOfMonth = bcdToDec(Wire.read());
  *month = bcdToDec(Wire.read());
  *year = bcdToDec(Wire.read());
}

float get3231Temp() {
  byte tMSB, tLSB;
  float temp3231;
  Wire.beginTransmission(DS3231_I2C_ADDRESS);
  Wire.write(0x11);
  Wire.endTransmission();
  Wire.requestFrom(DS3231_I2C_ADDRESS, 2);
  if (Wire.available()) {
    tMSB = Wire.read();
    tLSB = Wire.read();
    temp3231 = (tMSB & B01111111);
    temp3231 += ((tLSB >> 6) * 0.25);
    return temp3231;
  } else {
    Serial.println("DS3231 Sensor Error - cant read temperature");
    matrix.print(0xBEEF, HEX);
    matrix.writeDisplay();
    delay(5000);
  }
}
MyClock v1.1 (C/C++) - Corrección horario verano/invierno
Cambio principal: dayOfWeek == 1 en lugar de 7 para detectar correctamente el domingo en la función displayTime().
// MyClock v1.1
// Ingo Lohs
// Hardware: probado con Arduino Uno y Arduino Nano (ATmega328P [Old Bootloader]) con Arduino IDE v1.8.8
// Cambio v1.0 > v1.1: dayOfWeek == 1 en lugar de 7 para correcta detección del domingo en cambio horario

#include <Wire.h>
#include <Adafruit_GFX.h>
#include "Adafruit_LEDBackpack.h"

#define DS3231_I2C_ADDRESS 0x68

int ldr_sensor = A0;
int ldr_value = 0;
int brightness_matrix;
int threshold_brightness = 400;
int blinkrate_value = 0;
int delay_matrix_time = 20;
int delay_matrix_temp = 2000;
int blinky_dot = 2;

Adafruit_7segment matrix = Adafruit_7segment();

byte decToBcd(byte val) { return ((val/10*16) + (val%10)); }
byte bcdToDec(byte val) { return ((val/16*10) + (val%16)); }

void setup() {
  Serial.begin(9600);
  Wire.begin();
  matrix.begin(0x70);
}

void loop() {
  lightBrightness();
  matrixBlinkrate();
  displayTime();
  displayTemp();
}

void lightBrightness() {
  ldr_value = analogRead(ldr_sensor);
  Serial.print("LDR: "); Serial.println(ldr_value);
  if (ldr_value <= threshold_brightness) brightness_matrix = 0;
  else brightness_matrix = 15;
}

void matrixBlinkrate() { matrix.blinkRate(blinkrate_value); }

void displayTime() {
  matrix.setBrightness(brightness_matrix);
  matrix.clear();

  for (uint16_t i = 0; i < delay_matrix_time; i++) {
    byte second, minute, hour, dayOfWeek, dayOfMonth, month, year;
    getDateDs3231(&second, &minute, &hour, &dayOfWeek, &dayOfMonth, &month, &year);

    byte se = second, mi = minute, ho = hour, we = dayOfWeek;
    byte dm = dayOfMonth, mo = month, ye = year;

    // Cambio a horario de verano - último domingo de marzo a las 2h
    if ((dayOfWeek == 1) && (dayOfMonth >= 25) && (month == 3) && (hour == 2)) {
      setDS3231time(se, mi, 3, we, dm, mo, ye);
    }
    // Cambio a horario de invierno
    if ((dayOfWeek == 1) && (dayOfMonth >= 25) && (month == 10) && (hour == 1) && (year != 1)) {
      setDS3231time(se, mi, ho, we, dm, mo, 1);
    }
    if ((dayOfWeek == 1) && (dayOfMonth >= 25) && (month == 10) && (hour == 3) && (year == 1)) {
      setDS3231time(se, mi, 2, we, dm, mo, 0);
    }

    if (hour > 9) {
      matrix.writeDigitNum(0, (hour / 10), false);
      matrix.writeDigitNum(1, (hour % 10), false);
    } else {
      matrix.writeDigitNum(1, hour, false);
    }

    if (se <= 30) blinky_dot = 10;
    else if (se > 30) blinky_dot = 6;

    matrix.writeDigitRaw(2, blinky_dot);
    matrix.writeDigitNum(3, (minute / 10), false);
    matrix.writeDigitNum(4, (minute % 10), false);
    matrix.writeDisplay();
    delay(500);
    matrix.drawColon(false);
    matrix.writeDisplay();
    delay(500);
  }
}

void displayTemp() {
  matrix.setBrightness(brightness_matrix);
  matrix.clear();
  byte temp = get3231Temp();
  int abs_temp = abs(temp);
  matrix.writeDigitNum(1, (abs_temp % 10), false);
  if (temp < 0) matrix.writeDigitRaw(0, 64);
  if (temp <= -10) matrix.writeDigitRaw(2, 12);
  if (temp >= 10) matrix.writeDigitNum(0, (abs_temp/10), false);
  if (temp <= -10) matrix.writeDigitNum(0, (abs_temp/10), false);
  matrix.writeDigitRaw(3, 99); // "°"
  matrix.writeDigitRaw(4, 57); // "C"
  matrix.writeDisplay();
  Serial.print("Temperatura en C: ");
  Serial.println(get3231Temp());
  delay(delay_matrix_temp);
}

void setDS3231time(byte second, byte minute, byte hour, byte dayOfWeek, byte dayOfMonth, byte month, byte year) {
  Wire.beginTransmission(DS3231_I2C_ADDRESS);
  Wire.write(0);
  Wire.write(decToBcd(second));
  Wire.write(decToBcd(minute));
  Wire.write(decToBcd(hour));
  Wire.write(decToBcd(dayOfWeek));
  Wire.write(decToBcd(dayOfMonth));
  Wire.write(decToBcd(month));
  Wire.write(decToBcd(year));
  Wire.endTransmission();
}

void getDateDs3231(byte *second, byte *minute, byte *hour, byte *dayOfWeek, byte *dayOfMonth, byte *month, byte *year) {
  Wire.beginTransmission(DS3231_I2C_ADDRESS);
  Wire.write(0);
  Wire.endTransmission();
  Wire.requestFrom(DS3231_I2C_ADDRESS, 7);
  *second = bcdToDec(Wire.read() & 0x7f);
  *minute = bcdToDec(Wire.read());
  *hour = bcdToDec(Wire.read() & 0x3f);
  *dayOfWeek = bcdToDec(Wire.read());
  *dayOfMonth = bcdToDec(Wire.read());
  *month = bcdToDec(Wire.read());
  *year = bcdToDec(Wire.read());
}

float get3231Temp() {
  byte tMSB, tLSB;
  float temp3231;
  Wire.beginTransmission(DS3231_I2C_ADDRESS);
  Wire.write(0x11);
  Wire.endTransmission();
  Wire.requestFrom(DS3231_I2C_ADDRESS, 2);
  if (Wire.available()) {
    tMSB = Wire.read();
    tLSB = Wire.read();
    temp3231 = (tMSB & B01111111);
    temp3231 += ((tLSB >> 6) * 0.25);
    return temp3231;
  } else {
    Serial.println("DS3231 Sensor Error - cant read temperature");
    matrix.print(0xBEEF, HEX);
    matrix.writeDisplay();
    delay(5000);
  }
}
GitHub
https://github.com/ILohs/MySketches
Esquemáticos
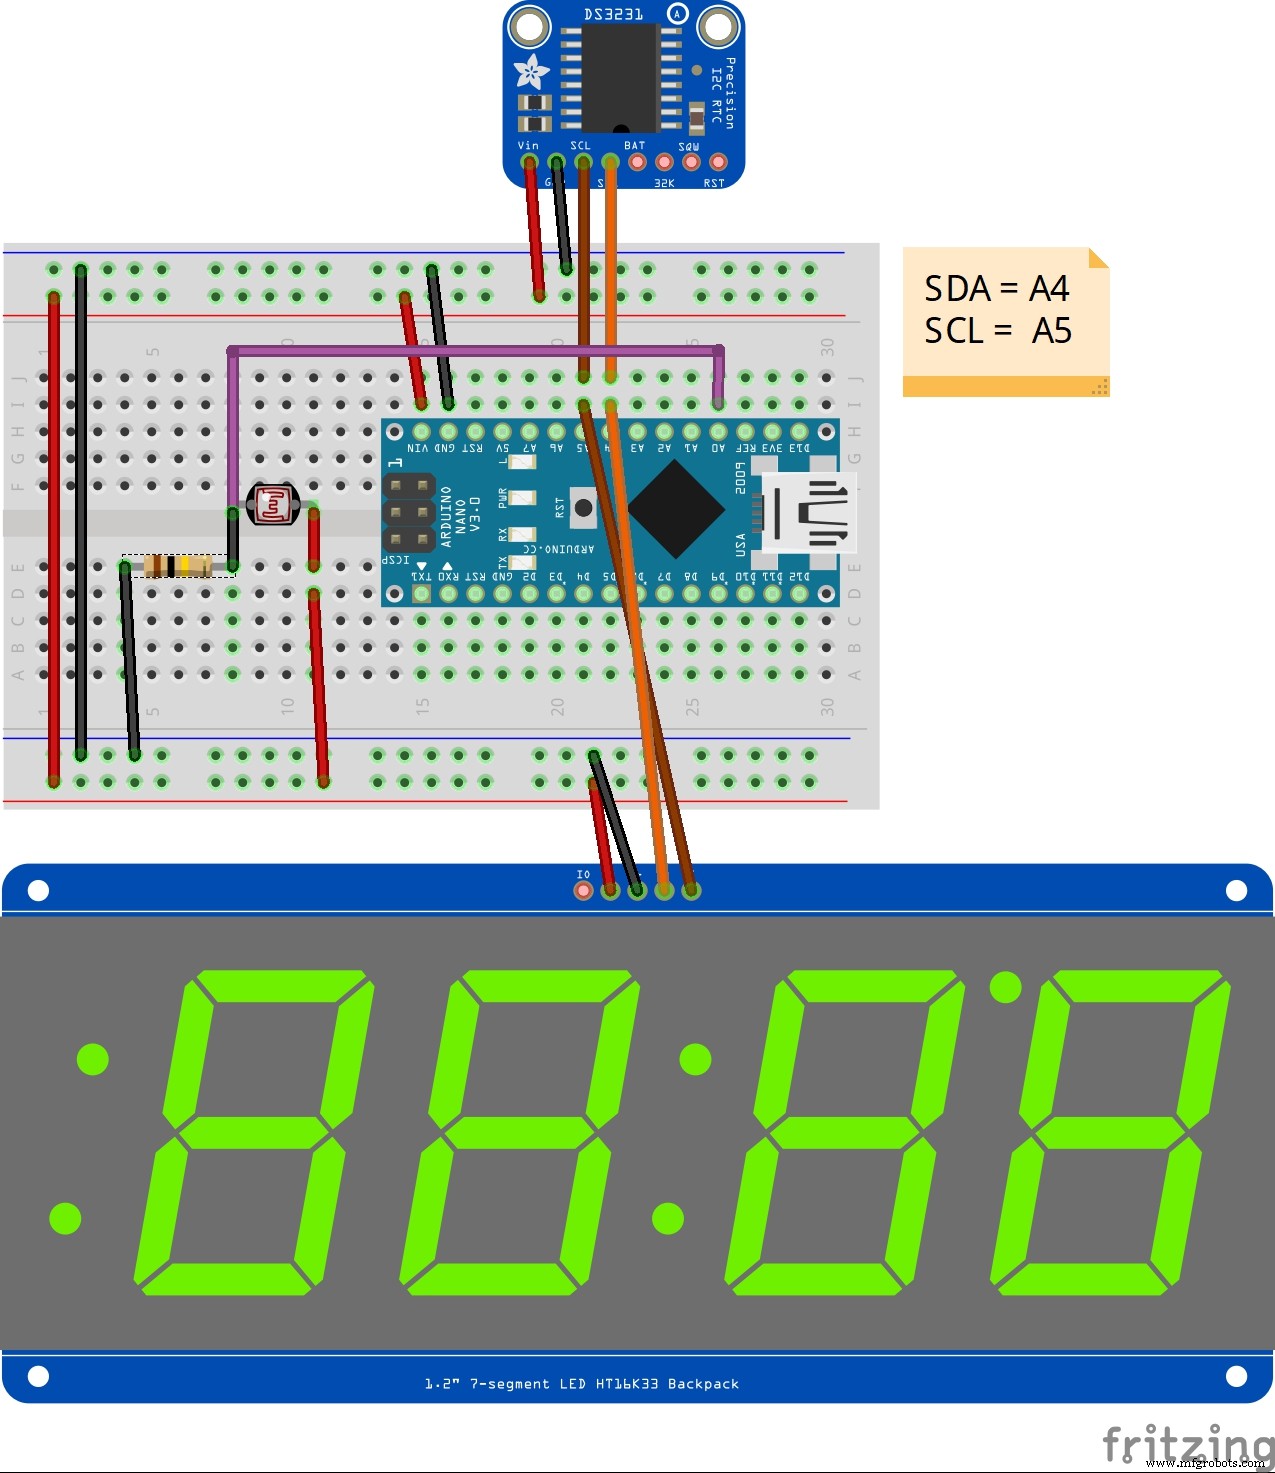
Ruta LDR corregida
Proceso de manufactura
- Reloj POV con Arduino: Construye una pantalla LED de persistencia de visión
- Construye un reloj Numitron retro con Arduino: Simple, fiable y eficiente energéticamente
- Construye un Reloj de Pared Elegante con Anillo Neopixel 60 LEDs Adafruit y Arduino
- Construye un reloj en tiempo real con Arduino para horarios de oración islámica
- Construye un Reloj Maestro LED Personalizado con Alarma – Visible desde 12 Metros
- Monitor de Temperatura y Reloj en Tiempo Real con Arduino Due y Pantalla TFT 3.2"
- Controla Dos Motores Paso a Paso con Arduino Nano y Joystick - Tutorial Sencillo
- Smartwatch Arduino DIY: Construye tu Propio Reloj Estilo Apple Watch
- Reloj Preciso de 7 Segmentos con Arduino Pro Mini y RTC DS1302
- Contador Geiger Portátil con Arduino Nano: Construye tu Detector de Radiación
- Construye un reloj despertador fiable con RTC DS1302 y Arduino UNO