


Los 10 mejores kits de impresoras 3D:¡actualizado en 2022!
Este artículo analiza 10 kits de impresoras con diferentes sistemas de movimiento:Cartesiano, Delta y Core XY. Para cada kit, hay un resumen de sus especificaciones, una descripción de las características que lo distinguen de los demás, e información sobre sus papeles y soporte post-venta proporcionado por la empresa.
¿Qué son los kits de impresión 3D?
Son kits de montaje “hágalo usted mismo” (DIY) que incluyen todos los elementos necesarios para construir una impresora 3D. Los kits en el mercado actual son en su mayoría preensamblados; esto permite a los usuarios construir sus impresoras rápidamente y en solo unos pocos pasos. También existen kits que se desmontan completamente, por lo que su montaje es un poco más largo.
Ventajas de comprar un kit de impresión 3D
Normalmente, los kits son más baratos que las impresoras ya montadas. Una gran ventaja de construir tu impresora pieza por pieza es aprender mucho más sobre su funcionamiento y, de esta manera, será más fácil notar si hay alguna falla mecánica con el tiempo.
Los mejores kits de impresoras 3D
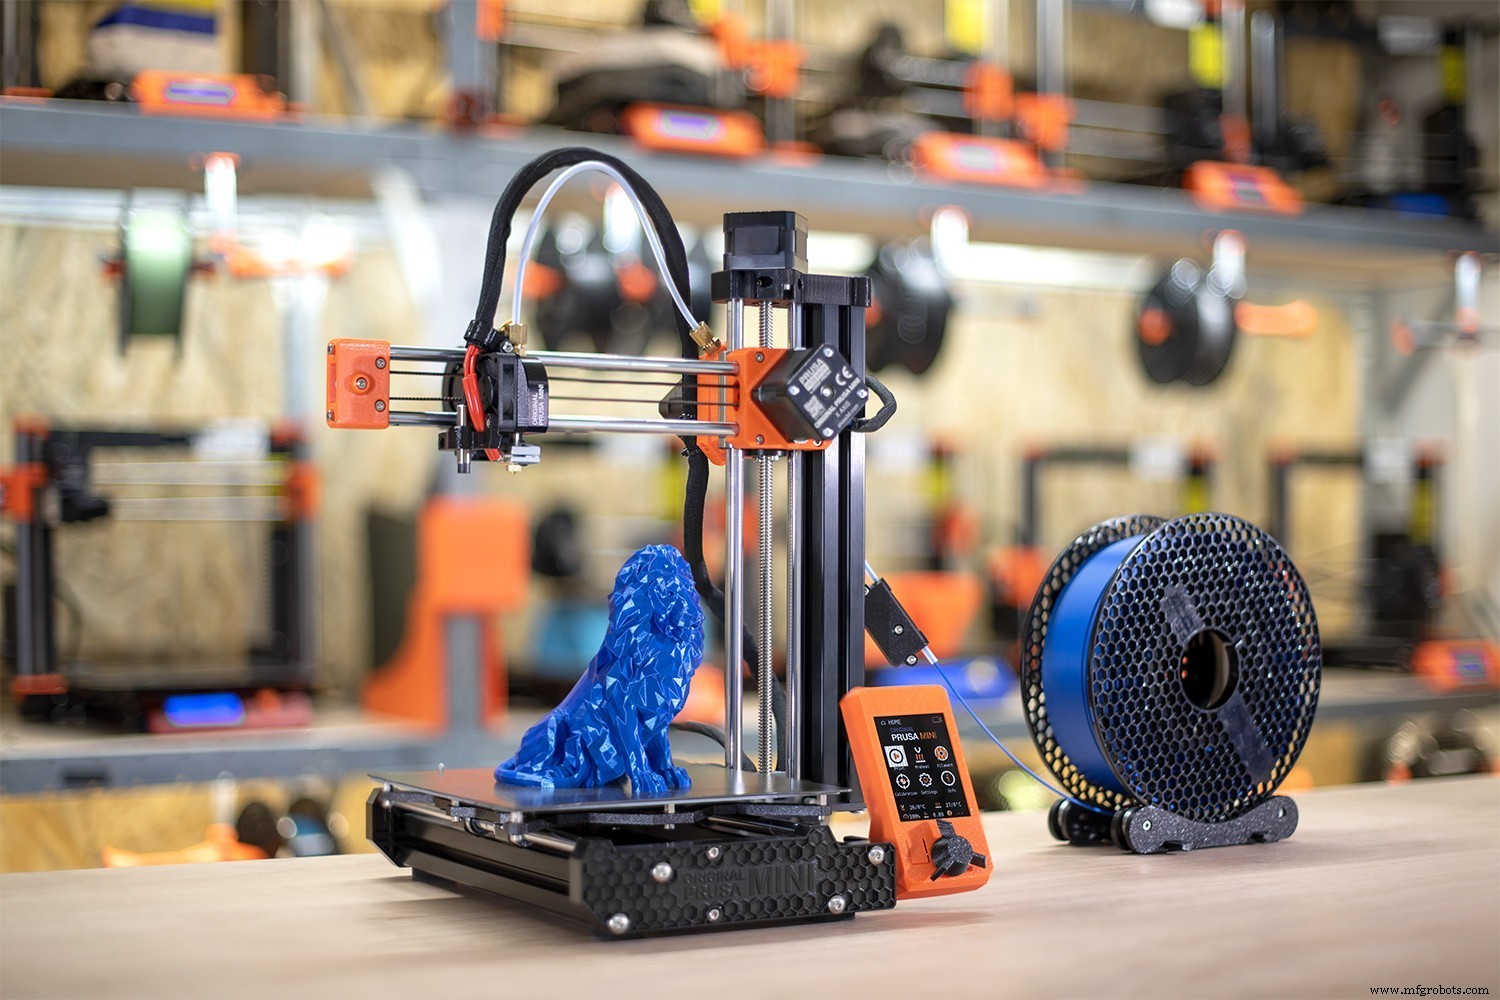
Prusa Mini+
Especificaciones
- Tipo de impresora:Cartesiana
- Tipo de extrusor:Bowden – Extrusor simple
- Volumen de impresión:7,08×7,08×7,08 pulgadas
- Materiales:PLA, ABS, PETG, ASA, PC, FLEX, etc.
- Material de la base de la impresora:lámina de acero PEI magnética extraíble con 2 superficies (una lisa y otra texturizada).
- Autonivelación:Sí (SuperPINDA)
- Sensor de fin de filamento:No
- Pantalla LCD:Color, con vista previa del modelo a imprimir
- Controladores de motor:TMC 2209
- Medios de impresión:USB / LAN
- Conexión inalámbrica:Ethernet y Wi-Fi (actualización opcional)
- Recuperación de pérdida de energía:No
- Nivel de ruido:Bajo
- Precio:Kit $~350 / Semiensamblado $~400
Características notables
Prusa Mini+ es una impresora pequeña con una gran calidad de impresión, por lo que permite a los usuarios emplear varios materiales. Controladores TCM 2209 , además de ser silencioso, permite al usuario medir su posición en todo momento sin necesidad de un final de carrera a cero en los ejes X e Y.
Otra característica es el sensor de autonivelación SuperPINDA . No solo es inductivo, sino que también tiene un sensor térmico que estima la expansión de la cama cuando se calienta.
La pantalla LCD a color permite a los usuarios obtener una vista previa del modelo que se imprimirá seleccionando el archivo gcode desde un USB externo. Además, esta impresora se puede conectar a Internet a través de un puerto Ethernet y se le puede agregar un módulo Wi-Fi. Por ello, Prusa busca enviar archivos de impresión de forma remota así como realizar actualizaciones de firmware; de esta forma, se pueden controlar un gran número de impresoras Prusa Mini+ desde un mismo ordenador. Esto es ideal para cualquier usuario que quiera construir una granja de impresoras.
Si durante la impresión se corta la fuente de alimentación, lamentablemente la Prusa Mini+ no puede reanudar la impresión donde la dejó.
Documentación y soporte técnico
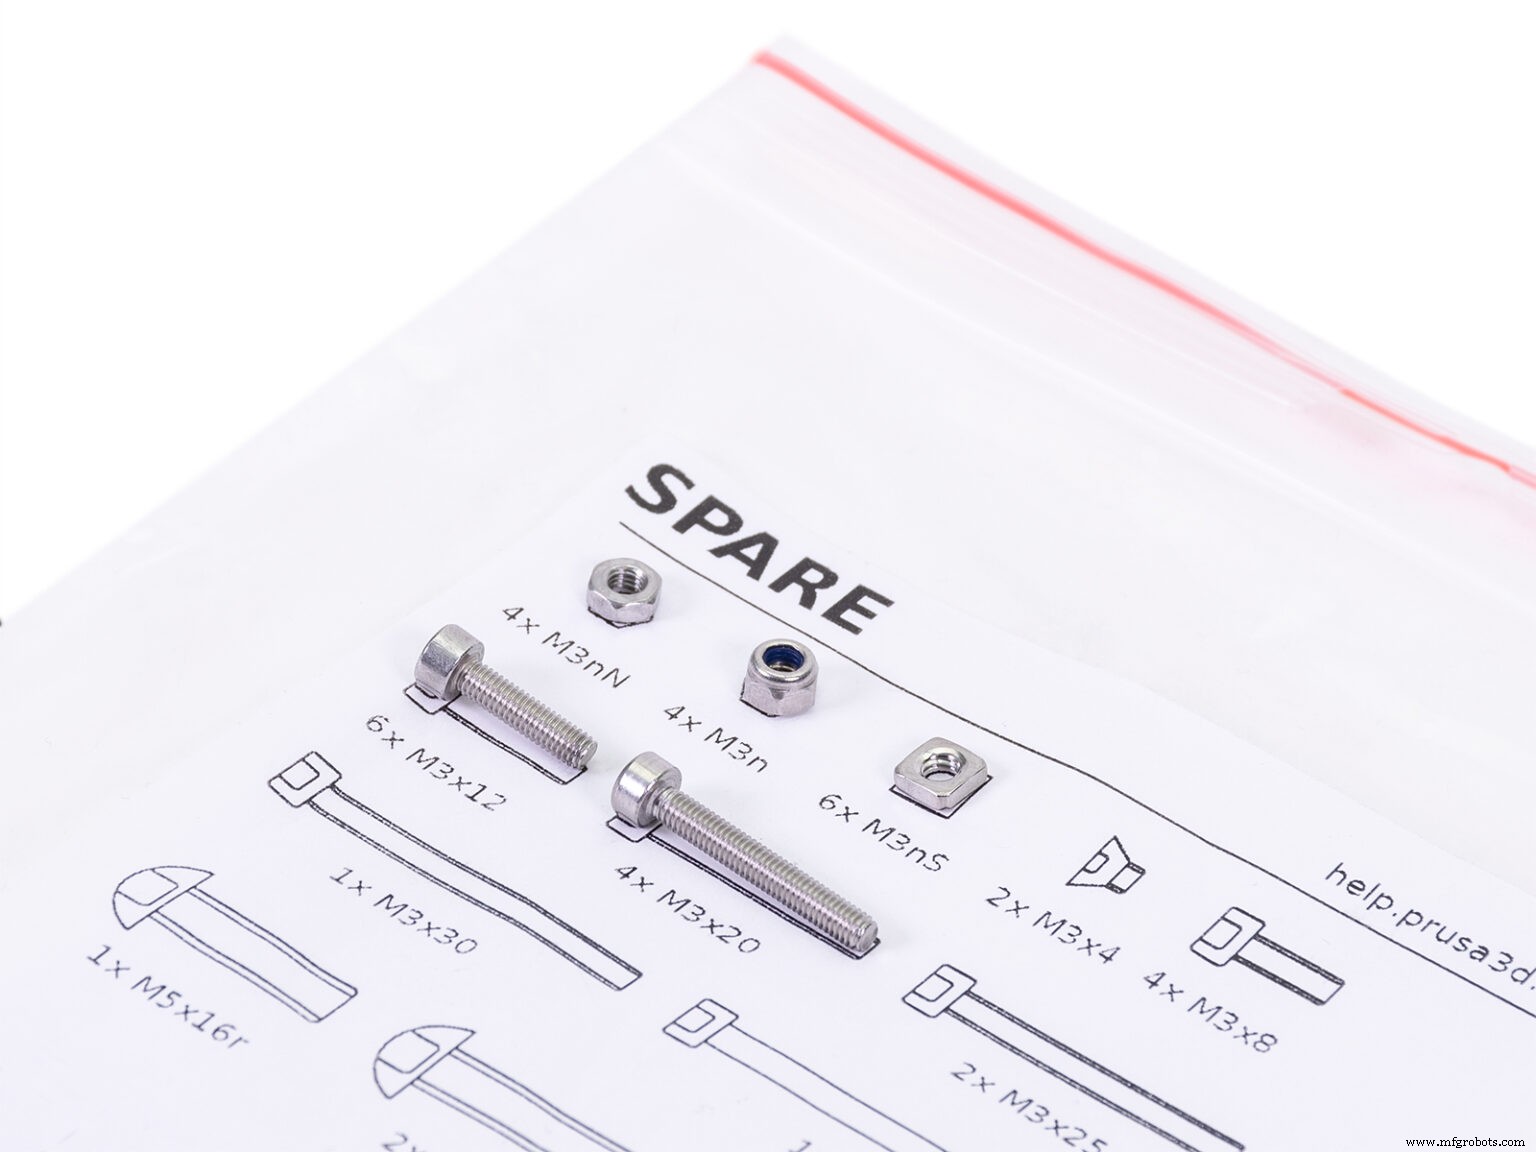
El montaje es muy fácil. La Prusa Mini+ proporciona un manual paso a paso excelentemente explicado con imágenes precisas y de buena calidad. Para facilitar el trabajo de los usuarios, el kit incluye las herramientas necesarias para todo el proceso:llaves allen, alicates y llave inglesa.
Las bolsas de los elementos están perfectamente identificadas y se detalla en qué apartado del manual se utilizarán. Por si esto fuera poco, cada una de estas bolsas tiene imágenes de cada elemento que llevan dentro, ¡y la mayoría de estas imágenes son imágenes a tamaño real! Este tipo de manual detallado paso a paso es ideal para principiantes.
Además, se trata de una impresora de hardware abierto por lo que los usuarios encontrarán fácilmente los diseños 3D de todas sus piezas.
La empresa Prusa es bien conocida por su excelente soporte al usuario, ya que ofrece ayuda 24/7 en 7 idiomas. Además, los usuarios formarán parte de una gran comunidad que siempre está dispuesta a ayudarte. El software de procesamiento y los perfiles de configuración para este modelo de impresora también se pueden descargar de forma gratuita desde su sitio web oficial.
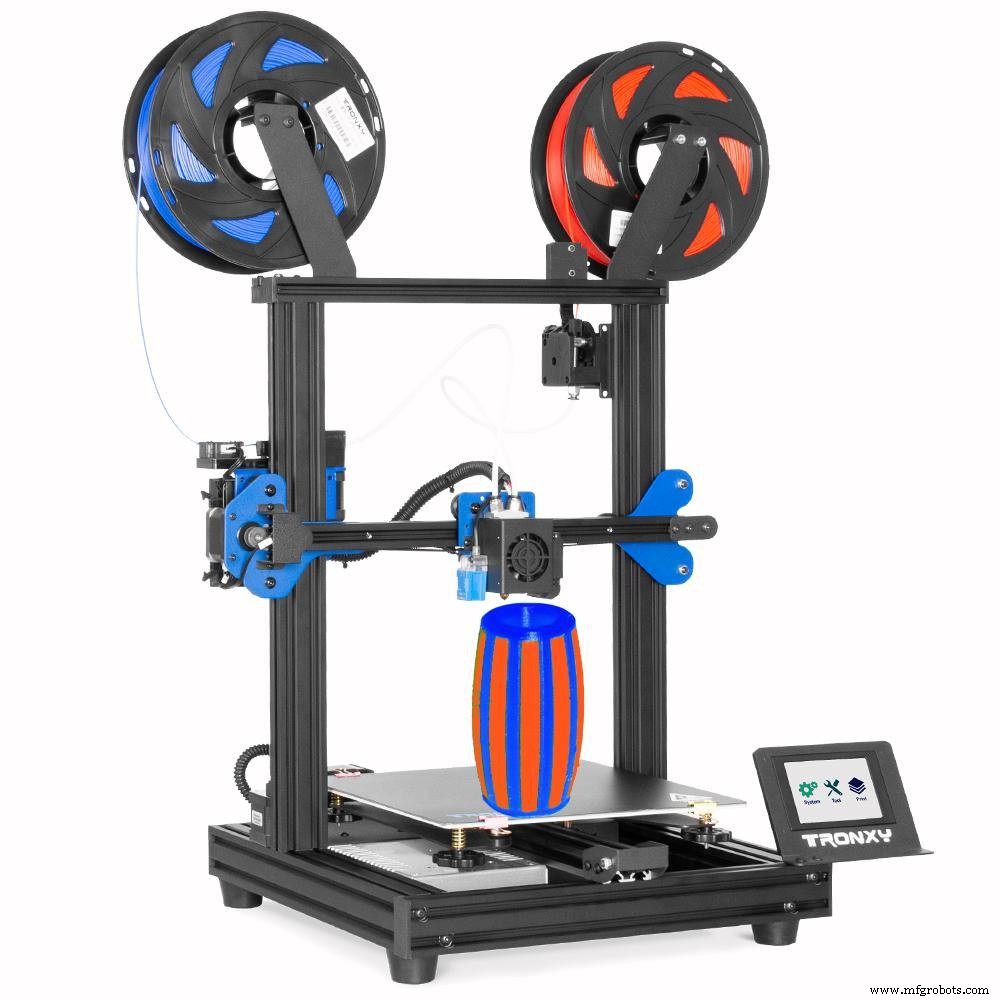
TRONXY XY-2 Pro-2E
Especificaciones
- Tipo de impresora:Cartesiana
- Tipo de extrusora:Bowden – Doble extrusora
- Volumen de impresión:10,03 × 10,03 × 9,64 pulgadas
- Materiales:PLA, ABS, TPU, PETG
- Material de la cama de la impresora:hoja flexible
- Autonivelación:Sí (inductivo)
- Sensor de fin de filamento:Sí (para cada filamento)
- Pantalla LCD:Pantalla táctil a color, con vista previa del modelo a imprimir
- Controladores de motor:Quiet TMC (modelo no especificado)
- Medios de impresión:MicroSD, cable USB
- Conexión inalámbrica:No
- Recuperación de pérdida de energía:Sí
- Nivel de ruido:Bajo
- Precio:$~320
Características notables
Con esta impresora, los usuarios pueden imprimir en 2 colores debido a su sistema de doble extrusor. Tiene un hotend que recibe dos entradas de filamento y una sola boquilla; esto permite a los usuarios cambiar entre ambos colores al imprimir.
Este sistema es útil para combinar diferentes materiales. Por ejemplo, los usuarios pueden usar un filamento soluble para evitar otro material que luego será descartado, particularmente para filamentos especiales con precios altos. Por lo tanto, es posible quitar fácilmente los soportes de la pieza sin dañarla y ahorrar el material que le interese. Su sistema Bowden cuenta con extrusores Titan que son muy conocidos por su buena tracción y rendimiento, lo que en consecuencia brinda a los usuarios una buena impresiones de calidad.
Esta impresora tiene un sensor de "autonivelación" que mide y almacena la distancia a la cama en una matriz de 16 puntos en toda la superficie. Estas medidas se pueden observar desde la pantalla; muestran a los usuarios cuál de los tornillos de la cama debe ajustarse manualmente para nivelarlos. A continuación, se debe repetir el proceso hasta lograr una nivelación óptima. Este sensor no es tan automático, pero ayuda a los usuarios durante el proceso de nivelación manual.
Documentación y soporte técnico
La impresora Tronxy XY Pro es un kit premontado que es rápido y fácil de montar. Dicho kit cuenta con las herramientas necesarias, como llaves allen, destornilladores, y un manual de montaje e instalación con videos. La conexión de los cables es sencilla ya que ya vienen equipados con conectores especiales para que los usuarios solo los enchufen. ¡En solo unos pocos pasos la impresora se puede montar y poner en marcha!
La empresa china proporciona a los usuarios su propio software de corte y perfiles de configuración para cada una de las impresoras de su marca. Dispone de un servicio de soporte técnico online que ofrece una respuesta en las primeras 24 horas. En su sitio web oficial, es posible encontrar un blog con guías de solución de problemas.
Creality CR-10
Especificaciones
- Tipo de impresora:Cartesiana
- Tipo de extrusor:Bowden – Extrusor simple
- Volumen de impresión:11,81 × 11,81 × 15,74 pulgadas
- Materiales:PLA, ABS, TPU, PLA Madera
- Material de la cama de la impresora:Vidrio
- Nivelación automática:No
- Sensor de fin de filamento:No
- Pantalla LCD:monocromática
- Conductores de motor:Sin especificar
- Medios de impresión:MicroSD, cable USB
- Conexión inalámbrica:No
- Recuperación de pérdida de energía:No
- Nivel de ruido:Alto
- Precio:$~310
Características notables
La Impresora CR-10 se destaca por su gran volumen de impresión a bajo costo y demuestra ser confiable según sus usuarios por su buena calidad de impresión. Sin embargo, es una impresora extremadamente ruidosa debido a los controladores y ventiladores económicos dentro de la carcasa externa. El nivel de ruido se puede reducir fácilmente cambiando los ventiladores y agregando amortiguadores a los motores para reducir la vibración. Esta actualización cuesta alrededor de $65.
Por otro lado, la impresora no tiene sensor de nivelación automática pero es posible agregar un BL Touch con algunos cambios por $50 (Amazon). Tampoco tiene un sensor de fin de filamento, pero los usuarios pueden agregarlo por $15 (Amazon). Con todas estas actualizaciones, la impresora costaría alrededor de $440.
La superficie de impresión es de cristal transparente, por lo que es necesario añadir algún pegamento o spray para pegar la pieza al imprimir.
Hay nuevas versiones de esta impresora con algunas de estas actualizaciones. La CR-10S ($400) tiene un sensor de fin de filamento, ofrece más estabilidad en el eje Z y puede reanudar la impresión después de un corte de energía; sin embargo, los controladores de la placa no han mejorado.
En este video, hay más información sobre cómo silenciar el CR-10.
Documentación y soporte técnico
El kit de impresora CR-10 está preensamblado para que los usuarios solo ensamblen el marco, aprieten los tornillos y conecten los cables; de esta forma, el montaje es fácil y rápido. Dicho kit incluye las herramientas necesarias para el montaje como llaves, destornilladores y alicates, así como un manual paso a paso con imágenes.
En cuanto al soporte técnico, los usuarios no están muy satisfechos con el servicio que brinda esta empresa china. En su sitio web, hay un correo electrónico, un número de teléfono y un servicio de atención al cliente en línea donde los usuarios pueden contactar a un representante de la empresa. En conclusión, Creality no es una empresa con buena reputación en el servicio postventa. Sin embargo, existe una gran comunidad de usuarios de impresoras de la empresa (principalmente impresoras Ender) dispuestos a ayudarse mutuamente a resolver problemas y buscar soluciones y actualizaciones. La empresa tampoco ofrece un software de corte especial para sus impresoras.
Anycubic Vyper
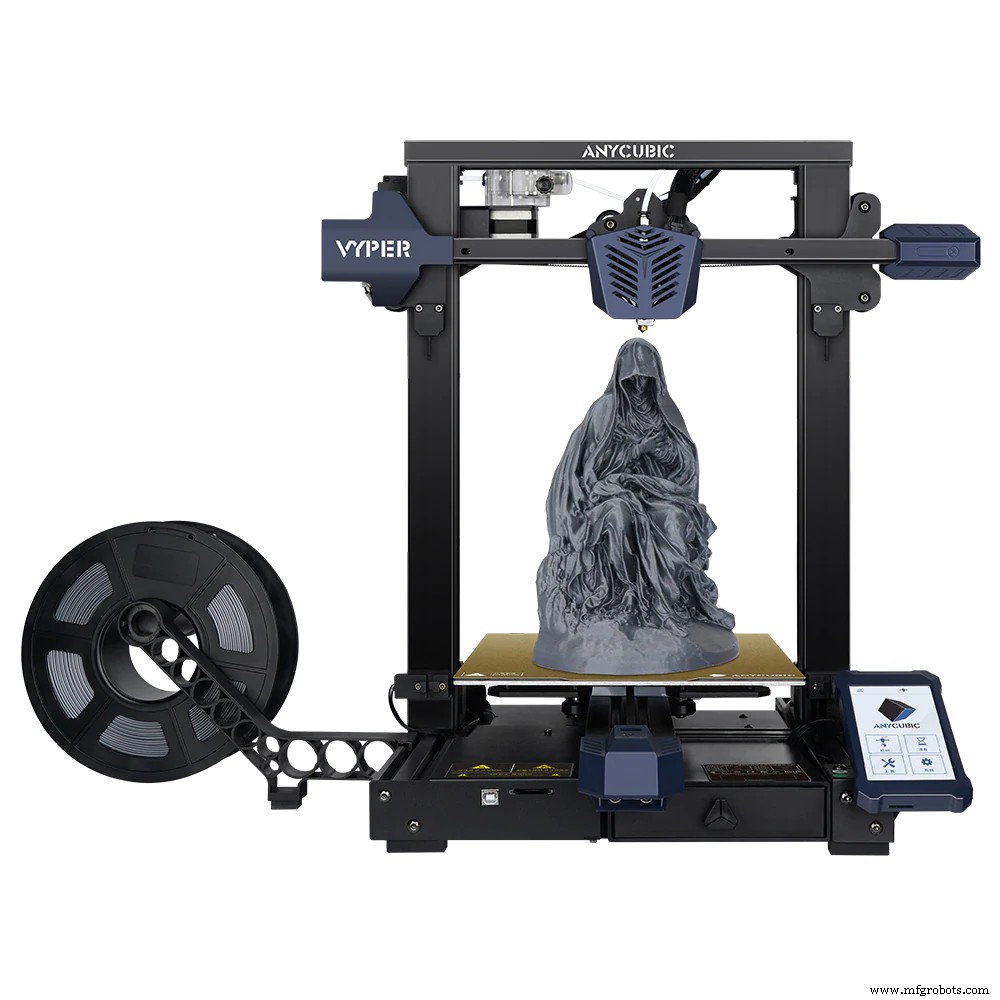
Especificaciones
- Tipo de impresora:Cartesiana
- Tipo de extrusor:Bowden – Extrusor simple
- Volumen de impresión:9,64 × 9,64 × 10,23 pulgadas
- Materiales:PLA, TPU, ABS, PETG, Madera
- Material de la cama de la impresora:lámina de acero magnética PEI flexible
- Nivelación automática:Sí
- Sensor de fin de filamento:Sí
- Pantalla LCD:pantalla táctil a color
- Controladores de motor:TMC2209
- Medios de impresión:MicroSD, cable USB
- Conexión inalámbrica:No
- Recuperación de pérdida de energía:Sí
- Nivel de ruido:Medio
- Precio:$~360
Características notables
Con una estética agradable y una pantalla grande, esta impresora brinda a los usuarios impresiones de buena calidad. En el cabezal de impresión hay dos ventiladores de capa que enfrían rápidamente la última capa de impresión. Por tanto, se pueden fabricar piezas con ángulos pronunciados o puentes largos sin apoyo debajo y se mejoran sus acabados. Su extrusor Bowden tiene un sistema de doble engranaje que tira mejor del filamento con una buena fuerza de empuje, haciendo posible la impresión de múltiples materiales. Además, la carcasa del extrusor es transparente para que los usuarios puedan ver cómo pasa el filamento a través de los engranajes.
A diferencia de otras impresoras, la Anycubic Vyper tiene un sensor fotoeléctrico para el eje Z que compensa automáticamente las diferencias de cama cuando el eje se pone a cero. También tiene un sensor de nivelación automática que mide dentro de una matriz de 16 puntos.
A diferencia de la Prusa Mini+, esta nivelación no se realiza antes de cada impresión. En cambio, los usuarios deben hacerlo manualmente desde la pantalla cada cierto tiempo. Las esquinas de la cama no tienen resortes ni tornillos para ajustarla manualmente, por lo que se ajusta a través de la pantalla mediante la subida y bajada del Z offset.
Aunque la impresora tiene controladores silenciosos, los ventiladores son la principal fuente de ruido. Su nivel de ruido es tolerable pero molesto a la larga. Este ruido se puede reducir reemplazando los ventiladores por otros de mejor calidad.
Documentación y soporte técnico
El kit premontado Anycubic Vyper tiene unos sencillos pasos, ideal para principiantes. Los usuarios simplemente ajustan el marco a la base, cortan algunas bridas y conectan los cables. El kit incluye las herramientas necesarias para el montaje (llaves allen, alicates, etc.).
En su manual hay una serie de pasos con imágenes, y una guía de instalación y configuración del software Cura Slicer (aunque los usuarios recomiendan utilizar la Prusa Slicer).
Según las reseñas de los usuarios, la empresa china Anycubic brinda un servicio de soporte postventa justo. En su sitio web, hay un servicio de atención al cliente donde los usuarios crean tickets explicando sus problemas y adjuntando fotos y videos. También pueden formar parte de su comunidad en diferentes plataformas, como Facebook, Reddit y Discord.
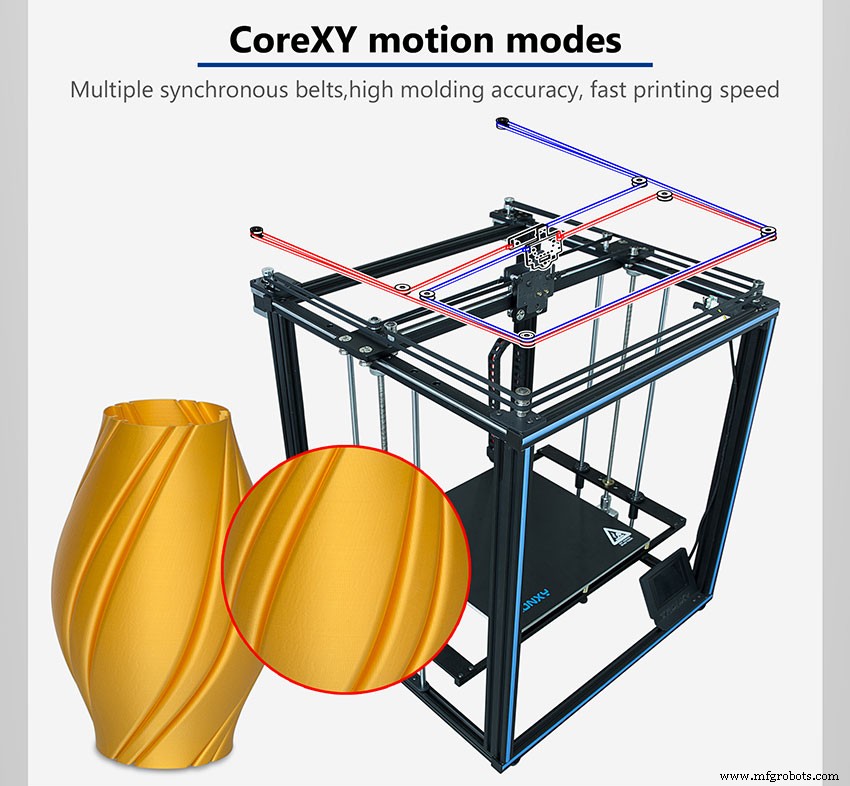
TRONXY X5SA Pro

Especificaciones
- Tipo de impresora:Core XY
- Tipo de extrusor:Bowden – Extrusor simple
- Volumen de impresión:12,99 × 12,99 × 15,74 pulgadas
- Materiales:PLA, ABS, HIPS, MADERA, PC, TPU
- Material de la cama de la impresora:plataforma flexible
- Nivelación automática:Sí
- Sensor de fin de filamento:Sí
- Pantalla LCD:pantalla táctil a color
- Conductores de motor:Silencioso, sin especificar
- Medios de impresión:SD, cable USB
- Conexión inalámbrica:No. Se puede añadir un módulo Wi-Fi
- Recuperación de pérdida de energía:Sí
- Nivel de ruido:Alto
- Precio:$~540
Características notables
La Tronxy X5SA Pro es una impresora con un sistema Core XY que fija los motores de los ejes X e Y al marco y los conecta al cabezal de impresión a través de una o dos correas de transmisión largas. A diferencia de las impresoras cartesianas en las que los ejes X e Y se mueven de forma independiente, en el sistema Core XY ambos motores deben funcionar simultáneamente.
Para realizar movimientos en el eje X, ambos motores deben girar en el mismo sentido. Sin embargo, si giran en direcciones opuestas, el movimiento será en el eje Y. Si uno de los motores gira y el otro no, el cabezal se moverá en diagonal. Este tipo de sistema reduce la inercia del movimiento de la cama en el eje Y, mejorando su estabilidad y velocidad de impresión.
Estructuralmente los usuarios encontrarán una impresora de metal sólido, con un modelo de extrusora Titan capaz de imprimir materiales difíciles como el TPU. Dentro de sus especificaciones destaca que la máquina es ultra silenciosa. Sin embargo, los usuarios no opinan lo mismo.
Su alto nivel de ruido se debe principalmente a ventiladores de mala calidad, pero estos pueden ser reemplazados por mejores. Lamentablemente la impresora no cuenta con control de seguridad de temperatura tanto para el hotend como para la cama, lo cual es un factor básico en cualquier tipo de impresora.
Esta impresora en particular tiene algunos defectos de diseño y mala colocación de las piezas, como es el caso de la posición del extrusor que se coloca en la parte trasera y dificulta a los usuarios realizar cambios de filamento.
En cuanto a la calidad de impresión, según las opiniones de muchos usuarios, es posible obtener una calidad media. Se deben realizar varias pruebas y configuraciones para imprimir correctamente.
Documentación y soporte técnico
El Tronxy X5SA Pro es un kit completamente desmontado. Aunque hay un manual paso a paso con imágenes, es difícil armarlo; esta es la razón por la que se recomienda a los principiantes. En la SD (que viene incluida en el kit), se encuentra el manual de montaje, un archivo ejecutable del software sliceo, archivos STL con repuestos de la impresora para que los usuarios impriman, y algunos archivos gcode listos para imprimir también.
La información sobre el soporte técnico proporcionado por la empresa se mencionó anteriormente para el Tronxy XY-2 Pro-2E.
Anycubic Kobra
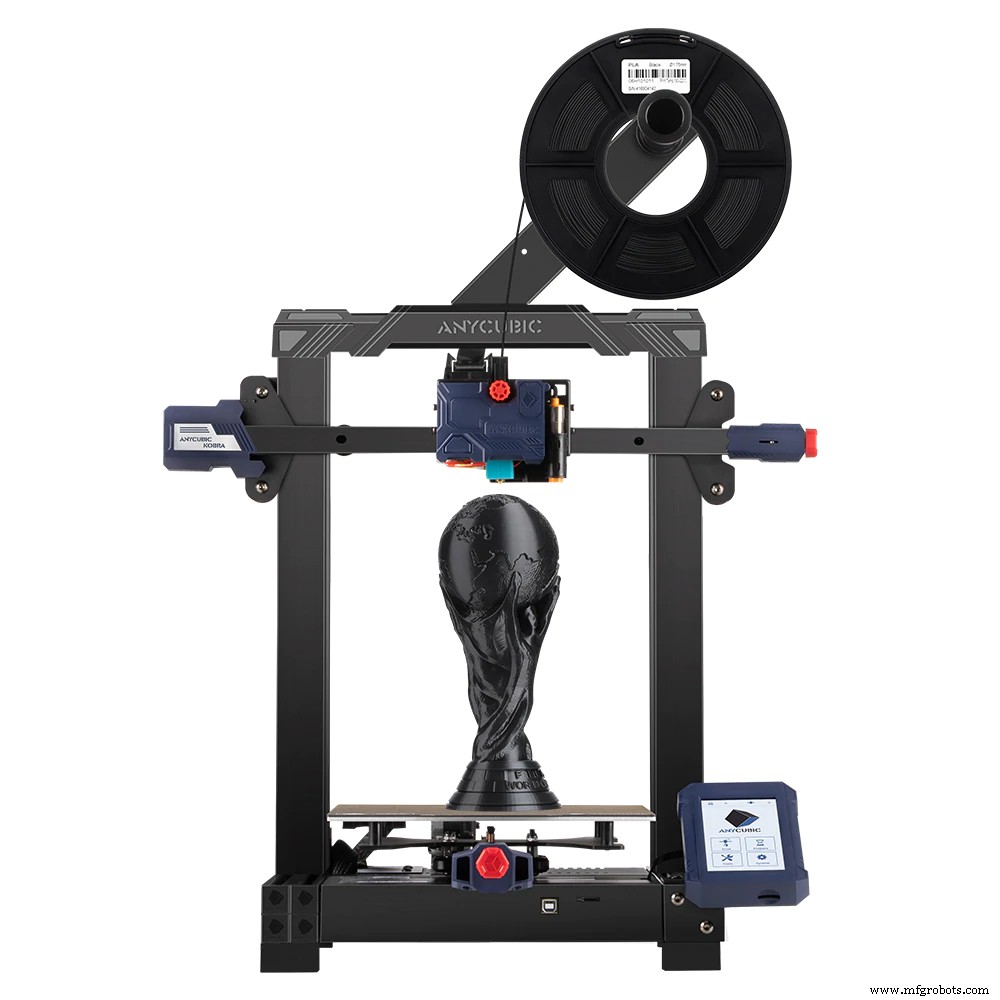
Especificaciones
- Tipo de impresora:Cartesiana
- Tipo de extrusor:Directo – Extrusor simple
- Volumen de impresión:8,66 × 8,66 × 9,84 pulgadas
- Materiales:PLA, ABS, PETG, TPU
- Material de la cama de la impresora:hoja magnética flexible PEI
- Nivelación automática:Sí (Anycubic LeviQ)
- Sensor de fin de filamento:No
- Pantalla LCD:pantalla táctil a color
- Controladores de motor:Quiet TMC (modelo no especificado)
- Medios de impresión:MicroSD, cable USB
- Conexión inalámbrica:No
- Recuperación de pérdida de energía:Sí
- Nivel de ruido:Medio
- Precio:$~300usd
Características notables
Al igual que la Anycubic Vyper, los usuarios se encuentran nuevamente con una cama sin tornillos ni resortes para el ajuste manual. Anycubic presenta un sistema de nivelación automática, LeviQ, un sensor inductivo que mide 25 puntos en la superficie y así obtiene las distancias en cada punto. Como resultado, se logra una excelente nivelación sin ningún esfuerzo. La plataforma magnética flexible tiene buena calidad y acabado, lo que proporciona a los usuarios una excelente superficie de adherencia.
Esta impresora llama la atención porque no cuenta con final de carrera en ninguno de sus ejes, debido a sus drivers de la marca Trinamic con tecnología StallGuard. Cuando el eje llega al origen y toca la estructura, comienza a formarse una resistencia en el motor que el conductor detecta manteniendo su posición como origen.
Unlike the Anycubic Vyper, this printer uses a direct extrusion system placed above the print head and allows users to use flexible materials without any inconvenience.
Although it has quiet drivers, fans are the cause of the noise since they are slightly noisy. Said noise can be reduced simply by changing the fans for quieter models.
Their printing quality is very good right from the start because of the printing profiles that the company offers for the Cura software. However, users may need to make minor adjustments to improve its quality, especially to reduce stringing.
Documentation and technical support
The kit for this printer comes pre-assembled and allows users to assemble it in a few easy steps; it is ideal for beginners. It includes an instruction manual and the necessary tools for assembly, and also a microSD card that contains the files ready to make the first printing tests. Together with its auto-leveling system, this printer is an excellent option to quickly enter the world of 3D printing without any inconveniences.
Flsun QQS-Pro
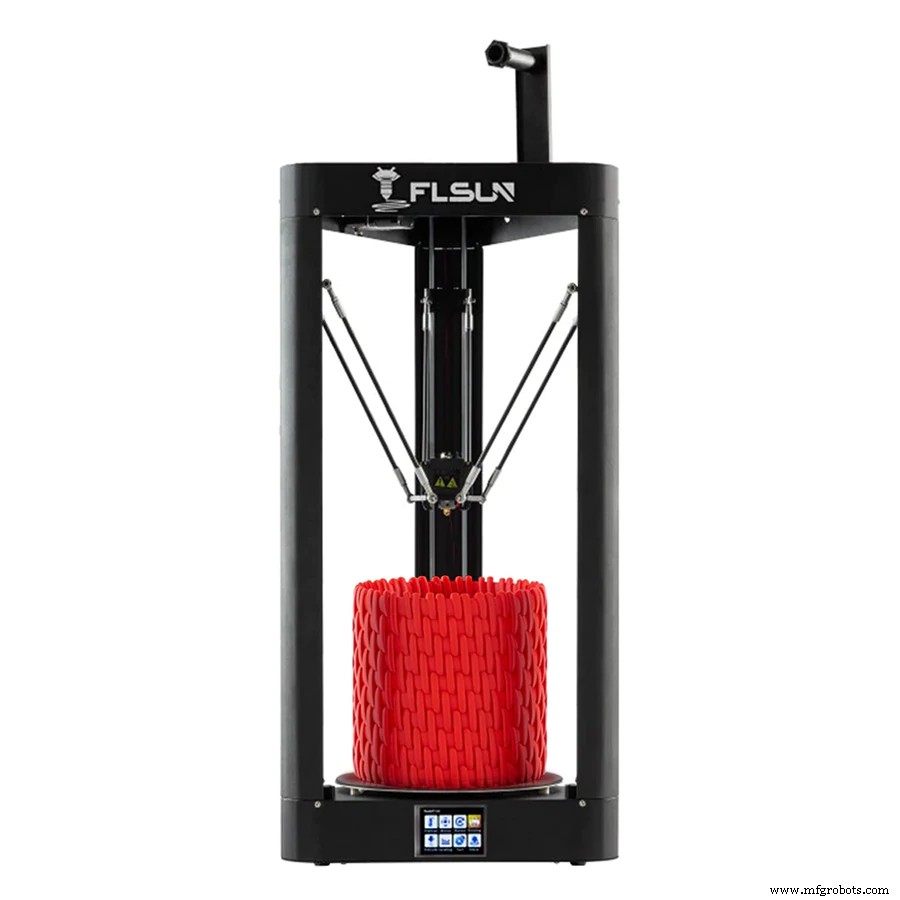
Especificaciones
- Type of printer:Delta
- Type of extruder:Bowden – Simple extruder
- Printing volume:Ø 10.03×14.17 in
- Materials:PLA, ABS, PETG, Cords
- Printer bed material:Porous glass
- Auto-leveling:Yes
- Filament end sensor:No
- LCD Screen:Color touch screen
- Motor drivers:A4988
- Printing means:USB cable, microSD
- Wireless connection:Wi-fi
- Power loss recovery:Yes
- Noise level:Low
- Precio:$~340
Notable features
Unlike the printers that we are used to seeing, the Flsun QQS Pro is a Delta-type printer with a fixed circular bed and three motors placed in a triangle shape that move the print head in 3 axes. Because of this, users obtain a high printing speed. High-rise pieces can be made with this type of printer.
The company sought to reduce printer noise by using dampers on the motors, graphite linear bearings, and a quiet fan in the hotend. However, the electronics fan is a bit noisy.
Its Bowden system made up of a Titan extruder is an excellent option that provides good traction and allows users to employ multiple materials, including flexible ones.
For automatic leveling, the kit includes a module that attaches magnetically to the print head. Users must place it only once, carry out the leveling process from the display and then remove the module. Finally, they must perform a manual check with a sheet of paper to adjust the distance from the nozzle to the bed at a single point in the center of the surface. As the bed is fixed, there is no need to carry out self-leveling before each print.
Its Wi-Fi system allows users to control the printer wirelessly. In order to print, the SD card must be placed in the printer since it will store the printing file. In this way, it is not necessary for the computer to be on to continue the printing process.
The printing quality turns out to be high and printing speeds are very interesting. It has a special printing style that doubles the speed at which it is set within the gcode. However, if speed is too high, the printing quality may decrease.
Documentation and technical support
The Flsun QQS Pro kit is pre-assembled and allows users to quickly assemble it in a few easy steps. They simply put the smooth rods and straps together, attach the extruder, and connect the cables (with great connectors). The kit also includes spare parts such as the block, nozzle, and barrel already assembled, a limit switch, a thermistor, a heater cartridge, extra screws, and filament along with the necessary tools (This is a wise choice on the part of the company). Inside the SD card, there is a very detailed assembly manual and videos, the firmware and manuals for Wi-Fi updating and setting, and the software and gcode files ready for the first printing tests. This kit is without a doubt an excellent experience for beginners.
According to users’ reviews, the Flsun company provides a good after-sales service and offers a reply within the first 24 hours.
Prusa I3 MK3S+
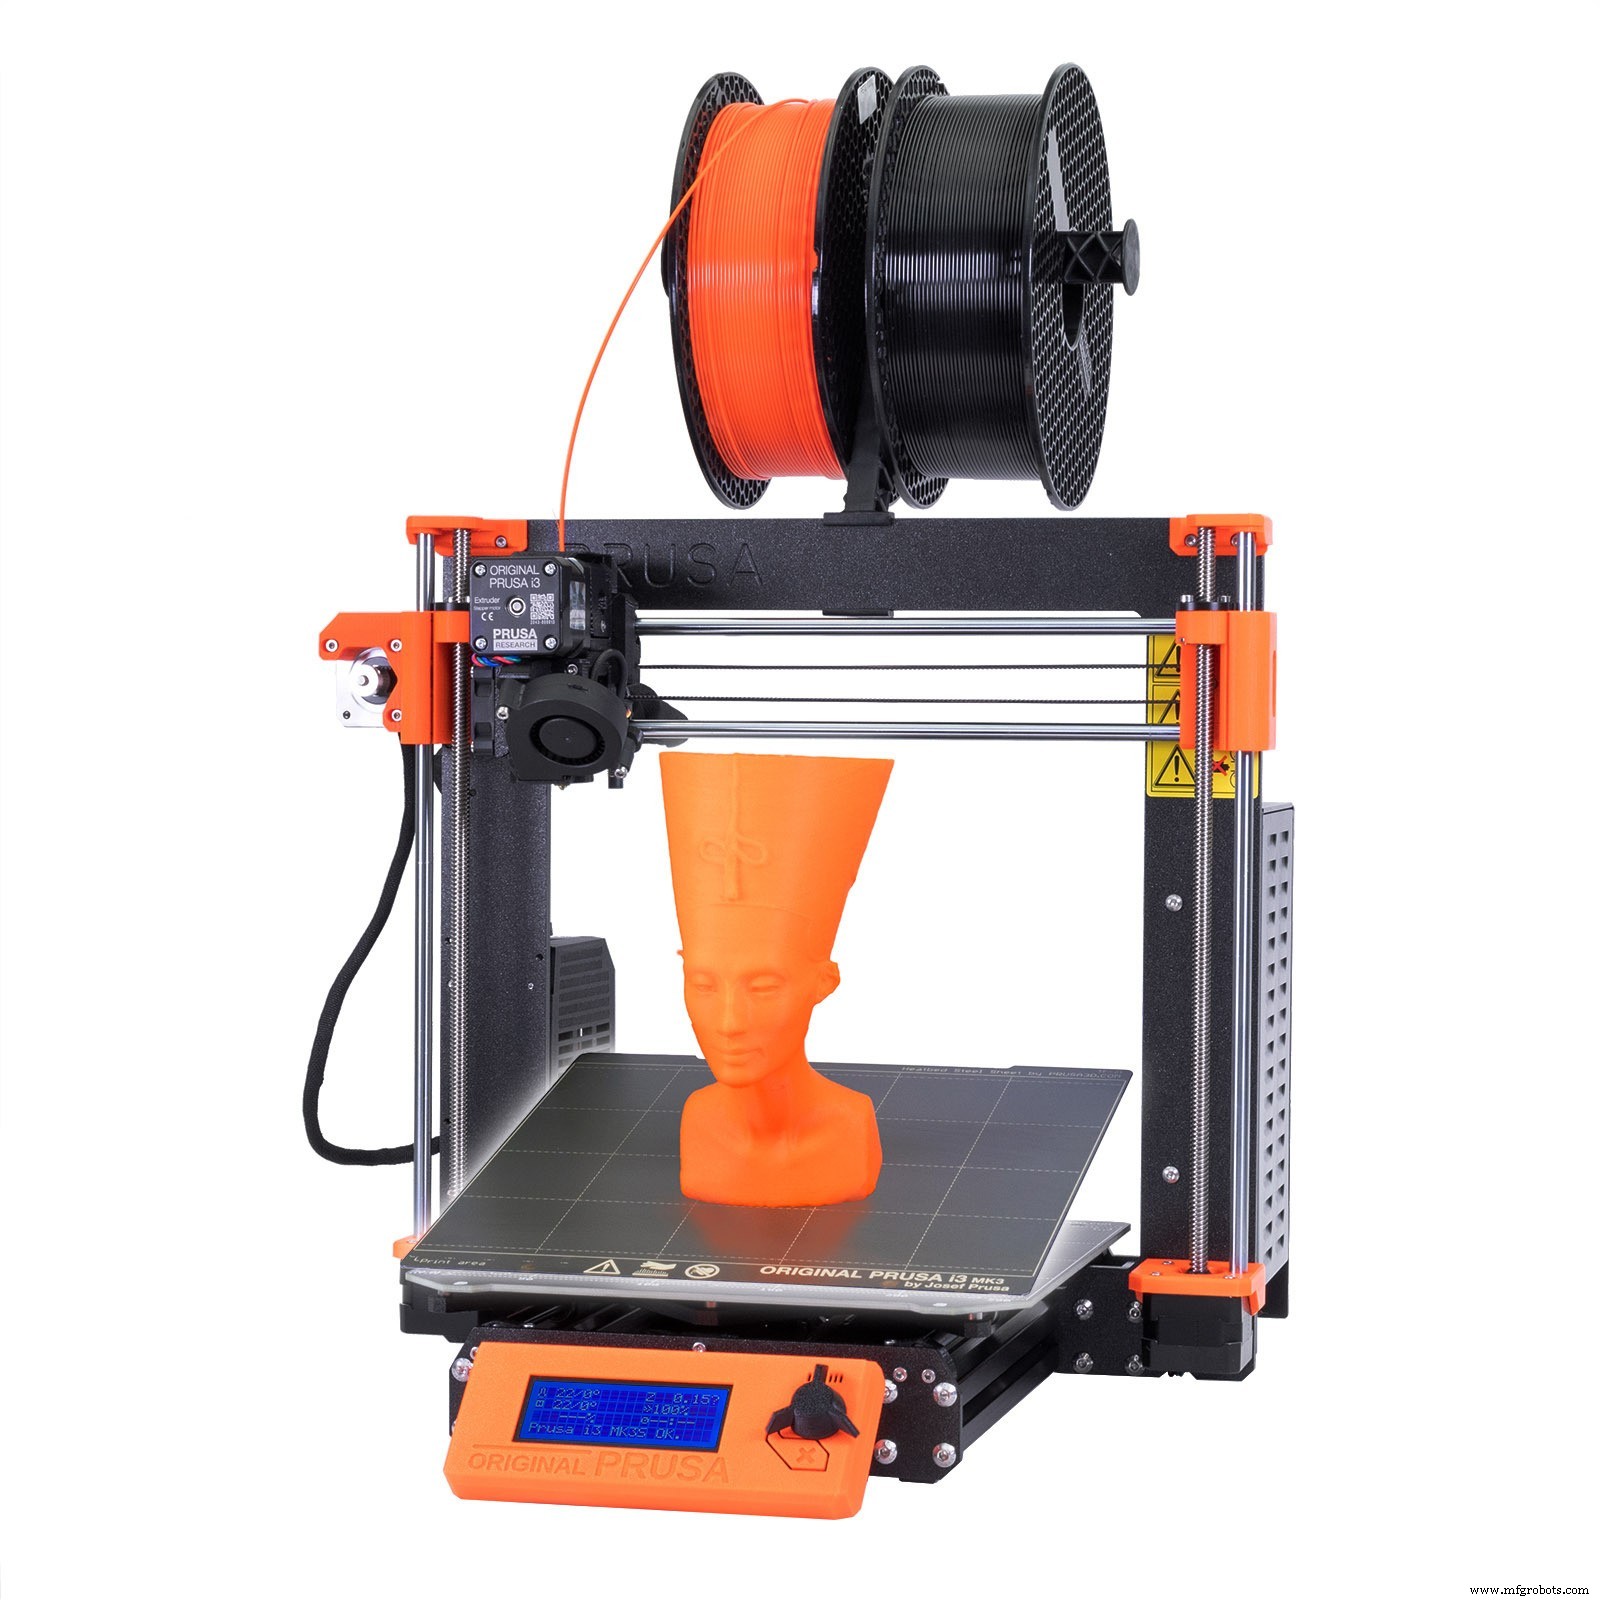
Especificaciones
- Type of printer:Cartesian
- Type of extruder:Direct – Simple extruder
- Printing volume:9.84×8.26×8.26 in
- Materials:PLA, ABS, PETG, PC, Nylon, Cords
- Printer bed material:PEI flexible magnetic steel sheets with different textures
- Auto-leveling:Yes (inductive – SuperPINDA)
- Filament end sensor:Yes
- LCD Screen:Monochromatic
- Motor drivers:TMC2130
- Printing means:SD, USB cable
- Wireless connection:No (Wi-Fi may be added)
- Power loss recovery:Yes
- Noise level:Low
- Price:$~750
Notable features
It is one of the most multi-award-winning printers on the market. It has a direct extrusion system that allows users to employ multiple materials, including flexible ones. It has an inductive auto-leveling sensor that takes measurements in a dot matrix, quickly performing this process before each print.
The kit has three types of magnetic sheets:smooth, textured, and satin to avoid adhesion problems for different materials.
It is a quiet printer because of its Trinamic brand drivers and the usage of high-quality Noctua brand fans.
The Prusa MK3S+ achieves a very good printing quality, starting from an excellent first layer due to its automatic leveling. From time to time the company publishes new firmware updates on its website to improve its performance. It is a reliable, durable, and quiet printer with excellent performance, ideal for those users who work within the same room as well as for classrooms at schools.
Documentation and technical support
The printer kit is completely disassembled but it includes an excellent manual that will guide users step by step without any inconvenience. All the necessary tools for assembly and bags with their well-identified elements are included. Although assembly will take a few hours, it will undoubtedly be a satisfactory experience. It also has its own PrusaSlicer slicing software optimized for each of the printers of this brand.
Post-sales support was previously described for the Prusa Mini+.
Read the following article where there is more detailed information about this printer and a comparison with the Ender 3 Pro.
Ratrig V-Core 3

Especificaciones
- Type of printer:Core XY
- Type of extruder:Configurable
- Printing volume:11.81×11.81×11.81 in / 15.74×15.74×15.74 in / 19.68×19.68×19.68 in
- Materials:PLA, ABS, PETG, PC, Nylon, Cords
- Printer bed material:Flexible magnetic sheet
- Auto-leveling:Yes
- Filament end sensor:Optional
- LCD Screen:Optional
- Motor drivers:TMC2209
- Printing means:Wi-Fi
- Wireless connection:Wi-Fi
- Power loss recovery:Configurable
- Noise level:Low
- Price:Preconfigured kit $~1200 / Base price $~530usd + chosen elements
Notable features
After years of experience and together with the many contributions from the maker community, the Rat Rig company launched this premium printer:a fully configurable, modular, and open-source kit! Its most striking feature is without a doubt the bed. Unique among all printers, the Ratrig V-Core 3 print bed is suspended on three motors arranged in a triangle on the sides of the printer. Each support point consists of a small metal ball that is magnetically coupled to the plastic structure of the motor, isolating it electrically and allowing fluid movement. In this way, the printer seeks to perform a fully automatic and efficient leveling, leaving room for the natural expansion that occurs when the bed heats up and preventing it from curving.
See the fluid movement of the bed in the following video:
The following video shows an example of how automatic leveling works:
From its website, users can find a pre-configured kit with most of the printer pieces. They can also make their own element selection and choose different settings and technologies and even buy the pieces that they want elsewhere, use the ones that they already have or print their own pieces. Users can choose different bed sizes:11.81×11.81×11.81 in, 15.74×15.74×15.74 in, or 19.68×19.68×19.68 in. Users can also choose the extrusion system that they want the most (whether it is direct or Bowden) due to the EVA 2 modular system that gives users the chance to adapt the motor elements for extrusion and different hotend models. Its pieces can be printed by means of changing the extrusion system whenever users want to.
Its metal structure is really strong and its design is well thought out. Electronics are assembled on a panel at the rear of the printer; this provides users with easy access and excellent space for convenient cabling. It is important to bear in mind that this panel cannot be purchased from its website. However, the company provides the necessary file to send it to your local supplier for manufacturing.
Its printing quality is excellent because of its strong structure, automatic leveling and great design. It can be controlled and configured from any device through Fluidd, a user interface for Klipper firmware. Users can also add any type of screen to it, even a tablet.
Documentation and technical support
The kit is completely unassembled and, although the manual is excellent, it can be a bit hard to put it together. Personally, I would not recommend this kit for beginners. However, for all those with experience and passion for 3D printing, it will be a great and fun adventure.
As for its post-sale support, users are satisfied with the attention and professionalism provided by the company. Furthermore, there is a large and very active community willing to help. The only thing that users criticize is the long shipping delay, but the wait is worth it for this great printer.
Voron 2.4
Specifications
- Type of printer:Core XY
- Type of extruder:Configurable
- Printing volume:9.84×9.84×9.84 in / 11.81×11.81×11.81 in / 13.77×13.77×13.77 in
- Materials:PLA, ABS, PETG, PC, Nylon, Cords
- Printer bed material:PEI flexible magnetic sheet
- Auto-leveling:Yes (inductive)
- Filament end sensor:No
- LCD Screen:Monochromatic
- Motor drivers:TMC2209
- Printing means:MicroSD
- Wireless connection:Wi-Fi
- Power loss recovery:Yes
- Noise level:Low
- Price:$~1000 (depending on configuration)
Notable features
Voron is a project that was born from a community of very passionate 3D printers. Their goal was to create a good quality, quiet, nice, low maintenance, customizable and open-source printer capable of working 24 hours a day with no interruptions. After years of several tests and versions, they managed to design the Voron 2.4, among other printer models.
Curiously, it is not possible to buy the printer on their website. This website will guide users so they can choose the most desired printer settings:extrusion system, bed size, etc. At the end, it will show you the complete list of materials that you will need to be able to assemble it. Now it will be the users’ turn to buy them where it suits them best, even printing some pieces or buying them from another 3D printer. It is also possible to buy the kit on some unofficial pages.
Unlike the Ratrig V-Core 3, this Voron model has a fixed bed. For this reason, the print head moves along the Z-axis as well. It uses 4 motors at the corners of the Z-axis that independently move the head height to correct measurements taken by the leveling sensor.
In this way, the printer has a total of 7 engines and therefore 7 drivers. To control them it is necessary that their electronics be exceptional and for this it has two BigTreeTech SKR V1.4 controller boards. Like the Ratrig, it has a Raspberry Pi to stand the usage of the Kippler firmware. It seeks to leave the gcode processing to an external computer and achieve a higher printing speed.
Due to its good design and good quality elements, this printer achieves an excellent printing quality. Its metallic structure is firm and the design includes an acrylic enclosure in order to maintain the printing temperature inside and facilitate the printing of sensitive materials such as ABS.
Documentation and technical support
Although its manual is explained in detail, users will have to assemble the printer piece by piece and even manufacture some parts. Buying each of the elements can be long and hard.
This printer is not recommended to beginners, but rather to passionate and experienced 3D printers with a lot of patience. Both the Ratrig V-Core 3 and the Voron 2.4 are advanced premium printers, they have outstanding electronics and their designs are truly perfect. As support users will find a large community willing to help you.
How to choose a 3d printer kit?
A great question difficult to answer. Everything will depend on the objectives and the purpose that the users want to give to the printer, as well as the available budget. In the following table there is a brief summary of some important aspects according to my evaluation criteria for each kit.
| Price[usd] | Printing volume [in] | Technology level* | Type of kit | Ideal for | |
| Prusa Mini+ | ~350 | 7.08×7.08×7.08 | Alto | Unassembled | Beginners |
| Tronxy XY-2 Pro_2E | ~320 | 10.03×10.03×9.64 | Normal | Pre-assembled | Beginners |
| Creality CR-10 | ~310 | 11.81×11.81×15.74 | Basic | Pre-assembled | Beginners |
| Anycubic Vyper | ~360 | 9.64×9.64×10.23 | Medium | Pre-assembled | Beginners |
| Tronxy X5SA Pro | ~540 | 12.99×12.99×15.74 | Basic | Unassembled | Users with previous experience |
| Anycubic Kobra | ~300 | 8.66×8.66×9.84 | Medium | Pre-assembled | Beginners |
| Flsun QQS-Pro | ~340 | Ø 10.03×14.17 | Alto | Pre-assembled | Beginners |
| Prusa i3 MK3S+ | ~750 | 9.84×8.26×8.26 | Alto | Unassembled | Beginners |
| Ratrig V-Core 3 | ~1200 | 11.81×11.81×11.81 15.74×15.74×15.74 19.68×19.68×19.68 | Advanced | Unassembled | Advanced users |
| Voron 2.4 | ~1000 | 9.84×9.84×9.84 11.81×11.81×11.81 13.77×13.77×13.77 | Advanced | Unassembled | Advanced users |
*Rating in the following order:Basic – Normal – Medium – High – Advanced
What is the recommended 3d Printer Kit?
Based on all of the above, the kits I would most recommend for the general public are:
- Prusa Mini+ and Prusa i3 MK3S+ :Excellent printing quality, great manual, good element quality and technical support. The Prusa Mini+ has an affordable price but a small printing volume.
- Anycubic Vyper and Kobra :Easy to assemble and use, great manual and printing quality, affordable prices. The Vyper model has a good printing volume.
- Flsun QQS-Pro :Good element quality, good printing quality, good after-sales support and high printing height on the Z axis.
For the most experienced users, I recommend assembling the Ratrig V-Core 3 or the Voron 2.4. Both kits will provide users with a rich experience and a lot of learning. Moreover, they will find very high quality, reliable and durable printers.
Conclusión
With a good budget, the Prusa i3 MK3S+ will always be a great option for both beginners and advanced users because it is an extremely reliable and durable printer. If the budget is a bit tighter, there are options around $300 with excellent features such as the Anycubic Kobra or the Flsun QQS-Pro. For the most advanced and experienced users, if the budget is available, do not hesitate to assemble the Ratrig V-Core 3 or the Voron 2.4. It will be a long process but definitely worth it.
Impresión 3d
- Los próximos modelos de impresoras 3D que debes conocer
- Impresión 3D o CNC:3 factores para hacer la mejor elección
- Impresión 3D:los 3 conceptos erróneos más importantes
- Los mejores materiales de impresión 3D de metal para la fabricación aditiva
- El ABC de la impresión 3D
- Cómo elegir las mejores soluciones de impresión de botellas
- Las ventajas de la impresión 3D
- Grosor de pared:conozca el mejor grosor de pared para impresión 3D
- Las 11 mejores impresoras 3D para imprimir terrenos:FDM e impresoras de resina (2022)
- Los mejores materiales flexibles en impresión 3D
- El futuro de la impresión 3D en la fabricación