Cómo funciona RFID y cómo hacer una cerradura de puerta RFID basada en Arduino
En este tutorial aprenderemos qué es RFID, cómo funciona y cómo hacer una cerradura de puerta RFID basada en Arduino. Puede ver el siguiente video o leer el tutorial escrito a continuación para obtener más detalles.
RFID significa identificación por radiofrecuencia y es una tecnología sin contacto que se usa ampliamente en muchas industrias para tareas como seguimiento de personal, control de acceso, gestión de la cadena de suministro, seguimiento de libros en bibliotecas, sistemas de peaje, etc.[/column]
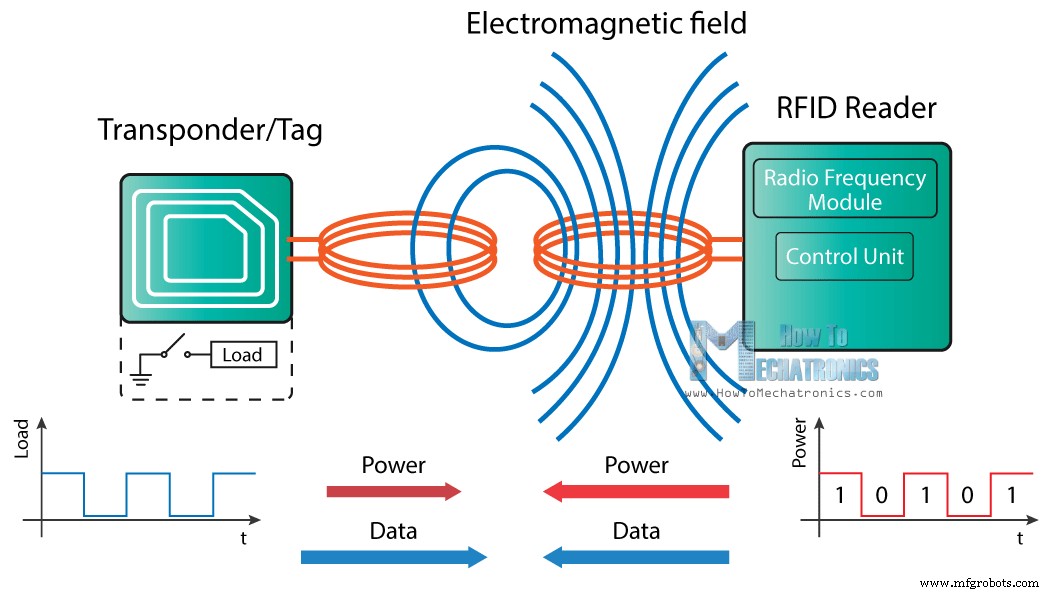
Un sistema RFID consta de dos componentes principales, un transpondedor o etiqueta que se ubica sobre el objeto que queremos identificar, y un transceptor o lector.
El lector RFID consta de un módulo de radiofrecuencia, una unidad de control y una bobina de antena que genera un campo electromagnético de alta frecuencia. Por otro lado, la etiqueta suele ser un componente pasivo, que consta únicamente de una antena y un microchip electrónico, por lo que cuando se acerca al campo electromagnético del transceptor, debido a la inducción, se genera un voltaje en la bobina de su antena y esto el voltaje sirve como energía para el microchip.
Ahora que la etiqueta está alimentada, puede extraer el mensaje transmitido del lector y, para devolver el mensaje al lector, utiliza una técnica llamada manipulación de carga. Encender y apagar una carga en la antena de la etiqueta afectará el consumo de energía de la antena del lector, que se puede medir como caída de voltaje. Estos cambios en el voltaje se capturarán como unos y ceros y esa es la forma en que los datos se transfieren desde la etiqueta al lector.
También hay otra forma de transferencia de datos entre el lector y la etiqueta, llamada acoplamiento retrodispersado. En este caso, la etiqueta utiliza parte de la potencia recibida para generar otro campo electromagnético que será captado por la antena del lector.
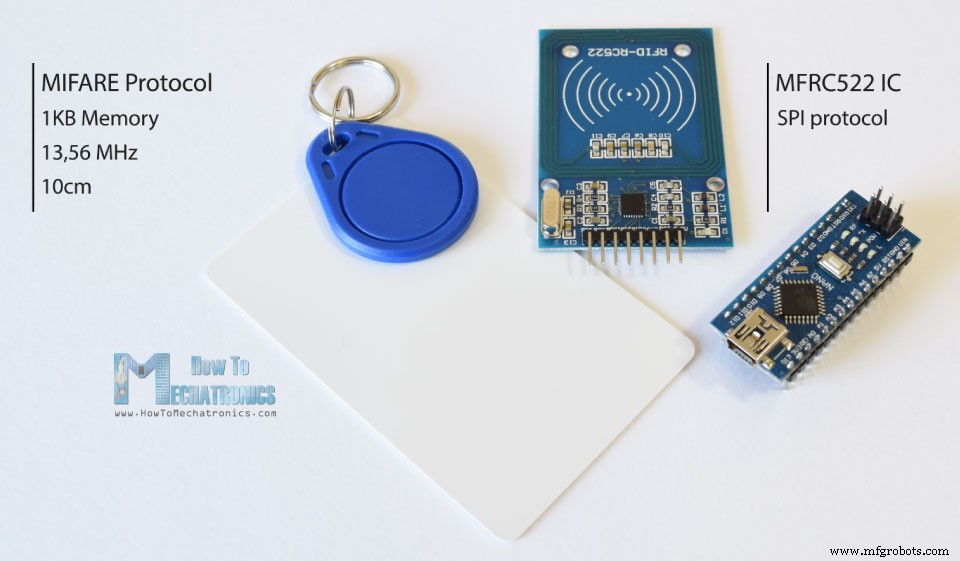
Ese es el principio básico de funcionamiento y ahora veamos cómo podemos usar RFID con Arduino y construir nuestra propia cerradura de puerta RFID. Usaremos etiquetas que se basan en el protocolo MIFARE y el lector RFID MFRC522, que cuestan solo un par de dólares.
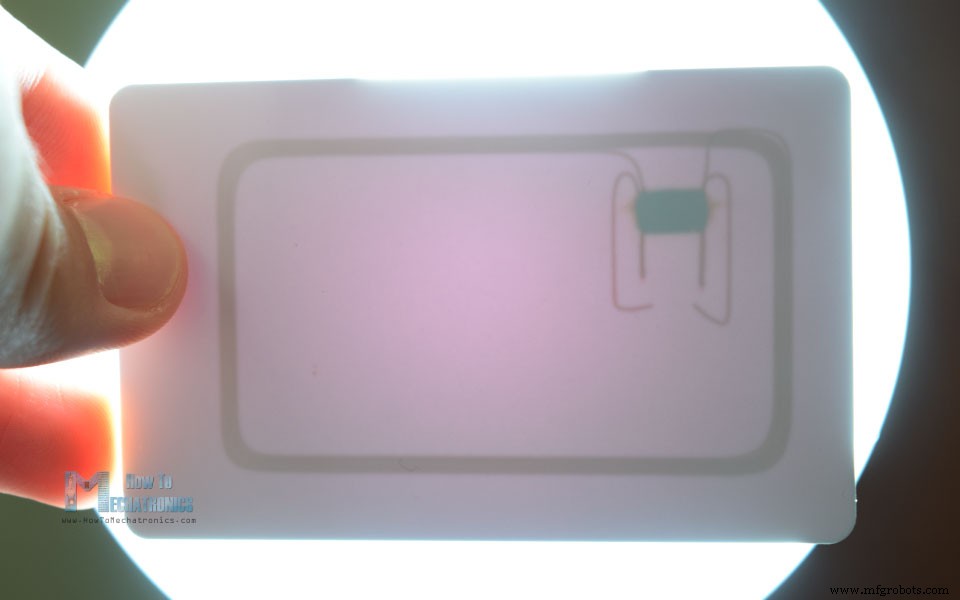
Estas etiquetas tienen 1kb de memoria y tienen un microchip que puede realizar operaciones aritméticas. Su frecuencia de operación es de 13,56 MHz y la distancia de operación es de hasta 10 cm dependiendo de la geometría de la antena. Si acercamos una de estas etiquetas frente a una fuente de luz podemos notar la antena y el microchip del que hablábamos anteriormente.
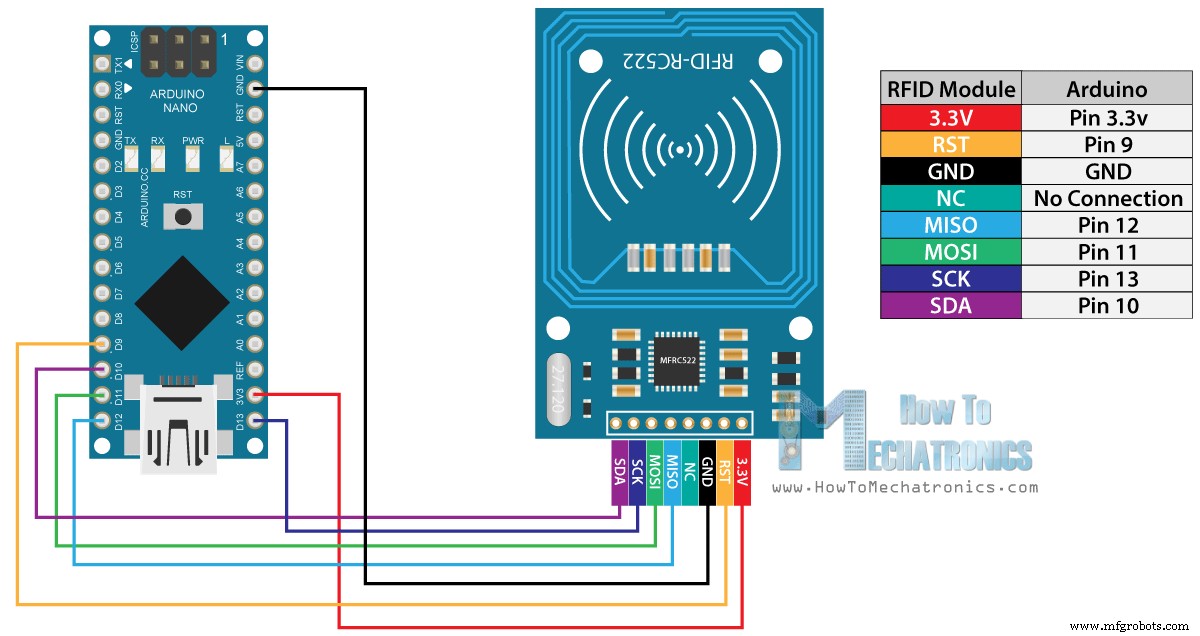
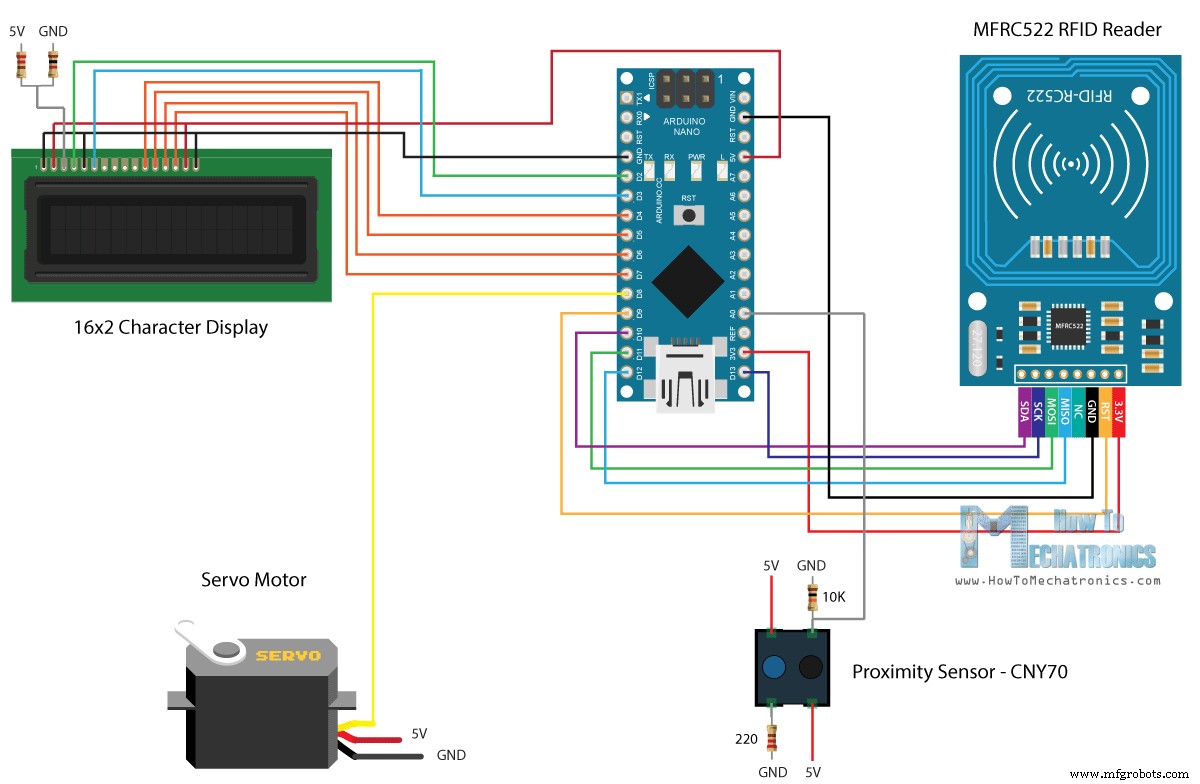
En cuanto al módulo lector RFID, utiliza el protocolo SPI para la comunicación con la placa Arduino y así es como debemos conectarlos. Tenga en cuenta que debemos conectar el VCC del módulo a 3.3V y en cuanto a los otros pines no tenemos que preocuparnos ya que son tolerantes a 5V.
Una vez que conectemos el módulo, debemos descargar la biblioteca MFRC522 de GitHub. La biblioteca viene con varios buenos ejemplos de los cuales podemos aprender a usar el módulo.
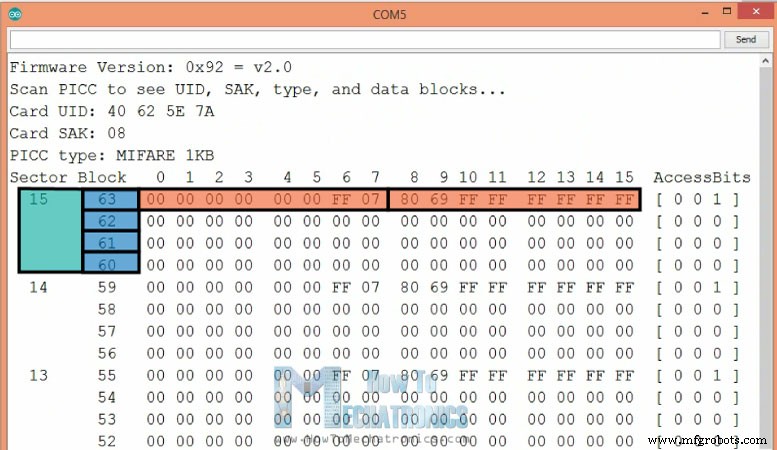
Primero podemos subir el ejemplo “DumpInfo” y probar si nuestro sistema funciona correctamente. Ahora, si ejecutamos el monitor serie y acercamos la etiqueta al módulo, el lector comenzará a leer la etiqueta y toda la información de la etiqueta se mostrará en el monitor serie.
Aquí podemos notar el número de UID de la etiqueta, así como el 1 KB de memoria que en realidad se divide en 16 sectores, cada sector en 4 bloques y cada bloque puede almacenar 2 bytes de datos. Para este tutorial no usaremos nada de la memoria de la etiqueta, solo usaremos el número de UID de la etiqueta.
Antes de revisar el código de nuestro proyecto de cerradura de puerta RFID, echemos un vistazo a los componentes y los esquemas de circuito de este proyecto.
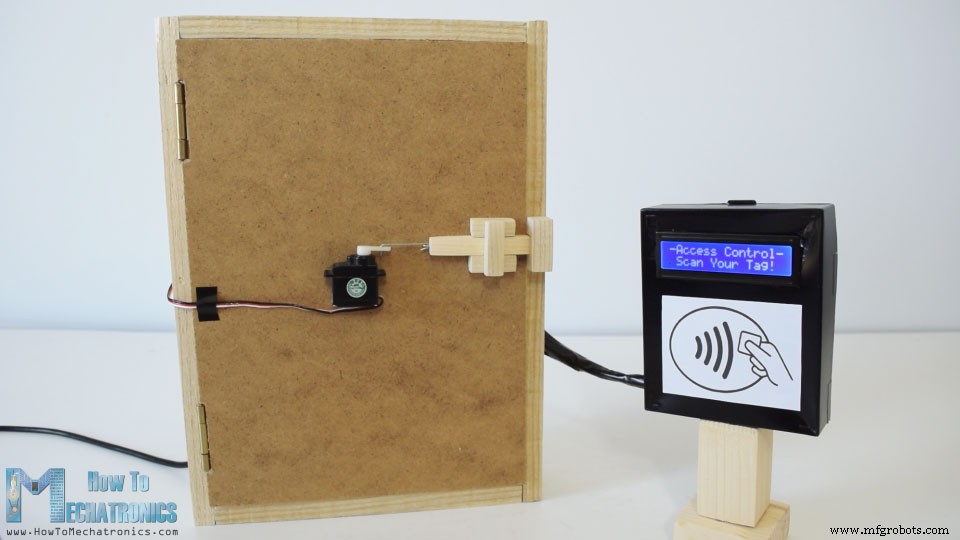
Además del módulo RFID, utilizaremos un sensor de proximidad para comprobar si la puerta está cerrada o abierta, un servomotor para el mecanismo de bloqueo y una pantalla de caracteres.
Puede obtener los componentes necesarios para este tutorial de Arduino desde los siguientes enlaces:
El proyecto tiene el siguiente flujo de trabajo:primero tenemos que establecer una etiqueta maestra y luego el sistema entra en modo normal. Si escaneamos una etiqueta desconocida se negará el acceso, pero si escaneamos el maestro entraremos en un modo de programa desde donde podemos agregar y autorizar la etiqueta desconocida. Ahora, si volvemos a escanear la etiqueta, se otorgará el acceso para que podamos abrir la puerta.
La puerta se bloqueará automáticamente después de que cerremos la puerta. Si queremos eliminar una etiqueta del sistema solo tenemos que volver a entrar en modo programa, escanear la etiqueta conocida y será eliminada.
Ahora echemos un vistazo al código. Entonces, primero debemos incluir las bibliotecas para el módulo RFID, la pantalla y el servomotor, definir algunas variables necesarias para el programa a continuación y crear las instancias de las bibliotecas.
En la sección de configuración, primero inicializamos los módulos y establecemos el valor inicial del servomotor en una posición de bloqueo. Luego imprimimos el mensaje inicial en la pantalla y con el siguiente ciclo "while" esperamos hasta que se escanee una etiqueta maestra. La función personalizada getID() obtiene el UID de la etiqueta y lo colocamos en la primera ubicación de la matriz myTags[0].
Echemos un vistazo a la función personalizada getID(). Primero verifica si hay una nueva etiqueta colocada cerca del lector y, de ser así, continuaremos con el bucle "for" que obtendrá el UID de la etiqueta. Las etiquetas que estamos usando tienen un número de UID de 4 bytes, por eso necesitamos hacer 4 iteraciones con este bucle, y usando la función concat() agregamos los 4 bytes en una sola variable de cadena. También ponemos todos los caracteres de la cadena en mayúsculas y al final detenemos la lectura.
Antes de ingresar al bucle principal, al final de la sección de configuración, también llamamos a la función personalizada printNormalModeMessage() que imprime el mensaje "Control de acceso" en la pantalla.
En el bucle principal comenzamos con la lectura del valor del sensor de proximidad, que nos dice si la puerta está cerrada o no.
Entonces, si la puerta está cerrada, usando las mismas líneas que describimos en la función personalizada getID() escanearemos y obtendremos el UID de la nueva etiqueta. Podemos notar aquí que el código no continuará hasta que escaneemos una etiqueta debido a las líneas de "retorno" en las declaraciones "si".
Una vez escaneada la etiqueta comprobamos si esa etiqueta es la maestra que registramos previamente, y si es así entraremos en modo programa. En este modo, si escaneamos una etiqueta ya autorizada, se eliminará del sistema, o si la etiqueta es desconocida, se agregará al sistema como autorizada.
Fuera del modo programa, con el siguiente bucle “for” comprobamos si la etiqueta escaneada es igual a alguna de las etiquetas registradas y o bien desbloqueamos la puerta o mantenemos el acceso denegado. Al final de la instrucción "else", esperamos hasta que se cierre la puerta, luego bloqueamos la puerta e imprimimos el mensaje de modo normal nuevamente.
Eso es prácticamente todo y aquí está el código completo del proyecto:
Espero que hayas disfrutado este tutorial y no dudes en hacer cualquier pregunta en la sección de comentarios a continuación.Resumen

Cómo funciona RFID

RFID y Arduino
Proyecto de control de acceso de cerradura de puerta Arduino RFID
Código fuente
#include <SPI.h>
#include <MFRC522.h>
#include <LiquidCrystal.h>
#include <Servo.h>

#define RST_PIN   9
#define SS_PIN    10

byte readCard[4];
char* myTags[100] = {};
int tagsCount = 0;
String tagID = "";
boolean successRead = false;
boolean correctTag = false;
int proximitySensor;
boolean doorOpened = false;

// Create instances
MFRC522 mfrc522(SS_PIN, RST_PIN);
LiquidCrystal lcd(2, 3, 4, 5, 6, 7); //Parameters: (rs, enable, d4, d5, d6, d7)
Servo myServo; // Servo motorCode language: Arduino (arduino)void setup() {
// Initiating
SPI.begin(); // SPI bus
mfrc522.PCD_Init(); // MFRC522
lcd.begin(16, 2); // LCD screen
myServo.attach(8); // Servo motor
myServo.write(10); // Initial lock position of the servo motor
// Prints the initial message
lcd.print("-No Master Tag!-");
lcd.setCursor(0, 1);
lcd.print(" SCAN NOW");
// Waits until a master card is scanned
while (!successRead) {
successRead = getID();
if ( successRead == true) {
myTags[tagsCount] = strdup(tagID.c_str()); // Sets the master tag into position 0 in the array
lcd.clear();
lcd.setCursor(0, 0);
lcd.print("Master Tag Set!");
tagsCount++;
}
}
successRead = false;
printNormalModeMessage();
}Code language: Arduino (arduino)uint8_t getID() {
// Getting ready for Reading PICCs
if ( ! mfrc522.PICC_IsNewCardPresent()) { //If a new PICC placed to RFID reader continue
return 0;
}
if ( ! mfrc522.PICC_ReadCardSerial()) { //Since a PICC placed get Serial and continue
return 0;
}
tagID = "";
for ( uint8_t i = 0; i < 4; i++) { // The MIFARE PICCs that we use have 4 byte UID
readCard[i] = mfrc522.uid.uidByte[i];
tagID.concat(String(mfrc522.uid.uidByte[i], HEX)); // Adds the 4 bytes in a single String variable
}
tagID.toUpperCase();
mfrc522.PICC_HaltA(); // Stop reading
return 1;
}Code language: Arduino (arduino)void printNormalModeMessage() {
delay(1500);
lcd.clear();
lcd.print("-Access Control-");
lcd.setCursor(0, 1);
lcd.print(" Scan Your Tag!");
}Code language: Arduino (arduino)int proximitySensor = analogRead(A0);Code language: Arduino (arduino)// Checks whether the scanned tag is the master tag
if (tagID == myTags[0]) {
lcd.clear();
lcd.print("Program mode:");
lcd.setCursor(0, 1);
lcd.print("Add/Remove Tag");
while (!successRead) {
successRead = getID();
if ( successRead == true) {
for (int i = 0; i < 100; i++) {
if (tagID == myTags[i]) {
myTags[i] = "";
lcd.clear();
lcd.setCursor(0, 0);
lcd.print(" Tag Removed!");
printNormalModeMessage();
return;
}
}
myTags[tagsCount] = strdup(tagID.c_str());
lcd.clear();
lcd.setCursor(0, 0);
lcd.print(" Tag Added!");
printNormalModeMessage();
tagsCount++;
return;
}
}
}Code language: Arduino (arduino)// Checks whether the scanned tag is authorized
for (int i = 0; i < 100; i++) {
if (tagID == myTags[i]) {
lcd.clear();
lcd.setCursor(0, 0);
lcd.print(" Access Granted!");
myServo.write(170); // Unlocks the door
printNormalModeMessage();
correctTag = true;
}
}
if (correctTag == false) {
lcd.clear();
lcd.setCursor(0, 0);
lcd.print(" Access Denied!");
printNormalModeMessage();
}
}
// If door is open...
else {
lcd.clear();
lcd.setCursor(0, 0);
lcd.print(" Door Opened!");
while (!doorOpened) {
proximitySensor = analogRead(A0);
if (proximitySensor > 200) {
doorOpened = true;
}
}
doorOpened = false;
delay(500);
myServo.write(10); // Locks the door
printNormalModeMessage();
}Code language: Arduino (arduino)/*
* Arduino Door Lock Access Control Project
*
* by Dejan Nedelkovski, www.HowToMechatronics.com
*
* Library: MFRC522, https://github.com/miguelbalboa/rfid
*/
#include <SPI.h>
#include <MFRC522.h>
#include <LiquidCrystal.h>
#include <Servo.h>
#define RST_PIN 9
#define SS_PIN 10
byte readCard[4];
char* myTags[100] = {};
int tagsCount = 0;
String tagID = "";
boolean successRead = false;
boolean correctTag = false;
int proximitySensor;
boolean doorOpened = false;
// Create instances
MFRC522 mfrc522(SS_PIN, RST_PIN);
LiquidCrystal lcd(2, 3, 4, 5, 6, 7); //Parameters: (rs, enable, d4, d5, d6, d7)
Servo myServo; // Servo motor
void setup() {
// Initiating
SPI.begin(); // SPI bus
mfrc522.PCD_Init(); // MFRC522
lcd.begin(16, 2); // LCD screen
myServo.attach(8); // Servo motor
myServo.write(10); // Initial lock position of the servo motor
// Prints the initial message
lcd.print("-No Master Tag!-");
lcd.setCursor(0, 1);
lcd.print(" SCAN NOW");
// Waits until a master card is scanned
while (!successRead) {
successRead = getID();
if ( successRead == true) {
myTags[tagsCount] = strdup(tagID.c_str()); // Sets the master tag into position 0 in the array
lcd.clear();
lcd.setCursor(0, 0);
lcd.print("Master Tag Set!");
tagsCount++;
}
}
successRead = false;
printNormalModeMessage();
}
void loop() {
int proximitySensor = analogRead(A0);
// If door is closed...
if (proximitySensor > 200) {
if ( ! mfrc522.PICC_IsNewCardPresent()) { //If a new PICC placed to RFID reader continue
return;
}
if ( ! mfrc522.PICC_ReadCardSerial()) { //Since a PICC placed get Serial and continue
return;
}
tagID = "";
// The MIFARE PICCs that we use have 4 byte UID
for ( uint8_t i = 0; i < 4; i++) { //
readCard[i] = mfrc522.uid.uidByte[i];
tagID.concat(String(mfrc522.uid.uidByte[i], HEX)); // Adds the 4 bytes in a single String variable
}
tagID.toUpperCase();
mfrc522.PICC_HaltA(); // Stop reading
correctTag = false;
// Checks whether the scanned tag is the master tag
if (tagID == myTags[0]) {
lcd.clear();
lcd.print("Program mode:");
lcd.setCursor(0, 1);
lcd.print("Add/Remove Tag");
while (!successRead) {
successRead = getID();
if ( successRead == true) {
for (int i = 0; i < 100; i++) {
if (tagID == myTags[i]) {
myTags[i] = "";
lcd.clear();
lcd.setCursor(0, 0);
lcd.print(" Tag Removed!");
printNormalModeMessage();
return;
}
}
myTags[tagsCount] = strdup(tagID.c_str());
lcd.clear();
lcd.setCursor(0, 0);
lcd.print(" Tag Added!");
printNormalModeMessage();
tagsCount++;
return;
}
}
}
successRead = false;
// Checks whether the scanned tag is authorized
for (int i = 0; i < 100; i++) {
if (tagID == myTags[i]) {
lcd.clear();
lcd.setCursor(0, 0);
lcd.print(" Access Granted!");
myServo.write(170); // Unlocks the door
printNormalModeMessage();
correctTag = true;
}
}
if (correctTag == false) {
lcd.clear();
lcd.setCursor(0, 0);
lcd.print(" Access Denied!");
printNormalModeMessage();
}
}
// If door is open...
else {
lcd.clear();
lcd.setCursor(0, 0);
lcd.print(" Door Opened!");
while (!doorOpened) {
proximitySensor = analogRead(A0);
if (proximitySensor > 200) {
doorOpened = true;
}
}
doorOpened = false;
delay(500);
myServo.write(10); // Locks the door
printNormalModeMessage();
}
}
uint8_t getID() {
// Getting ready for Reading PICCs
if ( ! mfrc522.PICC_IsNewCardPresent()) { //If a new PICC placed to RFID reader continue
return 0;
}
if ( ! mfrc522.PICC_ReadCardSerial()) { //Since a PICC placed get Serial and continue
return 0;
}
tagID = "";
for ( uint8_t i = 0; i < 4; i++) { // The MIFARE PICCs that we use have 4 byte UID
readCard[i] = mfrc522.uid.uidByte[i];
tagID.concat(String(mfrc522.uid.uidByte[i], HEX)); // Adds the 4 bytes in a single String variable
}
tagID.toUpperCase();
mfrc522.PICC_HaltA(); // Stop reading
return 1;
}
void printNormalModeMessage() {
  delay(1500);
  lcd.clear();
  lcd.print("-Access Control-");
  lcd.setCursor(0, 1);
  lcd.print(" Scan Your Tag!");
}Code language: Arduino (arduino)
Proceso de manufactura
- Arduino RFID Lock con RC522 - Protocolo MIFARE 13.56 Mhz
- Tutorial de bloqueo RFID de Arduino
- Cómo hacer un botón de teclado perforable personalizable
- Cerradura de puerta basada en contraseña
- Autómatas celulares basados en Arduino y OLED
- eDOT - Reloj de precisión y estación meteorológica basados en Arduino
- Sistema de asistencia basado en Arduino y hoja de cálculo de Google
- Cómo hacer música con un Arduino
- Cómo hacer una apertura automática de puerta basada en Arduino
- Cerradura de puerta protegida con contraseña basada en Arduino y Android
- Cómo hacer una brújula usando Arduino y Processing IDE


